
Open-source metal 3-D printer/ko


오픈소스 자체 복제 고속 프로토타입 제작기( RepRap ) 커뮤니티의 기술적 진보로 폴리머 기반 소재를 사용하여 분산형 적층 제조가 빠르게 확장될 수 있었습니다. 그러나 오픈소스 금속 대체품이 부족하고 독점적인 상용화된 금속 3D 프린터의 자본 비용이 높고 처리량이 느려 배포가 심각하게 제한되었습니다. 상용화된 금속 3D 프린터의 응용 분야는 고속 프로토타입 제작과 값비싼 완제품으로만 제한됩니다. 이는 중소기업, 개발도상국 및 실험실에서 사용하기 위해 기술에 대한 액세스를 심각하게 제한합니다. 이 논문은 2000달러 미만의 오픈소스 금속 3D 프린터 개발에 대해 보고합니다. 금속 3D 프린터는 오픈소스 마이크로 컨트롤러로 제어되며 저렴한 상용 가스 금속 MIG 용접기와 로스토크의 파생 제품인 델타봇 RepRap의 조합입니다. BOM, 전기 및 기계 설계 회로도, 기본 구성 및 작동 절차가 제공됩니다. 3D 프린터와 그 결과로 나온 강철 제품의 속성에 대한 예비 기술 분석이 수행됩니다. 맞춤형 기능성 금속 부품을 인쇄한 결과에 대해 논의하고 이 기술의 잠재력과 이 기술의 대량 유통에 필요한 미래 작업에 대한 결론을 도출합니다.
최신 MOST 금속 RepRap 3D 프린터에 대해서는 여기를 참조하세요.
새로운 소프트웨어: 오픈소스 GMAW 기반 금속 3D 프린팅을 위한 슬라이서 및 프로세스 개선

내용물
자재 목록
| 목 | 숫자 | 비용(USD) | 원천 |
|---|---|---|---|
| 모든 12개 인쇄 부품 @ $40/kg | 12.00달러 | 로컬 레프랩 | |
| 모든 패스너 | 2.00달러 | http://www.mcmaster.com/ | |
| M3너트 | 90 | ||
| M3x10mm 나사 | 12 | ||
| M3x12mm 나사 | 48 | ||
| M3x20mm 나사 | 12 | ||
| M3x8mm 셋스크류 | 6 | ||
| M3와셔 | 102 | ||
| 엠8넛 | 6 | ||
| M8셋스크류 | 3 | ||
| 152mm x 152mm 세라믹 단열재 | 1 | $ 4.00 | |
| 막대, 베어링 및 타이 | http://www.amazon.com/ | ||
| 300mm x 8mm 매끈한 막대 | 6 | 25.00달러 | |
| 304.8mm 탄소섬유 막대 | 6 | 6.00달러 | |
| 608zz베어링 | 6 | 2.40달러 | |
| LM8UU베어링 | 6 | 6.00달러 | |
| 작은 와이어 타이 | 3 | 0.50달러 | |
| 타이로드 엔드 | 24 | $ 8.00 | |
| 600mm T5 벨트 | 3 | $ 5.90 | http://www.polytechdesign.com/ |
| 241mm x 51mm x 4mm 알루미늄 판 | 3 | 114.00달러 | 지역 기계 공장 |
| NEMA17 스테퍼 모터(1.8도, 5.5kg-cm 유지 토크, 750mm 와이어) | 3 | 39.00달러 | http://www.kysanelectronics.com/ |
| 기계식 리미트 스위치 | 3 | 3.33달러 | http://www.digikey.com/ |
| Melzi 마이크로컨트롤러 보드 | 1 | 120.00달러 | http://web.archive.org/web/20160304170259/http://matterfy.com/ |
| Millermatic 140 자동 설정 MIG 용접기 카트 포함 | 1 | $836.00 | http://www.millerwelds.com/ |
| 전원 공급 | 1 | $8.00 | (재활용)/인터넷 |
| 전선 | 1 | $ 2.00 | (재활용)/인터넷 |
| 총 | 1,194.13달러 |
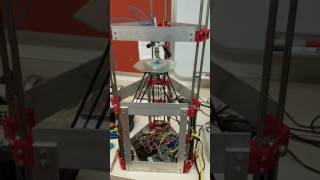
인쇄된 부분

이 STL 파일을 RepRap 의 모든 플레이버에 인쇄하세요 . 오른쪽 이미지의 빨간색 부분은 인쇄된 부분입니다. 필요하면SCAD 도 가능합니다.
- 3X 파일: End motor.stl
- 3X 파일: End idler.stl
- 3X 파일:벨트 종결자.stl
- 3X 파일:MOST 12 치아 풀리.stl
- 파일:Effector.stl
- 파일:Carriage.stl
- 파일:Bed adaptor.stl
건설
제작자를 위한 참고 사항
이전에 RepRap을 만들어 본 적이 있다면 쉽습니다. RepRaps나 Rostock과 같은 Deltabots에 익숙하지 않다면 MOST Prusa RepRap 빌드 페이지 와 Delta Build Overview:MOST 에서 더 자세한 빌드 지침을 볼 수 있습니다 . 이러한 링크는 예를 들어 전선을 땋거나 Melzi/Arduino 마이크로컨트롤러를 구성하는 방법에 대한 세부 정보를 제공합니다. 그러나 이 개념은 이 특정 설계에 국한되지 않으며 물론 대부분의 RepRap 프린터에 적용 가능합니다. 방화 처리와 자체 용접기만 있으면 됩니다... 행운을 빕니다! 작동하게 되면 저희에게 연락해 주세요.
초기 준비
- BOM에 나열된 모든 재료를 준비하세요
- RepRap 에 모든 플라스틱 구성품을 인쇄하세요
- 각 플라스틱 부품에 M3 나사 구멍을 뚫고 날카로운 칼로 너트 트랩을 청소하여 모든 M3 나사와 너트에 맞게 만듭니다.
단일 기둥 구조


- 모터와 베이스 플라스틱을 와셔가 달린 M3 X 10mm 나사로 부착합니다. 풀리의 셋스크류 너트 트랩에 M3 너트 두 개를 삽입하고 풀리에 M3 X 8mm 셋스크류 두 개를 느슨하게 삽입합니다. 풀리를 모터 로드에 밀어 넣고 모든 나사를 고정합니다.
- M2 X 10mm 나사를 사용하여 리미트 스위치를 베이스 플라스틱의 홀더에 부착합니다. 스위치가 움직이지 않도록 에폭시를 약간 첨가합니다. 캐리지의 나사가 스위치 암에 맞물리는지 확인합니다. 이 나사를 조정하여 캐리지가 리미트 스위치에 맞물리는 위치를 설정합니다.
- 드릴이나 칼을 사용하여 막대 구멍을 청소하고, 300mm의 매끄러운 막대 2개를 바닥 플라스틱의 구멍에 평행하게 삽입하고, 와셔가 달린 M3 X 12mm 나사를 사용하여 두 막대를 모두 고정하여 고정합니다.
- LM8UU 베어링을 오일에 넣어 윤활하고, LM8UU 베어링 2개를 플라스틱 셔틀의 슬롯에 삽입하고, 각 베어링을 두 개의 작은 와이어 타이로 단단히 조입니다. LM8UU 베어링을 플라스틱 셔틀과 함께 각 막대에 밀어 넣습니다.
- 평행 막대의 상단 끝을 와셔가 있는 M3 X 12mm 나사로 상단 플라스틱에 고정합니다. M8 셋스크류와 M8 너트를 사용하여 두 개의 608zz 베어링을 상단 플라스틱의 중앙 구멍에 고정합니다.
- T5 벨트의 한쪽 끝을 벨트 종단 장치 하나를 통과시키고 그 주위로 통과시킨 다음 벨트의 꼬리를 다른 종단 장치로 당깁니다. 벨트의 끝을 풀리 주위에 감습니다. 벨트의 다른 쪽 끝을 608zz 베어링 주위에 감습니다. 종단 장치 하나를 와셔가 달린 M3 X 10mm 나사로 LM8UU 베어링이 있는 플라스틱 셔틀에 부착합니다. 종단 장치를 작은 와이어 타이로 단단히 고정합니다.
3배
이것으로 단일 기둥 제작이 끝났습니다. 3개의 기둥을 평행으로 만들어야 합니다. 241mm X 51mm 알루미늄 판을 바닥과 상단 플라스틱에 부착하여 프레임을 삼각 프리즘 모양 으로 만듭니다 .
플랫폼 구축
- 타이 와이어 끝을 양쪽 끝의 탄소 섬유 막대에 에폭시로 고정합니다. M3 X 12mm 나사와 너트 세트를 사용하여 타이 와이어 끝을 플라스틱 셔틀에 고정합니다. 다른 쪽 끝은 플라스틱 스테이지 홀더에 고정합니다.
- M3 나사를 타이 와이어 끝의 구멍에 느슨하게 끼워서 각 탄소 섬유 팔이 모든 방향으로 자유롭게 움직일 수 있도록 하세요.
- 3.5cm 길이의 못을 플라스틱 플랫폼 홀더에 끼워 152mm X 152mm 크기의 세라믹 트레이를 받쳐줍니다.
전자제품

- 배선도는 Fig. 2를 참조하세요.
- 스테퍼 모터와 리미트 스위치는 마이크로컨트롤러 보드의 해당 단자에 연결되고, 이 보드는 USB 케이블을 통해 Linux 컴퓨터에 연결됩니다.
- 이 보드는 재활용된 컴퓨터 전원 공급 장치를 통해 구동됩니다.
- 용접기를 제어하기 위해 RAMPS 보조 I/O 및 전원 핀에 부착된 이러한 릴레이 중 하나를 사용합니다 . 보드가 부착된 핀의 상태를 변경하면 활성화된 핀에 할당된 릴레이의 상태가 변경됩니다. 그런 다음 릴레이 접점이 용접 건 핸들의 트리거 스위치와 병렬로 연결됩니다. 핸들 트리거 또는 릴레이를 토글하면 용접기가 토글됩니다. 이렇게 하면 용접기는 프린터에 부착되지 않았을 때와 마찬가지로 정상적으로 사용할 수 있습니다...
안전
- 안전 장비는 표준 MIG 용접 안전 프로토콜을 기반으로 합니다.
작업 영역
- 물과 가연성 물질로부터 격리된 평평한 표면에서 금속 3D 프린터를 사용하세요.
- 기판에 금속과 금속이 연결되어 적절하게 접지되었는지 확인하세요.
- 가스통은 항상 수직 지지대나 카트에 고정해 두고 용접용으로 설계된 가스 호스만 사용하세요.
- 작업 구역에서 잡동사니를 제거하세요. 사방에 불꽃이 날리게 될 테니까요. 발이 걸리는 것을 방지하기 위해 발 밑의 케이블 수를 최소화하세요.
- 호스를 정기적으로 검사하여 누출, 마모 및 느슨한 연결부를 확인하고 결함이 있는 선을 교체합니다. 비누와 물 혼합물을 뿌려 분사합니다. 거품이 누출을 보여줍니다.
- 작업 구역의 적절한 환기를 보장하세요. 용접 연기는 위험합니다. 집 차고에서는 문이나 창문을 열어두고 박스형 팬을 배기로 작동시켜 호흡 구역에서 연기를 제거하세요. 마스크도 사용했습니다.
안전 장비
- 연구실에 있는 동안은 항상 안전 안경을 착용하세요.
- 인쇄할 때 및/또는 인쇄하는 동안 프린터를 볼 때 용접 마스크/용접 헬멧(현재 ANSI 인증을 받은 자동 어둡게 하거나 플립 셰이드)을 착용하거나 웹캠을 사용하여 보십시오. 보호되지 않은 눈으로 프린터를 보지 마십시오!
- 인쇄 후 기판을 집어 올리려면 플라이어를 사용하거나 두꺼운 가죽 장갑을 착용하세요.
- 인쇄된 부분을 다룰 때는 항상 내화성 실험실 코트와 내구성이 뛰어난 가죽 장갑을 착용하십시오.
- 가죽 신발을 신으세요 - 하이탑 (강철코가 달린 신발은 보너스입니다).
금속 3D 프린팅은 일반적인 용접보다 더 오랜 시간 동안 용접에 노출됩니다. "햇볕에 타는 것"을 피하기 위해 피부 전체를 무언가로 덮어야 합니다.
작업
스테이지는 일반적인 RepRap Delta 3D 프린터처럼 제어됩니다. 명명법에 대한 입문서로 이것을 시도해 보세요 . Repetier 펌웨어와 호스트 소프트웨어를 다운로드하고 Arduino를 사용하여 펌웨어를 스테이지에 업로드하고 호스트에 Cura를 설정 하세요. 이것은 모든 유형의 컴퓨터에서 작동하지만 무료 오픈 소스 Debian을 권장합니다 . 모델은 OpenSCAD , Blender 또는 FreeCAD 와 같은 CAD 애플리케이션 과 같은 3D 편집기를 사용하여 만들고 수정할 수 있습니다 (무료 오픈 소스 CAD 프로그램의 자세한 목록은 여기를 참조하세요 ).모델은 STL 파일로 내보내야 합니다.이 파일은 Cura에 로드되어 툴패스로 슬라이스됩니다.모든 설정을 올바르게 하려면 몇 번 시도해야 할 수 있습니다.GCode는 디스크에 저장되고 Repetier Host에서 열리면 스테이지로 전송됩니다.플랫폼이 용접 건에 도달하면 스위치로 이어지는 케이블을 꽂아 용접기를 켭니다(와이어 타이로 눌러야 함).인쇄하는 동안 건과 객체 사이의 거리에 주의하세요.이 거리는 약 7mm에서 시작하여 동일하게 유지되어야 합니다.늘어나는 경우 레이어 높이를 줄이거나 이동 속도를 늦추세요(이는 Repetier Host로 인쇄하는 동안 수행할 수 있음).줄어드는 경우 반대로 하세요.
실험적 특징
전체 설정은 아직 매우 실험적이지만, 일부 부분은 다른 부분보다 더 실험적입니다. 다양한 수준의 성공으로 테스트 중인 일부 기능이 여기에 나열되어 있습니다. Cura는 공급 속도를 변경하여 증착된 필라멘트의 "선폭"을 조정하려고 시도합니다. 현재 용접기는 이러한 조정을 지원하지 않으므로 일부 부분은 예상보다 많은 재료를 얻고 다른 부분은 적게 얻습니다. 이를 해결하기 위해 이러한 공급 속도 변경을 노즐 속도 변경으로 변환하는 Cura용 플러그인이 개발되었습니다. 이 플러그인은 github 의 scad 파일에서 찾을 수 있습니다 . 이 플러그인은 또한 이동이 끝나거나 시작될 때 사용자 정의 명령을 추가하는 것을 지원합니다. 이것은 용접기 전원을 전환하기 위한 릴레이를 활성화하는 데 사용할 수 있습니다.
또한 참조
- 오픈소스 아크 분석기: 와이어 아크 적층 제조의 다중 센서 모니터링
- 가스 메탈 아크 용접 3D 알루미늄 금속 인쇄를 위한 기판 릴리스 메커니즘 - 망치로 기판에서 인쇄물을 제거하는 방법
- 가스 메탈 아크 용접 3D 프린팅을 위한 저가형 오픈소스 전압 및 전류 모니터
- 오픈소스 TIG 기반 금속 3D 프린팅을 위한 프린팅 매개변수의 입자군 최적화
- 웨지 캐스팅을 사용한 GMAW 기반 3D 프린팅을 위한 하이포에우텍틱 알루미늄-실리콘 합금 개발
- 오픈소스 랩
- OSAT의 오픈소스 3D 프린팅
- 오픈소스 3D 프린터를 활용한 분산 제조의 수명 주기 경제 분석
- 폴리머 구성 요소 및 제품의 3D 프린팅으로 인한 분산 제조의 환경 영향
- 무료 오픈소스 하드웨어로 연구 장비 구축
- 델프트 공과대학 - MIG+ Prusa I3
- Weld 3D - 첫 번째 상업적 스핀오프
- "와이어 아크 적층 제조"(WAAM)에 관한 문헌 참조
- 미니 메탈 메이커 - 금속 점토를 위해 특별히 설계된 3D 프린터로, 이후 소성됩니다. 제작 지침은 $25이므로 준 오픈 소스입니다.
- Código abierto Impresora 3-D para Metales
- 오픈소스 GMAW 기반 금속 3D 프린팅의 응용 프로그램
- MOST 오픈소스 금속 3D 프린터 v2
- 3D 금속 인쇄 슬라이서 플러그인
- 가스 메탈 아크 용접 금속 3D 프린팅을 위한 기판 릴리스 메커니즘의 현장 형성
- 가스 메탈 아크 용접 3D 프린팅을 위한 저가형 오픈소스 전압 및 전류 모니터
- 통합 전압-가스 금속 아크 용접 자기 볼 조인트 오픈 소스 3D 프린터의 전류 모니터링 및 제어
- 3D 프린팅을 위한 알루미늄 기판 세척:MOST
- 금속 주조를 위한 왁스 인쇄에 역 델타 사용
유용한 토론
- RepRap 포럼 토론
- Thingiverse 토론
- Reddit 토론
- 해킹 어 데이 토론
- Rastall G+ 토론
- 등록 토론
- Slashdot 토론
- 3D 프린터 팁, 트릭 및 리뷰에 대한 Google 그룹
메디아
미국 미디어
- 과학자들이 저가형 오픈소스 3D 금속 프린터를 제작하다 - Michigan Tech News, Phys.org , Science Daily , Science Codex , The Cherry Creek News , Planet Infowars , Business Standard , GentedeHoy(스페인어) , ItechPost , Reddit , CBS Detroit , Bubblenews , Lab Manager, 3ders , Hexus
- 느슨한 나사? 3D 프린터가 곧 새로운 나사를 만들어 줄 수도 있습니다 - NBC News
- 금속으로 인쇄: 엔지니어들이 1,500달러 이하로 DIY 용접 3D 프린터를 제작 - International Business Times
- 미시간 공대 과학자들이 1,500달러짜리 DIY 금속 3D 프린터를 제작 - Gigaomm , CNN Money, ARS Mobilitas
- 저가형 오픈소스 3D 금속 프린터, 수백만 명에게 혁신적인 기술을 제공할 수 있다 - International Science Times
- 새로운 3D 금속 프린터는 오픈 소스이며 저렴합니다 - Live Science, Yahoo News , Scientific American
- DIY 데스크탑 3D 금속 프린터에 경의를 표합니다 - DVice
- 이제 집에서 금속으로 3D 프린트가 가능합니다 - 마더보드
- 금속 테스트 - Newsweek, Newsweek.com
- 로스토크 용접 3D 프린터? - Hack-a-Day
- 미시간 공대, 2,000달러 이하로 오픈소스 3D 금속 프린터 출시 - 3D 프린팅 산업
- 금속 부품을 인쇄하는 저렴한 방법 - The New York Times
- RT ACM(The Association for Computing Machinery) , Treehugger , 3D Printer World , Engineering.com , Geeky Gadgets , Gizmodo , Dragons Tales , The Examiner , ICT Career , VR Zone , Gizmag , Computer Weekly , ITPro Portal , Consett Magazine , Shift Frequency
- Sigma Labs와의 MOU : Market Watch, Sacramento Bee , MSN Money , Wall Street Journal , Yahoo Finance, Business Week , ABC 27 , 3D Printing Industry , 3Ders , Technorati , Design News
- 3DPI 작가, Mike Molitch-Hou의 2013년 5대 3D 프린팅 응용 분야 - 3D 프린팅 산업
- 2013년에 탄생한 가장 놀라운 오픈소스 하드웨어 프로젝트 10가지 - Open Electronics
- Metal Manufacturing.net을 통한 차세대 3D 프린팅
- 인쇄 혁명, 새로운 3D 인쇄 기술 - The Rundown Live
- Free Form Metal 3D Printer는 스테로이드를 넣은 3Doodler입니다. - 3D 인쇄 산업
- Grace And Robotic Metal 3D 프린팅 – Joris Laarman의 MX3D-METAL - 3D 프린터 월드
- Michigan Tech의 최첨단 연구 - UP Second Wave
- 주목할 만한 8가지 놀라운 오픈소스 프로젝트! - Electronics For You Times
- 게임 체인저 기술 - Hang the Bankers
- 소비자를 위한 금속 인쇄 - Aurora Labs의 S1 - 3D 프린터 월드
- MIG 용접기로 금속에 인쇄하기 - Hack-A-Day
- 네덜란드 학생들이 Prusa i3 프린터와 MIG 용접기를 사용하여 DIY 금속 3D 프린터를 제작 - 3Ders, 학생들이 Prusa i3 프린터와 MIG 용접기를 결합하여 저렴한 금속 3D 프린터 제작 - 3D Print
- 네덜란드 학생들이 Prusa i3 프린터와 MIG 용접기를 사용하여 DIY 금속 3D 프린터를 제작했습니다. #3DPMetal - Adafruit
- 나는 알루미늄 맨이다 - 카 앤 드라이버 2017
국제 미디어
영국
- 금속 3D 프린팅과 '제2차 산업 혁명'의 6가지 핵심 변화 - The Guardian
- The Register , The Telegraph , The Independent , Techienews , ITPro , Eureka Magazine
캐나다
- 과학자들이 오픈소스 3D 금속 프린터에 대한 계획을 발표 - 캐나다 제조/디자인 엔지니어링
- 오픈 소스 혁신을 통한 새로운 저가형 3D 금속 프린터 - Substance
중국
- 3D 금속 프린터: 무엇을 만들고 싶으신가요? - Guokr.com (Nutshell)
- 3D 금속 프린터, 1500달러. 준비 되셨나요? - 3dyf.com (3dyf)
- OS 중국 , IT 홈 , CN 베타 , AMOBBS
덴마크
- Byg din egen 3D 금속 프린터(6,500크로네) - Ingeniøren
프랑스
- 프로젝트: 3D 금속 프린터... 오픈 소스 - Futura Sciences
- (주)지엔티
독일
- 3D 프린터의 금속 장비 - Scienexx, Linux Magazin
인도
- 과학자들이 저가형 오픈소스 3D 금속 프린터를 제작하다 - Jagran Post
- 과학자들이 저가형 오픈소스 3D 금속 프린터를 제작하다 - Economic Times (인디언 타임즈)
이탈리아
- 금속, 오픈소스, 땅콩의 3D 프린팅 - 톰스 하드웨어
일본
- 저렴한 DIY! Michigan Technological University가 오픈소스 3D 금속 프린터를 개발 중입니다 - Social Design News
리투아니아
- 이제 3D 금속 프린터는 천원에 1.5달러면 집에서 만들 수 있다 - Mokslasit 15분, Technologijos
말레이시아
- 2014년을 지배할 6가지 기술 트렌드 - HongKiat
노르웨이
- 그녀의 금속 3D 프린터는 자체적으로 제작되었습니다 - Teknisk Ukeblad(Technical Weekly)
폴란드
- 총 인쇄 - Rzeczpospolita (rp.pl)
루마니아
- 모든 사용자를 위한 3D 프린터 용접 금속 - Sfera
러시아 제국
- 3D 금속 씰 오픈 제작 -Lenta.ru, 2045.ru , Kazan Federal U , 인라인
- 미국인들이 금속에 인쇄할 수 있는 3D 프린터를 개발했습니다. - Imena
- Epoch Times , Computerra , Scienceblog.ru
스페인
- Impresora 3D 파라 메탈, barata y de código abierto - NCYT, Insurgente Press