
Open-source metal 3-D printer/pt

| Tipo | |
|---|---|
| Autores | Gerald C. Anzalone Chenlong Zhang Bas Wijnen Paul G. Sanders Joshua M. Pearce |
| Localização | Michigan , EUA |
| Status | Projetado Modelado Prototipado Verificado |
| Verificado por | MAIORIA |
| Anos | |
| Custo | USD 1.194,13 |
| Licença de hardware | CERN-OHL-S |
|---|---|
| Certificações | Comece a certificação OSHWA |


O progresso técnico na comunidade de prototipagem rápida autorreplicante de código aberto ( RepRap ) permitiu que uma forma distribuída de manufatura aditiva se expandisse rapidamente usando materiais à base de polímeros. No entanto, a falta de uma alternativa de código aberto para metal e os altos custos de capital e a baixa produtividade das impressoras 3D de metal comerciais proprietárias restringiram severamente sua implantação. As aplicações das impressoras 3D de metal comerciais se limitam à prototipagem rápida e a produtos acabados de alto custo. Isso restringe severamente o acesso à tecnologia para pequenas e médias empresas, países em desenvolvimento e para uso em laboratórios. Este artigo relata o desenvolvimento de uma impressora 3D de metal de código aberto com custo inferior a US$ 2.000. A impressora 3D de metal é controlada por um microcontrolador de código aberto e é uma combinação de uma soldadora MIG a gás-metal comercial de baixo custo e um derivado da Rostock, uma RepRap Deltabot. A lista de materiais, os esquemas de projeto elétrico e mecânico e os procedimentos básicos de construção e operação são fornecidos. Uma análise técnica preliminar das propriedades da impressora 3D e dos produtos de aço resultantes é realizada. Os resultados da impressão de peças metálicas funcionais personalizadas são discutidos e conclusões são tiradas sobre o potencial da tecnologia e o trabalho futuro necessário para a distribuição em massa dessa tecnologia.
Para a impressora 3D RepRap mais recente em metal, veja aqui.
Novo software: Melhorias no fatiador e no processo para impressão 3D de metal baseada em GMAW de código aberto.

Lista de Materiais
| Item | Número | Custo (USD) | Fonte |
|---|---|---|---|
| Todas as 12 peças impressas a US$ 40/kg | $ 12,00 | RepRap local | |
| Todos os fixadores | $ 2,00 | http://www.mcmaster.com/ | |
| Porca M3 | 90 | ||
| Parafuso M3x10 mm | 12 | ||
| Parafuso M3x12mm | 48 | ||
| Parafuso M3x20mm | 12 | ||
| Parafuso de fixação M3x8mm | 6 | ||
| Arruela M3 | 102 | ||
| Porca M8 | 6 | ||
| Parafuso de fixação M8 | 3 | ||
| Isolamento cerâmico de 152 mm x 152 mm | 1 | $ 4,00 | |
| Hastes, mancais e tirantes | http://www.amazon.com/ | ||
| Haste lisa de 300 mm x 8 mm | 6 | $ 25,00 | |
| Haste de fibra de carbono de 304,8 mm | 6 | $ 6,00 | |
| Rolamentos 608zz | 6 | $ 2,40 | |
| Rolamentos LM8UU | 6 | $ 6,00 | |
| Abraçadeiras de arame pequenas | 3 | $ 0,50 | |
| Terminal da barra de direção | 24 | $ 8,00 | |
| Correia T5 de 600 mm | 3 | $ 5,90 | http://www.polytechdesign.com/ |
| Placa de alumínio de 241 mm x 51 mm x 4 mm | 3 | $ 114,00 | Oficina mecânica local |
| Motor de passo NEMA17 (1,8 graus, torque de retenção de 5,5 kg-cm, fio de 750 mm) | 3 | $ 39,00 | http://www.kysanelectronics.com/ |
| Interruptor de limite mecânico | 3 | $ 3,33 | http://www.digikey.com/ |
| Placa de microcontrolador Melzi | 1 | $ 120,00 | http://web.archive.org/web/20160304170259/http://matterfy.com/ |
| Máquina de solda MIG Millermatic 140 com ajuste automático e carrinho. | 1 | $ 836,00 | http://www.millerwelds.com/ |
| Fonte de energia | 1 | $ 8,00 | (Reciclado)/Internet |
| Fios | 1 | $ 2,00 | (Reciclado)/Internet |
| Total | $ 1.194,13 |
Peças impressas

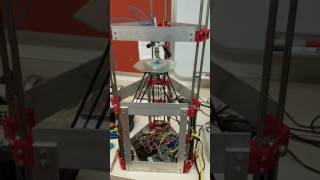
Imprima esses arquivos STL em qualquer impressora RepRap . As peças vermelhas na imagem à direita são as peças impressas. O arquivo SCAD está incluído, caso precise.
- Arquivo 3X :Fim do motor.stl
- Arquivo 3X :Fim do idler.stl
- Arquivo 3X : Terminadores de correia.stl
- Arquivo 3X : Polia de 12 dentes MOST.stl
- Arquivo:Effector.stl
- Arquivo: Carriage.stl
- Arquivo: Adaptador de cama.stl
Construção
Nota aos fabricantes
Se você já montou uma RepRap antes, isso será fácil. Caso não esteja familiarizado com RepRaps ou impressoras Deltabot como a Rostock, instruções de montagem mais detalhadas estão disponíveis na página de montagem da RepRap da MOST Prusa e na Visão Geral da Montagem Delta: MOST . Esses links fornecerão detalhes sobre como, por exemplo, trançar os fios ou configurar o microcontrolador Melzi/Arduino. Este conceito, no entanto, não se limita a este projeto específico e deve funcionar para a maioria das impressoras RepRap — você só precisa de proteção contra incêndio e de uma máquina de solda. Boa sorte! Se conseguir, entre em contato conosco.
Preparação inicial
- Prepare todos os materiais listados na lista de materiais.
- Imprima todos os componentes plásticos em uma RepRap.
- Alargue os furos para parafusos M3 em cada peça plástica e limpe os locais onde as porcas ficam presas com uma faca afiada, deixando-as compatíveis com todos os parafusos e porcas M3.
Construção de pilar único


- Fixe o motor e a base de plástico com parafusos M3 x 10 mm com arruelas. Insira duas porcas M3 nos encaixes das porcas dos parafusos de fixação na polia e, em seguida, insira dois parafusos de fixação M3 x 8 mm na polia, sem apertá-los completamente. Passe a polia pelas hastes do motor e aperte todos os parafusos.
- Fixe o interruptor de limite ao seu suporte na base de plástico usando parafusos M2 x 10 mm. Aplique um pouco de epóxi para garantir que o interruptor não se mova. Certifique-se de que o parafuso no carro esteja engatado no braço do interruptor. Ajuste este parafuso para definir a posição em que o carro engata no interruptor de limite.
- Use uma furadeira ou faca para limpar as aberturas das hastes, insira 2 hastes lisas paralelas de 300 mm nos orifícios da base de plástico e use parafusos M3 x 12 mm com arruelas para fixar todas as hastes e imobilizá-las.
- Mergulhe os rolamentos LM8UU em óleo para lubrificação, insira 2 rolamentos LM8UU nas ranhuras do suporte de plástico e aperte firmemente cada rolamento com duas abraçadeiras de nylon pequenas. Deslize os rolamentos LM8UU com os suportes de plástico em cada haste.
- Fixe a extremidade superior das hastes paralelas na parte superior de plástico com parafusos M3 x 12 mm com arruelas. Use o parafuso de ajuste M8 e a porca M8 para fixar dois rolamentos 608zz nos orifícios centrais da parte superior de plástico.
- Passe uma extremidade da correia T5 por dentro e ao redor de um dos terminais da correia e puxe a outra extremidade da correia pelo outro terminal. Enrole a extremidade da correia ao redor da polia. Enrole a outra extremidade da correia ao redor dos rolamentos 608zz. Fixe um terminal à lançadeira de plástico com rolamentos LM8UU usando um parafuso M3 x 10 mm com arruela. Prenda firmemente os terminais com uma pequena abraçadeira de nylon.
3X
Isso conclui a construção de um único pilar. Três pilares devem ser construídos em paralelo. Placas de alumínio de 241 mm x 51 mm são fixadas nas partes plásticas superior e inferior para formar um prisma triangular na estrutura .
Construção de plataforma
- Cole as extremidades do fio de amarração nas hastes de fibra de carbono com epóxi em ambas as pontas. Um conjunto de parafusos e porcas M3 x 12 mm é usado para fixar as extremidades do fio de amarração às lançadeiras de plástico. A outra extremidade é fixada ao suporte de plástico do palco.
- Certifique-se de que os parafusos M3 estejam frouxamente rosqueados no orifício das extremidades dos cabos de fixação, de forma a permitir que cada braço de fibra de carbono se mova livremente em todas as direções.
- Três pregos de 5 cm de comprimento são rosqueados no suporte de plástico da plataforma para sustentar a bandeja de cerâmica de 152 mm x 152 mm.
Eletrônica

- Para o diagrama de fiação, veja a Fig. 2.
- Os motores de passo e os interruptores de limite são conectados aos terminais correspondentes na placa do microcontrolador, que por sua vez está conectada a um computador Linux através de um cabo USB.
- A placa é alimentada por uma fonte de alimentação de computador reciclada.
- Para controlar a máquina de solda, utilizamos um desses relés conectados aos pinos de E/S auxiliares e de alimentação da RAMPS. Alterar o estado dos pinos aos quais a placa está conectada altera o estado do relé atribuído ao pino ativado. Os contatos do relé são então conectados em paralelo com o interruptor de disparo na alça da pistola de solda. Acionar o interruptor de disparo da alça ou o relé liga e desliga a máquina de solda. Dessa forma, a máquina de solda pode continuar sendo usada normalmente quando não estiver conectada à impressora.
Segurança
- Os equipamentos de segurança são baseados em protocolos de segurança padrão para soldagem MIG.
Área de trabalho
- Utilize sua impressora 3D de metal em uma superfície plana, isolada da água e de materiais inflamáveis.
- Verifique se você possui um aterramento adequado, com uma conexão metal com metal ao seu substrato.
- Certifique-se de que seu cilindro de gás esteja sempre preso a um suporte vertical ou carrinho e use somente mangueiras de gás projetadas para soldagem.
- Elimine a desordem da área de trabalho, pois você vai espalhar faíscas por toda parte. Minimize o número de cabos no chão para evitar tropeços.
- Examine as mangueiras regularmente para verificar vazamentos, desgaste e conexões soltas e substitua as mangueiras defeituosas. Borrife com uma mistura de água e sabão. As bolhas indicarão vazamentos.
- Assegure uma ventilação adequada da área de trabalho. Os fumos da soldagem são perigosos. Em uma garagem residencial, deixe uma porta ou janela aberta e utilize um ventilador de mesa como exaustor para remover os fumos da sua área de respiração. Também utilizamos máscaras.
Equipamento de segurança
- Use óculos de segurança o tempo todo enquanto estiver no laboratório.
- Ao imprimir e/ou observar a impressora durante a impressão, use uma máscara/capacete de soldador (com escurecimento automático ou blindagem e certificação ANSI atual) ou observe a impressora por meio de uma webcam. Não olhe para a impressora sem proteção!
- Use um alicate para pegar o substrato após a impressão ou luvas de couro grossas.
- Use sempre jaleco resistente a chamas e luvas de couro reforçadas ao manusear as peças impressas.
- Use sapatos de couro - tênis de cano alto (com biqueira de aço são um bônus).
A impressão 3D em metal expõe você à soldagem por períodos mais longos do que o normal para soldagem de rotina. Certifique-se de que toda a sua pele esteja coberta para evitar queimaduras solares.
Operação
A plataforma é controlada como uma impressora 3D RepRap Delta comum. Para uma introdução à nomenclatura, tente este link . Baixe o firmware Repetier e o software host , use o Arduino para carregar o firmware na plataforma e configure o Cura no host. Isso funcionará em qualquer tipo de computador, mas recomendamos o Debian, que é gratuito e de código aberto . Os modelos podem ser criados e modificados com qualquer editor 3D, como o OpenSCAD , o Blender ou um aplicativo CAD como o FreeCAD (para uma lista mais detalhada de programas CAD gratuitos e de código aberto, acesse aqui ). O modelo deve ser exportado como um arquivo STL. Este arquivo é carregado no Cura e fatiado para gerar o percurso da ferramenta. Pode ser necessário tentar algumas vezes para ajustar todas as configurações corretamente. O GCode é salvo no disco e aberto com o Repetier Host, que o envia para a plataforma de impressão. Quando a plataforma alcançar a pistola de solda, ligue a soldadora conectando o cabo que leva ao interruptor (que deve ser mantido pressionado com uma braçadeira de nylon). Durante a impressão, observe a distância entre a pistola e o objeto. Essa distância deve começar em aproximadamente 7 mm e permanecer a mesma. Se aumentar, diminua a altura da camada ou reduza a velocidade de movimento (isso pode ser feito durante a impressão com o Repetier Host). Se diminuir, faça o oposto.
Características experimentais
Embora toda a configuração ainda seja altamente experimental, algumas partes são mais experimentais do que outras. Algumas funcionalidades que estão sendo testadas com diferentes níveis de sucesso estão listadas aqui. O Cura tentará ajustar a "largura da linha" do filamento depositado alterando sua taxa de alimentação. Atualmente, a soldadora não suporta esse tipo de ajuste, então algumas peças recebem mais material do que deveriam, enquanto outras recebem menos. Para resolver isso, foi desenvolvido um plugin para o Cura que converte essas alterações na taxa de alimentação em alterações na velocidade do bico. O plugin pode ser encontrado junto com o arquivo scad no GitHub . Este plugin também permite adicionar comandos personalizados para o início e o fim do deslocamento. Isso pode ser usado para ativar um relé para ligar e desligar a soldadora.
Veja também
- Analisador de Arco de Código Aberto: Monitoramento Multissensor da Manufatura Aditiva por Arco com Arame
- Mecanismos de liberação do substrato para soldagem MIG/MAG em impressão 3D de alumínio - como remover a impressão do substrato com um martelo
- Monitor de tensão e corrente de baixo custo e código aberto para impressão 3D de soldagem a arco com gás e metal.
- Otimização por Enxame de Partículas dos Parâmetros de Impressão para Impressão 3D de Metal Baseada em TIG de Código Aberto
- Desenvolvimento de liga hipoeutética de alumínio-silício para impressão 3D baseada em GMAW utilizando fundição em cunha
- Laboratório de código aberto
- Impressão 3D de código aberto do OSAT
- Análise econômica do ciclo de vida da manufatura distribuída com impressoras 3D de código aberto
- Impactos ambientais da manufatura distribuída por meio da impressão 3D de componentes e produtos de polímero.
- Construindo equipamentos de pesquisa com hardware gratuito e de código aberto
- Universidade de Tecnologia de Delft - MIG+ Prusa I3
- Weld 3D - 1º spin-off comercial
- consulte a literatura sobre "fabricação aditiva de arco de arame" (WAAM)
- Mini Metal Maker - Impressora 3D projetada especificamente para argila metálica, que é então queimada - US$ 25 - Instruções de montagem, portanto, quase de código aberto.
- Código aberto Impresora 3-D para Metales
- Aplicações da impressão 3D em metal baseada em GMAW de código aberto
- Impressora 3D de metal de código aberto MOST v2
- Plugin de fatiamento para impressão 3D em metal
- Formação in situ de mecanismos de liberação do substrato para impressão 3D de metal de solda a arco com gás
- Monitor de tensão e corrente de baixo custo e código aberto para impressão 3D de soldagem a arco com gás e metal.
- Monitoramento e controle integrados de tensão e corrente para soldagem a arco com gás e metal em impressora 3D de código aberto com junta esférica magnética.
- Limpeza de substrato de alumínio para impressão 3D: MOST
- Utilizando uma matriz delta inversa para impressão em cera para fundição de metais.
Discussões úteis
- Fórum de Discussão RepRap
- Discussão no Thingiverse
- Discussão no Reddit
- Discussão sobre hackathon diário
- Discussão Rastall no G+
- Discussão do Registro
- Discussão no Slashdot
- Grupos do Google sobre dicas, truques e avaliações de impressoras 3D
Mídia
Mídia dos EUA
- Cientistas constroem uma impressora 3D de metal de baixo custo e código aberto - Michigan Tech News, Phys.org , Science Daily , Science Codex , The Cherry Creek News , Planet Infowars , Business Standard , GentedeHoy (espanhol) , ItechPost , Reddit , CBS Detroit , Bubblenews , Lab Manager, 3ders , Hexus
- Parafuso solto? Impressora 3D pode em breve fabricar um novo para você - NBC News
- Impressão com metal: Engenheiros criam impressora 3D de soldagem faça-você-mesmo por menos de US$ 1.500 - International Business Times
- Cientistas da Michigan Tech constroem uma impressora 3D de metal "faça você mesmo" por US$ 1.500 - Gigaomm , CNN Money, ARS Mobilitas
- Impressora 3D de metal de baixo custo e código aberto pode levar tecnologia revolucionária a milhões de pessoas - International Science Times
- Nova impressora 3D de metal é de código aberto e acessível - Live Science, Yahoo News , Scientific American
- Viva a impressora 3D de metal de mesa faça-você-mesmo! - DVice
- Agora você pode imprimir em 3D com metal em casa - Placa-mãe
- Testando seu metal - Newsweek, Newsweek.com
- Uma impressora 3D de soldagem em Rostock? - Hack-a-Day
- Michigan Tech lança impressora 3D de metal de código aberto por menos de US$ 2.000 - Indústria de Impressão 3D
- Uma maneira barata de imprimir peças de metal - The New York Times
- RT ACM (The Association for Computing Machinery) , Treehugger , 3D Printer World , Engineering.com , Geeky Gadgets , Gizmodo , Dragons Tales , The Examiner , ICT Career , VR Zone , Gizmag , Computer Weekly , ITPro Portal , Consett Magazine , Shift Frequency
- Memorando de Entendimento com a Sigma Labs : Market Watch, Sacramento Bee , MSN Money , Wall Street Journal , Yahoo Finance, Business Week , ABC 27 , Indústria de Impressão 3D , 3Ders , Technorati , Design News
- Os 5 principais aplicativos de impressão 3D de 2013, segundo Mike Molitch-Hou, redator da 3DPI - Indústria de impressão 3D
- 10 dos projetos de hardware de código aberto mais incríveis que surgiram em 2013 - Open Electronics
- Impressão 3D de última geração com Metal Manufacturing.net
- Revolução da Impressão, Novas Tecnologias de Impressão 3D - Resumo ao Vivo
- Impressora 3D de Metal Free Form: uma 3Doodler turbinada - Indústria de Impressão 3D
- Impressão 3D em Metal com Graça e Robótica – MX3D-METAL de Joris Laarman - Mundo das Impressoras 3D
- Pesquisa de ponta da Michigan Tech - UP Second Wave
- 8 projetos incríveis de código aberto para ficar de olho! - Electronics For You Times
- Tecnologia revolucionária - Enforquem os banqueiros
- Impressão em metal para o consumidor – A S1 da Aurora Labs - Mundo das Impressoras 3D
- Impressão em metal com solda MIG - Dicas do Dia
- Estudantes holandeses constroem impressora 3D de metal DIY usando impressora Prusa i3 e soldadora MIG - 3Ders, Estudantes combinam impressora Prusa i3 com soldadora MIG para criar uma impressora 3D de metal acessível - Impressão 3D
- Estudantes holandeses constroem impressora 3D de metal DIY usando impressora Prusa i3 e soldadora MIG #3DPMetal - Adafruit
- Eu sou o Homem de Alumínio - Car and Driver 2017
Mídia Internacional
Grã-Bretanha
- Impressão 3D em metal e seis mudanças-chave na 'segunda revolução industrial' - The Guardian
- The Register , The Telegraph , The Independent , Techienews , ITPro , Eureka Magazine
Canadá
- Cientistas divulgam planos para impressora 3D de metal de código aberto - Canadian Manufacturing/Design Engineering
- Nova impressora 3D de metal de baixo custo baseada em inovação de código aberto - Substance
China
- Impressora 3D de metal: O que você quer fabricar com ela? - Guokr.com (Resumidamente)
- Impressora 3D de metal, US$ 1500. Você está pronto? - 3dyf.com (3dyf)
- SO China , TI Home , CN Beta , AMOBBS
Dinamarca
- Byg din egen impressora 3D de metal por 6.500 coroas - Engenheiro
França
- Em projeto: uma impressora 3D de metal... código aberto - Futura Sciences
- GNT
Alemanha
- Equipamentos metálicos da impressora 3D - Scienexx, Revista Linux
Índia
- Cientistas constroem impressora 3D de metal de baixo custo e código aberto - Jagran Post
- Cientistas constroem impressora 3D de metal de baixo custo e código aberto - Economic Times (Indian Times)
Itália
- Impressão 3D de metal, código aberto e amendoins - Tom's Hardware
Japão
- Faça você mesmo a baixo custo! A Universidade Tecnológica de Michigan está desenvolvendo uma impressora 3D de metal de código aberto - Social Design News
Lituânia
- A partir de agora, uma impressora 3D de metal custa apenas 1,5 por mil dólares e pode ser feita em casa - Mokslasit 15 min, Technologijos
Malásia
- 6 tendências tecnológicas que dominarão 2014 - HongKiat
Noruega
- Suas impressoras 3D de metal podem ser usadas sozinhas - Teknisk Ukeblad (Technical Weekly)
Polônia
- Imprima uma arma - Rzeczpospolita (rp.pl)
Romênia
Rússia
- Selo metálico 3D aberto - Lenta.ru, 2045.ru , Universidade Federal de Kazan , Inline
- Os americanos criaram uma impressora 3D que permite imprimir em metal - Imena
- Epoch Times , Computerra , Scienceblog.ru
Espanha
- Impressora 3D para metal, barata e de código aberto - NCYT, Insurgente Press
| Autores | Joshua M. Pearce |
|---|---|
| Licença | CC-BY-SA-3.0 |
| Organizações | MAIORIA , MTU |
| Citar como | Joshua M. Pearce (2013–2025). "Impressora 3D de metal de código aberto" . Appropedia . Consultado em 2 de maio de 2026 . |