
Open-source metal 3-D printer/es

| Tipo | |
|---|---|
| Autores | Gerald C. Anzalone Chenlong Zhang Bas Wijnen Paul G. Sanders Joshua M. Pearce |
| Ubicación | Míchigan , Estados Unidos |
| Estado | Diseñado Modelado Prototipado Verificado |
| Verificado por | MAYORÍA |
| Años | |
| Costo | USD 1.194,13 |
| Licencia de hardware | CERN-OHL-S |
|---|---|
| Certificaciones | Iniciar la certificación OSHWA |


El progreso técnico en la comunidad de prototipos rápidos autorreplicantes de código abierto ( RepRap ) ha permitido que una forma distribuida de fabricación aditiva se expanda rápidamente utilizando materiales basados en polímeros. Sin embargo, la falta de una alternativa de metal de código abierto y los altos costos de capital y el bajo rendimiento de las impresoras 3D de metal comercializadas y propietarias han restringido severamente su implementación. Las aplicaciones de las impresoras 3D de metal comercializadas se limitan únicamente al prototipado rápido y a productos terminados costosos. Esto restringe severamente el acceso a la tecnología para pequeñas y medianas empresas, el mundo en desarrollo y para su uso en laboratorios. Este documento informa sobre el desarrollo de una impresora 3D de metal de código abierto de <$2000. La impresora 3D de metal se controla con un microcontrolador de código abierto y es una combinación de una soldadora MIG de gas-metal comercial de bajo costo y un derivado de Rostock, un deltabot RepRap. Se proporciona la lista de materiales, los esquemas de diseño eléctrico y mecánico, y los procedimientos básicos de construcción y operación. Se realiza un análisis técnico preliminar de las propiedades de la impresora 3D y los productos de acero resultantes. Se discuten los resultados de la impresión de piezas metálicas funcionales personalizadas y se extraen conclusiones sobre el potencial de la tecnología y el trabajo futuro necesario para su difusión masiva.
Para la última impresora 3D RepRap de metal MOST, consulte esto
Nuevo software: mejoras en el cortador y el proceso para la impresión 3D de metal basada en GMAW de código abierto

Lista de materiales
| Artículo | Número | Costo (USD) | Fuente |
|---|---|---|---|
| Las 12 piezas impresas a $40/kg | $12.00 | RepRap local | |
| Todos los sujetadores | $2.00 | http://www.mcmaster.com/ | |
| Tuerca M3 | 90 | ||
| Tornillo M3x10 mm | 12 | ||
| Tornillo M3x12 mm | 48 | ||
| Tornillo M3x20mm | 12 | ||
| Tornillo de fijación M3x8 mm | 6 | ||
| Arandela M3 | 102 | ||
| Tuerca M8 | 6 | ||
| Tornillo de fijación M8 | 3 | ||
| Aislamiento cerámico de 152 mm x 152 mm | 1 | $4.00 | |
| Varillas, cojinetes y tirantes | http://www.amazon.com/ | ||
| Varilla lisa de 300 mm x 8 mm | 6 | $25.00 | |
| Varilla de fibra de carbono de 304,8 mm | 6 | $6.00 | |
| Rodamientos 608zz | 6 | $2.40 | |
| Rodamientos LM8UU | 6 | $6.00 | |
| Bridas de alambre pequeñas | 3 | $0.50 | |
| Extremo de la barra de acoplamiento | 24 | $8.00 | |
| Correa T5 de 600 mm | 3 | $5.90 | http://www.polytechdesign.com/ |
| Placa de aluminio de 241 mm x 51 mm x 4 mm | 3 | $114.00 | Taller de maquinaria local |
| Motor paso a paso NEMA17 (1,8 grados, par de retención de 5,5 kg-cm, cable de 750 mm) | 3 | $39.00 | http://www.kysanelectronics.com/ |
| Interruptor de límite mecánico | 3 | $3.33 | http://www.digikey.com/ |
| Placa de microcontrolador Melzi | 1 | $120.00 | http://web.archive.org/web/20160304170259/http://matterfy.com/ |
| Soldadora MIG Millermatic 140 Auto-set con carro | 1 | $836.00 | http://www.millerwelds.com/ |
| Fuente de alimentación | 1 | $8.00 | (Reciclado)/Internet |
| Cables | 1 | $2.00 | (Reciclado)/Internet |
| Total | $1,194.13 |
Piezas impresas

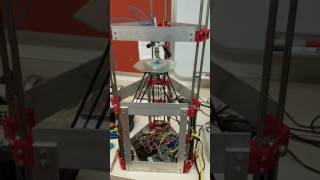
Imprima estos archivos STL en cualquier versión de RepRap . Las partes rojas en la imagen de la derecha son las partes impresas. El SCAD , si lo necesita.
- Archivo 3X :Fin del motor.stl
- Archivo 3X :Fin idler.stl
- Archivo 3X :Terminadores de cinturón.stl
- Archivo 3X : MOST 12 dientes polea.stl
- Archivo:Effector.stl
- Archivo:Carriage.stl
- Archivo:Adaptador de cama.stl
Construcción
Nota para los creadores
Si ya has creado una RepRap, esto te resultará fácil. Si no estás familiarizado con RepRaps o Deltabots como el Rostock, encontrarás instrucciones de construcción más detalladas en la página de construcción de la RepRap de MOST Prusa y en la descripción general de la construcción de Delta: MOST . Estos enlaces te mostrarán detalles sobre cómo, por ejemplo, trenzar los cables o configurar el microcontrolador Melzi/Arduino. Sin embargo, este concepto no se limita a este diseño específico y, por supuesto, debería funcionar con la mayoría de las impresoras RepRap; solo necesitas la protección contra incendios y tu propio soldador... ¡mucha suerte! Si consigues que funcione, escríbenos.
Preparación inicial
- Prepare todos los materiales enumerados en la lista de materiales
- Imprima todos los componentes de plástico en una RepRap
- Escariar los orificios de los tornillos M3 en cada pieza de plástico y limpiar las trampas de las tuercas con un cuchillo afilado, para que se ajuste a todos los tornillos y tuercas M3.
Construcción de un solo pilar


- Fije el motor y la base de plástico con tornillos M3 x 10 mm y arandelas. Inserte dos tuercas M3 en los alojamientos de los tornillos de fijación de la polea e inserte, sin apretar, dos tornillos M3 x 8 mm en la polea. Introduzca la polea a través de las varillas del motor y apriete todos los tornillos.
- Fije el interruptor de límite a su soporte en la base de plástico con tornillos M2 x 10 mm. Aplique un poco de epoxi para asegurar que el interruptor no se mueva. Asegúrese de que el tornillo del carro enganche el brazo del interruptor. Ajuste este tornillo para fijar la posición donde el carro enganche el interruptor de límite.
- Utilice un taladro o un cuchillo para limpiar las aberturas de las varillas, inserte 2 varillas lisas paralelas de 300 mm en los orificios del plástico de la base, utilice un tornillo M3 X 12 mm con arandelas para fijar todas las varillas para inmovilizar ambas varillas.
- Sumerja los rodamientos LM8UU en aceite para lubricarlos, inserte dos rodamientos LM8UU en las ranuras de la lanzadera de plástico y apriete firmemente cada rodamiento con dos bridas pequeñas. Deslice los rodamientos LM8UU con las lanzaderas de plástico sobre cada varilla.
- Fije el extremo superior de las barras paralelas a los plásticos superiores con tornillos M3 x 12 mm y arandelas. Utilice el tornillo de fijación M8 y la tuerca M8 para fijar dos rodamientos 608zz en los orificios centrales del plástico superior.
- Pase un extremo de la correa T5 a través de un terminal y tire de la cola de la correa a través del otro. Enrolle el extremo de la correa alrededor de la polea. Enrolle el otro extremo de la correa alrededor de los rodamientos 608zz. Conecte un terminador a la lanzadera de plástico con rodamientos LM8UU con un tornillo M3 x 10 mm con arandela. Sujete firmemente los terminadores con una brida pequeña.
3X
Con esto finaliza la construcción de un solo pilar. Se deben construir 3 pilares en paralelo. Se unen placas de aluminio de 241 mm x 51 mm a los plásticos inferior y superior para hacer que el marco tenga forma de prisma triangular .
Construcción de la plataforma
- Fije con epoxi los extremos del alambre de amarre a las varillas de fibra de carbono en ambos extremos. Se utiliza un juego de tornillos y tuercas M3 x 12 mm para fijar los extremos del alambre de amarre a las lanzaderas de plástico. El otro extremo se fija al soporte de plástico de la platina.
- Asegúrese de que los tornillos M3 pasen sin apretar a través del orificio en los extremos del cable de amarre para permitir que cada brazo de fibra de carbono se mueva libremente en todas las direcciones.
- Se enroscan 3 clavos de 5 cm de largo en el soporte de plataforma de plástico para apoyar la bandeja de cerámica de 152 mm x 152 mm.
Electrónica

- Para el diagrama de cableado, consulte la Fig. 2
- Los motores paso a paso y los interruptores de límite están conectados a los terminales correspondientes en la placa del microcontrolador, que está conectada a la computadora Linux con un cable USB.
- La placa se alimenta con una fuente de alimentación de computadora reciclada.
- Para controlar la soldadora, utilizamos uno de estos relés conectado a las entradas y salidas auxiliares de RAMPS y a los pines de alimentación. Al cambiar el estado de los pines a los que está conectada la placa, se modifica el estado del relé asignado al pin activado. Los contactos del relé se conectan en paralelo con el gatillo del mango de la pistola de soldar. Al accionar el gatillo del mango o el relé, se activa la soldadora. De esta forma, la soldadora puede seguir utilizándose normalmente cuando no está conectada a la impresora.
Seguridad
- El equipo de seguridad se basa en protocolos de seguridad de soldadura MIG estándar.
Área de trabajo
- Utilice su impresora 3D de metal en una superficie plana aislada del agua y de materiales inflamables.
- Verifique que tenga una conexión a tierra adecuada con una conexión de metal con metal a su sustrato.
- Asegúrese de que su cilindro de gas esté asegurado a un soporte vertical o carro en todo momento y utilice únicamente mangueras de gas diseñadas para soldar.
- Elimine el desorden del área de trabajo, ya que habrá chispas por todas partes. Minimice la cantidad de cables bajo sus pies para evitar tropiezos.
- Revise las mangueras regularmente para detectar fugas, desgaste y conexiones sueltas, y reemplace las líneas defectuosas. Rocíe con una mezcla de agua y jabón. Las burbujas indicarán fugas.
- Asegúrese de que el área de trabajo esté bien ventilada. Los humos de soldadura son peligrosos. En el garaje de una casa, deje una puerta o ventana abierta y utilice un ventilador de caja como extractor para eliminar los humos de la zona de respiración. También hemos utilizado mascarillas.
Equipo de seguridad
- Use gafas de seguridad en todo momento mientras esté en el laboratorio.
- Al imprimir o mirar la impresora mientras imprime, use una máscara o casco de soldador (con oscurecimiento automático o pantalla abatible con certificación ANSI vigente) o mírela a través de una cámara web. ¡No mire la impresora sin protección ocular!
- Utilice alicates para recoger el sustrato después de imprimir o guantes de cuero gruesos.
- Utilice siempre una bata de laboratorio resistente al fuego y guantes de cuero resistentes al manipular las piezas impresas.
- Use zapatos de cuero, de caña alta (las puntas de acero son una ventaja).
La impresión 3D de metal te expone a la soldadura durante más tiempo del habitual. Asegúrate de cubrirte la piel para evitar quemaduras solares.
Operación
La plataforma se controla como una impresora 3D RepRap Delta normal. Para una introducción a la nomenclatura, prueba esto . Descarga el firmware y el software del host Repetier , usa Arduino para cargar el firmware a la plataforma y configura Cura en el host. Funciona en cualquier ordenador, pero recomendamos Debian, una versión gratuita y de código abierto . Los modelos pueden ser creados y modificados con cualquier editor 3-D, como OpenSCAD , Blender o una aplicación CAD como FreeCAD (para una lista más detallada de programas CAD de código abierto gratuitos, vaya aquí . El modelo debe ser exportado como un archivo STL. Este se carga en Cura y se corta en una trayectoria de herramienta. Puede tomar varios intentos para obtener todas las configuraciones correctas. El GCode se guarda en el disco y se abre con Repetier Host, que lo envía al escenario. Cuando la plataforma llega a la pistola de soldadura, encienda el soldador enchufando el cable que conduce al interruptor (que debe mantenerse presionado con una brida de alambre). Mientras se realiza la impresión, preste atención a la distancia entre la pistola y el objeto. Esta debe comenzar aproximadamente en 7 mm y permanecer igual. Si aumenta, disminuya la altura de la capa o ralentice el movimiento (esto puede hacerse durante la impresión con Repetier Host). Si disminuye, haga lo contrario.
Características experimentales
Aunque la configuración completa aún es muy experimental, algunas partes son más experimentales que otras. Aquí se enumeran algunas funciones que se están probando con distintos niveles de éxito. Cura intentará ajustar el ancho de línea del filamento depositado modificando su velocidad de avance. Actualmente, la soldadora no admite este ajuste, por lo que algunas piezas reciben más material del debido, mientras que otras reciben menos. Para solucionar esto, se desarrolló un complemento para Cura que convierte estos cambios en la velocidad de avance en cambios en la velocidad de la boquilla. El complemento se puede encontrar con el archivo scad en GitHub . Este complemento también permite añadir comandos personalizados al finalizar o iniciar el recorrido. Esto permite activar un relé para conmutar la potencia de la soldadora.
Véase también
- Analizador de arco de código abierto: Monitoreo multisensor de la fabricación aditiva con arco de alambre
- Mecanismos de liberación del sustrato para la impresión 3D de aluminio con soldadura por arco metálico con gas : cómo retirar la impresión del sustrato con un martillo
- Monitor de voltaje y corriente de código abierto de bajo costo para impresión 3D de soldadura por arco metálico con gas
- Optimización de los parámetros de impresión mediante enjambre de partículas para la impresión 3D de metal basada en TIG de código abierto
- Desarrollo de una aleación hipoeutéctica de aluminio y silicio para la impresión 3D basada en GMAW mediante piezas fundidas en cuña
- Laboratorio de código abierto
- Impresión 3D de código abierto de OSAT
- Análisis económico del ciclo de vida de la fabricación distribuida con impresoras 3D de código abierto
- Impactos ambientales de la fabricación distribuida a partir de la impresión 3D de componentes y productos poliméricos
- Construcción de equipos de investigación con hardware gratuito y de código abierto
- Universidad Tecnológica de Delft - MIG+ Prusa I3
- Weld 3D - 1er spin-off comercial
- consulte la literatura sobre "fabricación aditiva por arco de alambre" (WAAM)
- Mini Metal Maker : impresora 3D diseñada específicamente para arcilla metálica que luego se cuece. Instrucciones de construcción por $25, por lo que es de código abierto.
- Código abierto Impresora 3-D para Metales
- Aplicaciones de la impresión 3D de metal basada en GMAW de código abierto
- La impresora 3D de metal de código abierto MOST v2
- Complemento de corte para impresión de metal 3D
- Formación in situ de mecanismos de liberación del sustrato para la impresión 3D de metales de soldadura por arco metálico con gas
- Monitor de voltaje y corriente de código abierto de bajo costo para impresión 3D de soldadura por arco metálico con gas
- Monitoreo y control integrados de voltaje y corriente de soldaduras de arco metálico con gas mediante impresora 3D de código abierto con rótula magnética
- Limpieza de sustratos de aluminio para impresión 3D: MOST
- Uso de un delta inverso para la impresión en cera para fundición de metal
Discusiones útiles
- Discusión del foro RepRap
- Discusión sobre Thingiverse
- Discusión de Reddit
- Discusión de hack-a-day
- Discusión de Rastall G+
- El debate sobre el Registro
- Discusión en Slashdot
- Grupos de Google sobre consejos, trucos y reseñas de impresoras 3D
Medios
Medios de comunicación estadounidenses
- Científicos construyen una impresora 3D de metal de código abierto y bajo costo - Michigan Tech News, Phys.org , Science Daily , Science Codex , The Cherry Creek News , Planet Infowars , Business Standard , GentedeHoy (español) , ItechPost , Reddit , CBS Detroit , Bubblenews , Lab Manager, 3ders , Hexus
- ¿Tornillo suelto? Una impresora 3D podría fabricarte uno nuevo pronto - NBC News
- Impresión con metal: Ingenieros crean una impresora 3D de soldadura casera por menos de 1500 dólares - International Business Times
- Científicos de Michigan Tech construyen una impresora 3D de metal casera de 1.500 dólares - Gigaomm , CNN Money, ARS Mobilitas
- Una impresora 3D de metal de código abierto y bajo costo podría llevar tecnología revolucionaria a millones de personas - International Science Times
- Nueva impresora 3D de metal de código abierto y asequible - Live Science, Yahoo News , Scientific American
- ¡Viva la impresora 3D de metal de escritorio DIY! - DVice
- Ahora puedes imprimir en 3D con metal en casa - Motherboard
- Poniendo a prueba tu metal - Newsweek, Newsweek.com
- ¿ Una impresora 3D de soldadura Rostock? - Hack-a-Day
- Michigan Tech lanza una impresora 3D de metal de código abierto por menos de $2,000 - Industria de la impresión 3D
- Una forma económica de imprimir piezas metálicas - The New York Times
- RT ACM (Asociación para Maquinaria Computacional) , Treehugger , 3D Printer World , Engineering.com , Geeky Gadgets , Gizmodo , Dragons Tales , The Examiner , ICT Career , VR Zone , Gizmag , Computer Weekly , ITPro Portal , Consett Magazine , Shift Frequency
- Memorando de entendimiento con Sigma Labs : Market Watch, Sacramento Bee , MSN Money , Wall Street Journal , Yahoo Finance, Business Week , ABC 27 , Industria de la impresión 3D , 3Ders , Technorati , Design News
- Las 5 principales aplicaciones de impresión 3D de 2013 según Mike Molitch-Hou - Industria de la impresión 3D
- 10 de los proyectos de hardware de código abierto más increíbles nacidos en 2013 - Open Electronics
- Impresión 3D de vanguardia con Metal Manufacturing.net
- Revolución de la impresión, nuevas tecnologías de impresión 3D - The Rundown Live
- La impresora 3D de metal Free Form es un 3Doodler con esteroides - Industria de la impresión 3D
- Impresión 3D de metal con gracia y robótica: MX3D-METAL de Joris Laarman - 3D Printer World
- Investigación de Michigan Tech a la vanguardia - UP Second Wave
- 8 increíbles proyectos de código abierto que no te puedes perder - Electronics For You Times
- Tecnología que cambia las reglas del juego : cuelguen a los banqueros
- Impresión en metal para el consumidor: la S1 de Aurora Labs - 3D Printer World
- Impresión en metal con soldadora MIG - Hack-A-Day
- Estudiantes holandeses construyen una impresora 3D de metal casera usando una impresora Prusa i3 y un soldador MIG - 3Ders, Estudiantes combinan la impresora Prusa i3 con un soldador MIG para crear una impresora 3D de metal asequible - Impresión 3D
- Estudiantes holandeses construyen una impresora 3D de metal casera usando una impresora Prusa i3 y un soldador MIG #3DPMetal - Adafruit
- Soy el Hombre de Aluminio - Car and Driver 2017
Medios internacionales
Gran Bretaña
- Impresión 3D de metal y seis cambios clave en la "segunda revolución industrial" - The Guardian
- The Register , The Telegraph , The Independent , Techienews , ITPro , Eureka Magazine
Canadá
- Científicos publican planes para una impresora 3D de metal de código abierto - Ingeniería de diseño y fabricación canadiense
- Nueva impresora 3D de metal de bajo coste en la innovación de código abierto - Substance
Porcelana
- Impresora 3D de metal: ¿Qué usos le quieres dar? - Guokr.com (En pocas palabras)
- Impresora 3D de metal, 1500 $. ¿Listo? - 3dyf.com (3dyf)
- Sistema operativo China , TI para el hogar , CN Beta , AMOBBS
Dinamarca
- Impresora de metal 3D Byg din egen por 6.500 coronas - Ingeniøren
Francia
- En proyecto: una impresora 3D de metal... de código abierto - Futura Sciences
- GNT
Alemania
India
- Científicos construyen una impresora 3D de metal de código abierto y bajo costo - Jagran Post
- Científicos construyen una impresora 3D de metal de código abierto y bajo costo - Economic Times (Indian Times)
Italia
- Impresión 3D de metal, código abierto y cacahuetes - Tom's Hardware
Japón
- ¡Hazlo tú mismo a bajo precio! La Universidad Tecnológica de Michigan desarrolla una impresora 3D de metal de código abierto - Noticias de Diseño Social
Lituania
- A partir de ahora, se podrá fabricar una impresora 3D de metal en casa por solo 1,5 por cada mil dólares - Mokslasit 15 min, Technologijos
Malasia
Noruega
- Her er metall-3D-printeren du kan lage selv - Teknisk Ukeblad (Technical Weekly)
Polonia
- Imprimir una pistola - Rzeczpospolita (rp.pl)
Rumania
Rusia
- Sello metálico 3D abierto -Lenta.ru, 2045.ru , Universidad Federal de Kazán , en línea
- Los estadounidenses han creado una impresora 3D disponible para imprimir sobre metal - Imena
- La Gran Época , Computerra , Scienceblog.ru
España
- Impresora 3D para metal, barata y de código abierto - NCYT, Insurgente Press
| Autores | Joshua M. Pearce |
|---|---|
| Licencia | CC-BY-SA-3.0 |
| Ubicación | {{{coordenadas}}} |
| Organizaciones | LA MAYORÍA , MTU |
| Citar como | Joshua M. Pearce (2013–2025). «Impresora 3D de metal de código abierto» . Appropedia . Consultado el 15 de septiembre de 2025 . |