Do not let the magnets slam together! They are very brittle and will break surprisingly easily if mishandled. They are exceptionally strong and will slam together with enough force to break them.
Do not use "steel" epoxies as many really do contain steel. They'll flow uncontrollably all over the surface of the magnet, which isn't fun to clean up.
A non-magnetic tool for pushing the magnets into their pockets (a wooden spoon handle or aluminum x-acto knife handle works nicely).
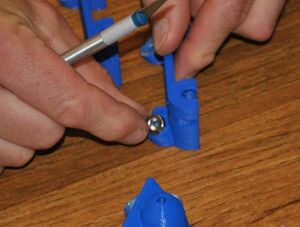
Cleaning magnet pocket sides with knife.Cleaning magnet pocket bottoms with screwdriver.Thoroughly clean the magnet pocket sides with a sharp knife. Use a small flat blade screwdriver to clean protrusions off the bottoms of the pockets - it's important that the magnets seat fully in them. Be careful to not remove too much material as the magnets should fit snugly in them.
The magnets come in pairs with pairs being identified as those attracted to each others' same face, that is the sides with the larger diameter recesses should attract each other. Magnets should be placed in the end effector such that nearest-neighbors attract rather than repel. Magnets may be placed in the carriages without regard for polarity.
Magnets are placed in their pockets with the larger diameter opening facing outward. This is the surface that mates with the ball bearing on the end of a tie rod.
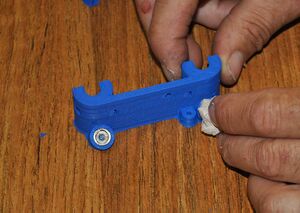
Test fitting magnets.Test fit the magnets in each of their pockets - they should fit snugly and all should fit flatly against the bottom of their pockets. Use the stack of magnets to insert and remove the end magnet during testing fitting. Do not let the magnets slam together!
Mixing plastic epoxy.After ensuring the magnets fit properly in their pockets, mix enough two part plastic epoxy to coat the pockets.
Applying epoxy to magnet pockets.Coat the interiors of all the magnet pockets with a thin layer of epoxy.
Inserting magnets into epoxy-coated pockets.Press the magnets into their pockets keeping in mind that the large diameter opening in the magnet points outward and the nearest neighbor magnets should attract each other in the end effector.
Fully seating magnets in their pockets.Press the magnets all the way into the pockets using a non-magnetic tool or fingers (the aluminum handle of the precision knife works nicely).
Cleaning epoxy off magnets.Wipe excess epoxy from the faces of the magnets and ensure that they are clean. After curing, excess epoxy that remains on the face of the magnets can be removed with a sharp knife.