
Solar Panels holders (Solar powered delta)


For full details on a more advanced version of this solar-powered 3-D printer see High-Efficiency Solar-Powered 3-D Printers for Sustainable Development
-
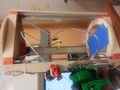 Fig 1:MOST delta 3D printer
 -
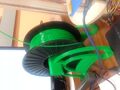 Fig 2:Spool_holder
 -
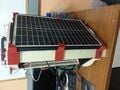 Fig 3: Solar powered Delta side view
 -
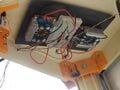 Fig 4: Printer PV Power Supply unit
 -
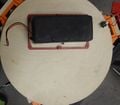 Fig 5: Battery mounting, Delta top view
 -
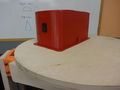 Fig 5: Battery casing mounting
 -
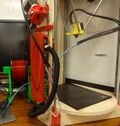 Fig 6: Melzi casing mounting
 -
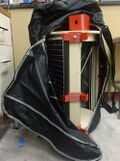 Fig 6: 3D printer in a Duffel bag
.jpg)
.jpg)
.jpg)


Introduction
[edit | edit source]This page describes the modifications to the MOST Delta printer' as part of my graduate MY4777/MY5777/EE4777/EE5777 Open-source 3-D printing class project. This project enable the use of the MOST-delta printer off-the grid using solar power. These modifications not only makes the solar powered 3D printer a valuable tool for poverty alleviation and wealth creation in the developing world, but it also gives any 3D printing enthusiast the freedom to safely transport their printer to a remote camping site or any location of their choice. The modifications steps involved the following;
- PV system sizing - 60 W system.
- Coming up with the bill of materials (BOM).
- Designing and construction of a PV power supply system (fig.4).
- Designing and printing of solar panel holders (For safe transporting in a duffel bag) (fig.3).
- Design and printing of battery casing holder(mounted on top side of the top plywood board)(fig.5).
- Mounting the power supply under the top plywood board (inner-side).
- Design and printing the Melzi board casing (for protection during transit)(fig.6).
- Customized spool holder (easy to assemble) (fig.2).
Bill of Materials
[edit | edit source]- 12V/1.35A 25W solar panels x 3 [1]
- 12A/100W 4.5-30V to 0.8-30V DC Buck Volt Converter x 2 [2]
- Li-ion 20Ah battery (includes PCM with balance function)[3]
- 36" Duffel bag[4]
- Bolt with nuts x 3
- LED x 2 [5]
- Switches X 2 [6]
- Diodes x 5 [7]
Source Files
[edit | edit source]- File:Panel 2 holder.stl
- File:Panel 2 holder.scad
- File:Panel 2 holder midsection.stl
- File:Panel 2 holder midsection.scad
- File:Battery casing final.stl
- File:Battery casing final.scad
Tools
[edit | edit source]- 5.5mm nut driver
- Sharp x-acto-like knife
- Small, flat bladed screwdriver
- No.2 Phillips screwdriver (a power driver is best)
- 1.5mm allen wrench
- 2mm allen wrench
- 2.5mm allen wrench
- 3mm (1/8") drill bit
- 8mm (5/16") drill bit
- Tape measure (large calipers >300mm are better), preferably metric
- Soldering iron
- Wire strippers and cutters
- Needle nose or other pliers
Consumables
[edit | edit source]- PLA
- Connector wires
Note that all of the pictures in the process can be enlarged by clicking on them.
| Authors | |
|---|---|
| License | CC-BY-SA-3.0 |
| Cite as | Jgwamuri (2014–2025). "Solar Panels holders (Solar powered delta)". Appropedia. Retrieved July 20, 2026. |