

This is a fully automated version of Recyclebot v2.2 with many improved features. Some of the features are:
- Type of plastic can be selected from the keypad interface and the controller automatically updates the extrusion temperature for the plastic.
- Extrusion temperature can also be feed by the keypad interface for any type of plastic which can be melted and extruded.
- LCD interface for better process monitoring.
- No extrusion until the extrusion temperature is achieved - automatically controlled by microcontroller, with (manual option).
- Low cost power control options using a Triac and MOSFET.
More information: Christian Baechler, Matthew DeVuono, and Joshua M. Pearce, "Distributed Recycling of Waste Polymer into RepRap Feedstock" Rapid Prototyping Journal, 19(2), pp. 118-125 (2013). open access

Part List[edit | edit source]
The major mechanical components were fabricated in a machine shop - and their details can be found at http://www.thingiverse.com/thing:12948
The electronic components for the RecycleBot are found below.
Power Calculations[edit | edit source]
The first step is to choose the required power for melting and extruding plastic. For RecycleBot v2.2 and Recyclebot v2.3, a maximum power level (Pmax) of 440 W was chosen on the basis of extrusion speed, size of extruder and requirements. This is to be noted that although the Pmax was chosen as 440 W, this power level is barely used; as this level is well enough to reach a temperature of 500C almost instantaneously, therefore a very highly reliable power control system has to be used so that system remains in the bounded limits. At this maximum power level almost all types of plastic vaporize instantaneously. The system is designed to operate well below a maximum temperature of 350 C which can be feed or chosen from the keypad interface.
Variables and constants
- Pmax: Maximum power
- n: number of turns on the heating pipe section
- d: outer diameter of the heating pipe section
- Ω': resistance of nichrome wire per unit length
- r: resistance of nichrome wire
- L: length of nichrome wire
- V: potential difference used for powering heating element (nichrome) = 110 V
- I: current flowing through the heating element (nichrome)

(This is used to select the Triac on the basis of maximum current of Triac IT(RMS))


The length of nichrome is calculated according to the above-mentioned procedure. There are two types of nichrome, bare and insulated. If insulated nichrome is used, be sure that the nichrome is in contact with the metal heating section of pipe throughout the length, otherwise even a slight air gap between the nichrome and metal interface will trigger high localized temperature and nichrome will start fuming. Therefore it is better to use bare nichrome wire with insulated ceramic beads as shown in the picture gallery below. This allows us to use higher power for and higher temperature operation. The gauge of nichrome is selected on the basis of required length, current and the power requirements for the heating. For this purpose, 18-26 AWG nichrome can be used. For a low voltage and high current based control, thick nichrome is recommended and for high voltage (AC) and low current based control, thin nichrome is recommended since it has a higher value of Ω'.
For this RecycleBot, the 26 AWG of nichrome was used along with ceramic beads to get a maximum temperature of the order of 350C. Length of nichrome was approximately 10 feet's having 2.67 Ohms/ feet of resistance.
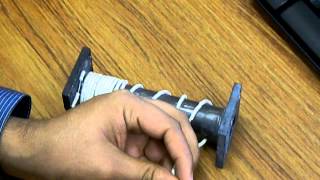
Heating section/Melt zone[edit | edit source]
As the heater is the most important section it must be designed and fabricated precisely for better results as changes in temperature of few degrees can result in different mechanical properties of the extruded plastic. Another important criteria for the heating section is to create uniform heating environment so that the temperature remains nearly constant throughout the barrel such that the extruded plastic is uniform. To achieve this, high temperature ceramic beads were used to insulate the bare nichrome wire so as to achieve electrical isolation from the iron barrel, and an advantage of using this scheme is high-quality thermal insulation from the ambient environment and heat transfers efficiently to the iron barrel as the bottom side of the ceramic beads rest on the metal tightly and the top surface is insulated to the air, which is then insulated as well.
Steps to make the heater section[edit | edit source]
- Clean the barrel and then make the top surface rough with a file.
- Again clean the surface and remove any residing metal debris and dust.
- Cut the required length of nichrome wire and straighten that up and hook the ends to a clamp.
- Carefully insert the ceramic beads onto the nichrome wire one by one till the whole wire is completely covered up with ceramic beads.
- Take the furnace cement and cover-up the iron barrel throughout the surface, it need to be made sure that whole surface is completely covered up with furnace cement as any exposed bare metal can posses the risk of short circuit with the bare nichrome and hence elevating the chances of electric shock (and destroying your power supply).
- Gently take the nichrome wire and place it over the barrel and slowly cover up the barrel as if making a coil out of nichrome wire.
- Fix the two free ends of the nichrome tightly to a clamp and apply furnace cement to cover up the whole surface of ceramic beads and it should look like the picture given in gallery. Again it is stressed that the furnace cement must be applied all over to cover the whole surface of ceramic beads so as to adhere strongly to the underlying metal and it should also make an electrical insulation layer such that bare nichrome shouldn't touch the metal anywhere.
- Allow it to dry for at least 24 hours.
- Connect the two free ends with alligator clips to power up the heater.
Safety note use gloves while using furnace cement as its alkaline in nature and can injure you and damage the skin if exposed for a prolonged time, if by chance skin comes in contact with furnace cement, then wash it under running water immediately. It is recommended that you do this in a hood if you have access to one.
-
Ceramic beads used for insulation
-
Furnace cement used for electrical and thermal insulation
-
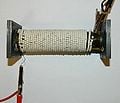
Heater section with nichrome coiled and wrapped over the iron barrel
-
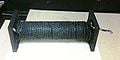
Heater section with furnace applied all over the surface


Temperature Monitoring and Process Control[edit | edit source]
Controlling the temperature and other related processes of plastic recycling and extrusion in an efficient manner and simultaneously decreasing the cost is the key challenge for RecycleBot development especially for home applications. In order to promote the RecycleBot for open sustainability, the whole control system is designed to work on Arduino, which is a very popular open source microcontroller based application development platform. Being easy to use and program with excellent user community support, Arduino is a low cost rapid prototyping platform ideal to implement control system for RecycleBot. Arduino Mega was used to design and implement the system, having enough input/ output pins for interfacing LCD, keypad, and other components.
The whole process is divided into two parts
- Input mode
- Control mode
Input mode[edit | edit source]
The process starts with user input of either plastic selection or extrusion temperature. With the option of 10 different types of plastic, user can select the desired type of plastic to recycle and the program automatically loads the optimum temperature range for operation/ extrusion for that particular type of plastic. Alternatively, user can also feed the temperature of extrusion for any type of plastic which can be operated below 350oC. After the extrusion temperature is set, program ask the user to confirm the temperature and once the temperature is set, the program steps into the control mode.
Control mode[edit | edit source]
In the control mode, the microcontroller is taking the temperature as input and adjusting the output power of heater accordingly such that temperature remains within the set bound range which is 15oC above and below the set extrusion temperature. The system is designed in such a way that if by any means the system temperature exceeds the set extrusion temperature, the power of the heater is cut off completely until the system temperature gets within the set bound range. Also, when the temperature is within the set range, the extrusion process starts, i.e. the motor starts feeding the shredded plastic from the hopper to the heater, also the spooler stepper motor starts which wind up the filament and coil over a spool. If the temperature drops 15oC below the extrusion temperature, the program stops the feeder motor as well as the spooler motor to ensure that the quality of filament remains the same, and as soon as the system temperature reach the set range of operation, both the feeder and spooler motor resumes working.
Program Code[edit | edit source]
The code for RecycleBot was written by Ankit Vora in C on Arduino IDE, using the keypad, LCD and stepper motor libraries. In order to replicate the RecycleBot code on an Arduino Mega, first, all the libraries must be copied into the correct destination of Arduino folder such that Arduino compiler can compiler them along with the program code. On Arduino development platform LCD library is already included, however keypad and stepper motor library need to be registered before compiling the code.
Steps to replicate, compile and upload the program code on Arduino Mega
- Download the libraries, unzip and copy every folder exactly into the folder: arduino-1.0\libraries\
(if you are using a new version of Arduino, then copy all the libraries to that folder, in any case the folder of Arduino development platform will be having folder 'libraries' and each and every library used must be copied to this folder.
- Run the Arduino development platform, go to the 'sketch' tab, then go to the section 'import library...' one should find the Keypad and AFMotor in the list. If they appear, it means we are all set and ready to use the code.
- Download the code for RecycleBot and spooler. Copy the RecycleBot code into Arduino IDE or just open the file with Arduino, and then select Arduino Mega from the list of board and upload. The RecycleBot code is now ready to be executed. For spooler, copy the code from the file or open the file for spooler code with Arduino, select the Arduino Uno as board and upload, the spooler is all set to work.
Program code link [1]
If you cant find the files or broken link, please send me an email at avora#mtu.edu (replace # with @, anti-spam)
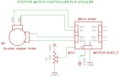
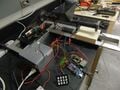
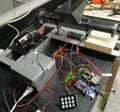
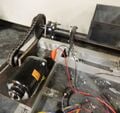
RecycleBot Circuit[edit | edit source]
Download the circuit diagram and fabricate on two separate PCBs in order to get better reliability. One can use breadboard, but using breadboards sometimes creates reliability issues due to hanging wires, and especially when we are using high power control elements with low power DC control and monitoring components, its better and recommended to make the circuit on general purpose PCB for rapid prototyping. It is recommended to make the temperature sensor and measurement circuit on one PCB and DC motor and heater controller on another PCB. The circuit for temperature sensor is small and works on low voltage of +5 V and needs a good isolation for the AC components and must be fabricated on a separate PCB as shown in the picture gallery. And the circuit for DC motor control and heater controller uses both +5V, +12V and 110V AC, so it must be well isolated from the low voltage DC components like Arduino etc., so that the transients, spikes won't affect the working of temperature and process control, hence it must be also fabricated on a separate PCB. Use good quality copper wire for heater power controller such that it can withstand both high power and temperature.
-
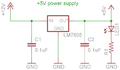
Circuit for Power Supply
-
Temperature sensor based on Thermocouple
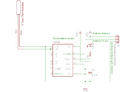
-
Contol system based on Arduino Mega 2560
-
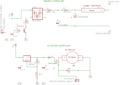
Heater and Motor controller
-
Spooler controller


How the Circuit Works[edit | edit source]
The RecycleBot v.2.3 is fully automated process control system with easy to operate input/ output interface.
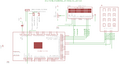
The input components constitute
- Keypad
- Temperature sensor
The output components constitute
- LCD
- Motor controller MOSFET
- Triac control
- Spooler
The first thing that Arduino does, when its powered up is to display a welcome message. After that it steps into a while loop and stays there as long as user doesn't feed a valid choice of either '1' or '2' from the keypad. The choice of '1' from the keypad will make the program to check the condition statement for '1' being equal to select the plastic and similarly the choice of '2' from the keypad will make the program to check the condition statement for '2' being equal to feed the temperature. In any of the above case, the program steps ahead by breaking off the loop and goes to the next loop according to the choice made before.
If the user entered '1' then it will again go to a while loop and will stay there until the user doesn't make a choice between 0~9 for a plastic selection. After selecting the plastic, the program displays the type of plastic and the set temperature and asks the user to confirm by pressing '#' key which is checked by conditional if else statement. If the condition is found to be true the while loop is broken and it steps into the process control loop and it stays there till the end.
Similarly for the choice '2', programs steps into a while loop and stays there till a valid input is feed and in this case it is a temperature less than 350oC. If the user press '*' the previous temperature input is cleared from the variable and a new temperature input is taken as long as it is lower than 350oC. After that the programs steps into the condition check mode and waits for the user till he confirms the temperature by pressing a '#' key. As soon as '#' key is pressed, the loop breaks and the program steps into the process control loop and it stays there till the end until someone presses the main reset button on Arduino board.
In the process control loop, the program stays in a loop continuously monitoring the temperature, which is fed by the AD 595 (thermocouple amplifier) to the ADC input of Arduino. The Arduino converts that analog value into the digital equivalent and that is further converted into Celsius scale by suitable multiplication of a factor. After reading the temperature, the Arduino steps into conditional statement comparison mode and compares various operating conditions explained in the subsequent section and on the basis of that controls the power of the heater. Partial PWM mode is used to control the heater power, however the DC motor is just controlled on/ off by the Arduino and the speed of the motor is controlled by the linear regulator and its value varies by resistance of the potentiometer, which is manually controlled. By changing the value of potentiometer, the output voltage gets changed and the corresponding power to the DC motor also gets changed. The spooler is a simple variable speed stepper motor driver, which is controlled by another Arduino board and is synchronized with Arduino Mega which is hosting the RecycleBot process control. Whenever the DC feed motor is on/off the stepper motor also performs the same, with the difference that its being controlled by a different Arduino. This step in process control gets repeated infinitely and is programmed to keep the temperature of the barrel within the set range of temperature which is 15oC above and below the set values. Sometimes it may happen that the system temperature will exceed the set temperature, but in that case the program will adjust itself in such a way that the barrel temperature will get down within the range in a short duration depending upon the operating conditions.
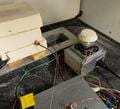
How to Assemble (Electrical Components)[edit | edit source]
Wire up the PCBs following the circuit diagrams in the last section.
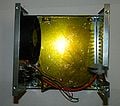
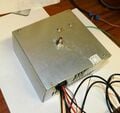
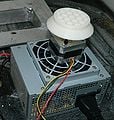
After the circuit is complete it needs to be housed (especially the DC motor controller and AC power control) for better safety. A low cost solution that was used in our prototype was a discarded computer ATX SMPS power supply.
- First dismantle the power supply, and remove the power supply PCB from inside.
- Now drill 4 holes on the heater control PCB if it is not already have them for mounting purpose, and also drill 4 on the bottom side of the ATX power supply metal casing by aligning properly with the mounting holes on the PCB.
- Then mount the PCB in the cabinet, connect the exhaust fan of the SMPS power supply with the connector given on the PCB for fan or just hook wires with correct polarity with given +12V power connector. The exhaust fan helps to cool the MOSFET and linear voltage regulator and keeping the temperature under the operable temperature range.
- Then drill a hole on the top surface of cabinet to insert and mount potentiometer for speed controller of DC motor.
- Mount the Triac as shown in the picture gallery below.
- Take the input and output wires out from the circular opening in ATX power supply and connect them to their respective elements like heater, motor, AC power socket etc.
- The thermocouple should be placed between the heater barrel flange and extrusion die by covering it completely with kapton tape such that it is completely insulated from the background vapors and electrical noise as shown in the figure below.
After the circuit is assembled, it is time to test if everything works as designed and intended. The spooler mechanism is to be placed over the stepper motor to make a spool out of extruded plastic.
-
Discarded ATX power supply, SMPS PCB removed and base insulated with Kapton tape.
-

Heater and Motor controller PCB is mounted in the cabinet. Exhaust fan is connected to supply.
-
Final assembly is completed, with potentiometer on top to control motor speed.
-
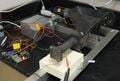
Final assembly with electrical connections and contacts.
-
Final assembly with electrical connections and contacts.
-
Simple spooler mechanism.


Final complete assembly ready to be tested in a clean hood
Details on insulation
How to Assemble (Mechanical Components)[edit | edit source]
Mechanical assembly instructions and drawing of parts can be found on the below given link. This is to be noted that in the evolution of various versions of RecycleBots in MOST, the underlying mechanical parts are the same, whereas electrical parts are continuously upgraded for better performance.
How to Test[edit | edit source]
The RecycleBot is easy to test and use. Once it is assembled completely, connect the power plug to AC power socket and you should get a welcome message on the LCD, the power LED on both the temperature sensor board and Arduino Mega board should lit up indicating power in the circuit. After the welcome message you will be asked to select the plastic for extrusion or feed the extrusion temperature. After selecting the extrusion temperature, you will find the LCD displaying the system temperature and set temperature. TheRecycleBot should follow the below mentioned logic.
- If the system temperature is below the set temperature - 15oC, extrusion will not start and heater will be on with full power.
- If the system temperature is above set temperature - 15oC, but below the set temperature, then extrusion will continue and heater will be on with input power reduced to controlled the temperature in the bound range. Spooler also starts with the motor.
- If the system temperature is above set temperature but below the set temperature + 15oC, then extrusion will continue and heater will be on with input power further reduced and controlled to keep the temperature in the bound range. Spooler continues to coil the filament as long as motor is rotating.
- If the system temperature is above set temperature + 15oC, then extrusion will continue and heater will be cutoff completely to keep the temperature in the bound range. Spooler continues to coil the filament as long as motor is rotating.
If the RecycleBot works differently than the above mentioned algorithm, then it needs to be troubleshot. In general, it is very unlikely that the code will not work according to the above mentioned algorithm as it has been tested sufficiently enough. The main sources of potential errors can be faulty temperature sensor, wrong temperature reading, loose connections especially to heater power controller and DC motor controller.
-
Power LED turns on when the circuit is powered up.
-
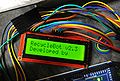
Welcome screen 1 appears after the screen is turned on.
-
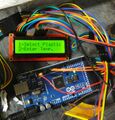
Contributors screen appears after welcome screen.
-
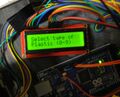
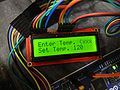
1st Option screen appears and user need to input either 1 or 2.
-
This option screen appears when user press 1 in the previous option, user need to press any key between 0 to 9 according to type of plastic.
-
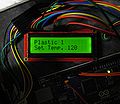
After user selects the type of plastic, user need to confirm selection by pressing '#'.
-
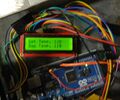
After confirming the selection, process starts.
-
System temperature increases rapidly as soon as process starts.
-
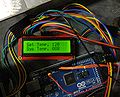
System temperature further increases rapidly as soon as process starts.
-
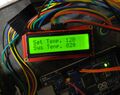
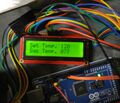
System temperature reaches the extrusion temperature range and extrusion starts.
-
DC feed motor starts as soon as system temperature reaches the extrusion temperature range.
-
spooler starts as soon as system temperature reaches the extrusion temperature range.
-

shredded plastic used for recycling and extrusion.
-
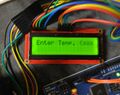
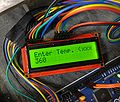
This option screen appears when user press 2 for the very first time, to manually enter extrusion temperature.
-
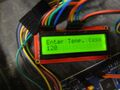
user enters the temperature.
-
Arduino ask the user to confirm the extrusion temperature.
-
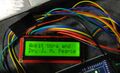
User enters a temperature higher than the maximum temperature.
-
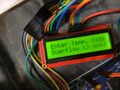
Arduino gives "overflow" error for entered temperature that is higher than maximum temperature.
-
1st Option screen appears and user need to input either 1 or 2.
-
filament comes out of the die, this is now ready to be spooled.


How to Use[edit | edit source]
Steps to use the RecycleBot
- As soon as the power flows into the circuit, a welcome message is displayed and the controller ask the user to input choice to either select the type of plastic for extrusion or to feed the temperature. If you want to select the plastic, enter 1 or if you want to feed the temperature, then press 2 from the keypad.
- If you want to select a plastic, then you have 10 choice of various plastic, just press 0~9 according to the choice of plastic and the RecycleBot will automatically load the extrusion temperature. After the choice is made, the Arduino will ask to confirm the temperature, at that point press '#' from the keypad and the process will start.
- If you want to enter the temperature for extrusion, then enter from the keypad, it need to be ensure that it is below 350oC, otherwise it will not accept and an overflow message will appear and user will be asked again to input the temperature. If at any point one want to clear the input temperature, just press the '*' button and you can again enter the temperature. If the input temperature is below 100oC, also add a '0' before the number. Arduino will only accept the temperature in three digits, i.e. if you want to enter 50oC, then you would have to enter 050. Again, After the temperature is feed, Arduino will ask to confirm the temperature, at that point press '#' from the keypad and the process will start.
- Now you have to wait till the filament comes out from the die, as it comes out, take a nose plier and gently pull that in a slow fashion and place it over the spooler. The speed of the spooler can be adjusted by the potentiometer given for that. The thickness of the filament can be adjusted by temperature and the speed of the spooler.

Troubleshooting[edit | edit source]
Thermocouple cleaning and care[edit | edit source]
Accurate measurement of temperature is the most important input control parameter for the whole process. It has been found that due to vaporization of polymers and capillary action during extrusion, the polymer sticks to the thermocouple (on kapton tape) and affects the accurate measurement of temperature. This problem can be easily solved by dismantling and opening the front extrusion die and then taking off the thermocouple. Now the thermocouple can be easily cleaned by a razor blade after taking off the small kapton tape placed over it. After cleaning that, again place small strip of kapton tape over the thermocouple covering and insulating the whole thermocouple and then place it between the barrel flange and extrusion die as before. This action of thermocouple cleaning and care should be done on a regular basis to ensure same filament quality.
Dismantling the heating section and Auger[edit | edit source]
Sometimes it is required to dismantle the heater and also the auger needs to be taken out for cleaning. This is not easy especially when there is some polymer left over and has solidified and chocked the auger in the heating barrel. In this situation it is recommended to use band heaters which are cheaply available and can be very efficiently used to melt and vaporize the left over polymer. Band heaters have a very high temperature density and they can easily vaporize the polymer. Any band heater having diameter more than an inch and heating power above 500 W should be good enough to solve the purpose. Just place and move slowly the band heater along the barrel axis such that it heats up the barrel and feed pipe. Within a short time, it will vaporize the polymer. After all the left over polymer is vaporized, allow the barrel to cool down to room temperature and then the system can be dismantled and auger can be taken out easily.
What to do when Auger gets stuck after extrusion?[edit | edit source]
It is quite likely that after the end of extrusion process (when the RecycleBot is shut down), some polymer chips will be inside the auger and heating section of pipe, which would have been solidified by the time it gets to room temperature. In such a situation when the RecyclebBot is operated again, it may be possible that Auger doesn't rotate and push the shredded plastic within the hopper towards the heating section, so what to do? In such a situation this can be done according to below mentioned cases:
- Case 1: If the next extrusion cycle uses same polymer - In this case, the preceding polymer will melt automatically at the set temperature and auger will start rotating on itself as soon as the temperature inside the heating section reaches melting temperature of residing polymer.
- Case 2: If the next extrusion cycle uses different polymer of higher melting temperature -- In this case, the preceding polymer will melt as the temperature inside the heating section reaches melting temperature of residing polymer and the auger will also start rotating on itself, however, the preceding polymer needs to be removed before the current polymer is extruded and coiled over a spool. This can be done by adding a few shredded bits of currently used polymer, this will push the preceding polymer out of the extruder, but it will also have current polymer in it, so a few shredded bits will go in waste to remove previous polymer. After sufficient extrusion of mixed polymers, which can be judged based on looking at filament, it can be cut down and new filament can be used for spooling when filament is relatively free from preceding polymer impurity.
- Case 3: If the next extrusion cycle uses different polymer of lower melting temperature - In this case, the procedure of case 2 can be repeated, however if preceding polymer doesn't comes out well, the extrusion temperature can be set to a maximum temperature and currently used polymer shredded chips can be added in order to force the preceding polymer to come out or the heating section can be opened and cleaned with a round file. After this, assemble the heating section and operate the RecycleBot at highest temperature without any polymer feed, this will melt up and vaporize the preceding polymer.
Future Work - Making this better[edit | edit source]
Use less components -- Reduce complexity -- Reduce cost
- Make it smaller - the mechanical side is oversized - the base is largely unnecessary
- One major improvement involves cutting the second microcontroller for the spooler. The spooler is controlled by another Arduino (Uno) not by the Arduino Mega. Both the libraries, i.e. of Arduino Motor shield, and LCD or Keypad are using some of the same "Timer registers" which are responsible for generating accurate timing cycle for various processes and commands, so when we use both the libraries simultaneously, it crashes after running for a few seconds. We have plenty of pins left on Mega itself. What we can do or could have done is generate the timing cycle by Arduino Mega itself and then control the stepper motor by that. This would be a cheaper way to do build it, but we need two more chips and four power transistor, so went with the quick option rather than again designing and writing a code for new addition.
Some useful references and external links[edit | edit source]
- Thermocouple Sensor for reprap
- Arduino Keypad Tutorial
- Arduino Motor sheild
- Waste plastic extruder (see reference section and External links)
- Very Simple recyclebot
- Waste plastic extruder Literature review
- Power Jack Motion: Professional Motion Control Solutions