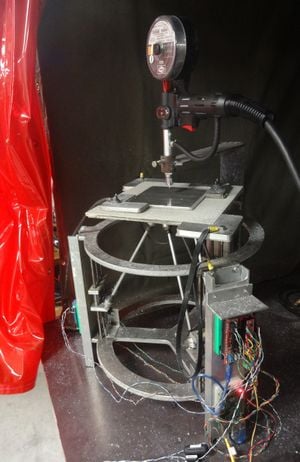
Первую версию можно найти на металлическом 3D-принтере с открытым исходным кодом (на самом деле это версия 3, хотя мы используем две — лучше начинать здесь)
Содержание
Спецификация и чертежи
- https://osf.io/ytvgm/ (включая OpenSCAD, STL и спецификацию)
Программное обеспечение
- Франклин
- Улучшения слайсера и процессов для 3D-печати металлом на основе GMAW с открытым исходным кодом — лучше
- Плагин слайсера для 3D-печати металла
- Анализатор дуги с открытым исходным кодом: мультисенсорный мониторинг аддитивного производства проволочной дуги
- Оптимизация параметров печати роем частиц для 3D-печати металлом с открытым исходным кодом на основе TIG
Приложения
Смотрите также
- Применение 3D-печати металлом на основе GMAW с открытым исходным кодом
- Механизмы отделения подложки для 3D-печати алюминия и металла при газовой дуговой сварке — как снять отпечаток с подложки с помощью молотка
- Недорогой монитор напряжения и тока с открытым исходным кодом для 3D-печати при дуговой сварке в газе и металле
- Разработка доэвтектического алюминиево-кремниевого сплава для 3D-печати на основе GMAW с использованием клиновых отливок
- Лаборатория с открытым исходным кодом
- 3D-печать OSAT с открытым исходным кодом
- Экономический анализ жизненного цикла распределенного производства с использованием 3D-принтеров с открытым исходным кодом
- Воздействие распределенного производства на окружающую среду при 3D-печати полимерных компонентов и изделий
- Создание исследовательского оборудования с использованием бесплатного оборудования с открытым исходным кодом.
- Делфтский технологический университет - MIG+ Prusa I3
- Weld 3D — первый коммерческий спин-офф (кажется мертвым, см. архивную копию )
- см. литературу по «аддитивному производству проволочной дуги» (WAAM).
- Mini Metal Maker — 3D-принтер, разработанный специально для металлической глины, которую затем обжигают — инструкции по сборке за 25 долларов, поэтому почти открытый исходный код
- Плагин слайсера для 3D-печати металла
- Формирование in situ механизмов освобождения подложки для 3D-печати металла при дуговой сварке металлом в газе
- Интегрированный мониторинг напряжения и тока и контроль газа Магнитно-шарнирный 3D-принтер с открытым исходным кодом для дуговой сварки металла
- Очистка алюминиевой подложки для 3D-печати: MOST
- Использование обратной дельты для восковой печати при литье металла
Примечания для пользователей
Общие сведения о системе
Для цельнометаллического дельта-принтера в приводном механизме использовались три шаговых двигателя NEMA17 (крутящий момент 5,5 кг·см) с ходовыми винтами, встроенными в их валы, что не требовало никаких соединений между двигателями и ходовыми винтами. Ходовые винты с трапециевидной резьбой имели шаг 5 мм и длину 300 мм. Три двигателя были расположены вертикально по кругу диаметром 394 мм на расстоянии 120° друг от друга. В целом, 3-осевой этап был основан на конструкции промышленного дельта-робота, обычно используемого для операций захвата и перемещения, за исключением того, что он допускал большее перемещение в направлении Z. Управление осуществлялось контроллером на базе Arduino . Прошивка Франклина (программное обеспечение, находящееся в микроконтроллере принтера) управляла движением принтера, переводя команды с сервера печати, работающего на главном компьютере. Главный компьютер, в свою очередь, предоставлял веб-интерфейс, с помощью которого конечный пользователь мог управлять движением стола, ставить в очередь задания на печать и вносить изменения в конфигурацию.
Альтернативой является покупка продукта, предлагаемого одним из наших партнеров, CNC Router Parts . Вместо фрезера прикрепите сварочный пистолет. Эта система намного дороже, чем дельта-принтер MOST, но она позволяет использовать большую область печати (или несколько областей печати), и вы можете использовать охлаждающую пластину для отвода тепла. Франклина также можно использовать для управления этой настройкой принтера.
Сварной блок
If choosing between a Millermatic 190 or a Millermatic 140, we recommend the 190. It behaves much better with the long print cycles that exist with 3-D printing. However, if you have the budget for a MIG-based welder that will allow you to pulse the arc and/or control the waveform, by all means use it. We use a standard Miller Spoolmate weld gun for aluminum welding. For steel welding we use an M-100 weld gun, also from Miller our America Makes project partner. You can see what you are doing with these low cost welders using this:
Software/Firmware
We originally modeled our parts in OpenSCAD, sliced them using Cura, and used an in-house developed firmware known as Franklin. You could use any 3-D modeling software that allows you to export the part as a.STL file (e.g. FreeCAD). If you choose to use Cura, it may be beneficial to download our Cura plug-in. This plug-in helped to transform Cura from a traditionally plastic-based slicing software to a metal-based one; the print paths that work to print plastic parts often do not work with metal. We are currently working on a metal-Cura that goes far beyond the plug in.
If you use Cura, you should manually review the produced GCode as there can occasionally be strange artifacts in the code. Alternatively, you can write your GCode manually. There's currently no ideal, low-cost, open source slicing software ideally suited for metal. We have a graduate student developing a slicing software now, but it is not ready for distribution. Our Franklin site has information regarding download and use of Franklin to control the printer motion. At the bottom of the Franklin site is a link to our recently released paper related to Franklin that has all the details you will need to understand its operation.
Substrate Choice & Cleaning
We print both aluminum and steel on 1/4" thick A36 steel sheets machined to ~6"x6" with rounded corners. We print aluminum on steel as this provides a weak interface so the aluminum samples can be removed from the substrate by hand or with a hammer. If you have the funds, you might also be able to obtain the same effect printing steel on titanium (or on any material that ferrous based metals form brittle phases). Other methods for steel and aluminum are discussed in our papers:
- Substrate Release Mechanisms for Gas Metal Arc Weld 3D Aluminum Metal Printing - how to get your print off the substrate with a hammer
- In Situ Formation of Substrate Release Mechanisms for Gas Metal Arc Weld Metal 3-D Printing
If you employ one of these substrate release mechanisms, keep in mind the first layer is going to look and sound terrible - the goal here IS to get a bad weld. This corrects itself in the subsequent layers.
It is important to clean substrates prior to use to prevent porosity and issues with weld arc formation. We degrease the substrates and then gently abrade them with a scotch brite pad. Gentle abrasion removes oxides and dirt without grinding them further into the substrate. The use of scotch brite pads is controversial in the welding community - some swear by them, others avoid them completely, but we have had good success using them. We rinse the substrates with isopropyl and allow them to air dry thoroughly prior to use. Use of compressed air is not recommended as many compressed air sources contain moisture. Moisture can introduce porosity into welds.
See also: Aluminum substrate cleaning for 3-D printing:MOST
Weld Alloys
Use good-quality weld alloys! We were originally using the cheapest weld alloys we could find on the internet. Not all manufacturers clean oxides or drawing fluid from their weld wire and these can significantly affect weld quality. For aluminum, AlcoTec and Hobart are quality vendors that we have had success printing. Aluminum silicon alloys (4043, 4943, and 4047) seem to be the easiest to print. 0.030" diameter wire is the easiest to work with although you could develop strategies for using larger wire diameters.
Aluminum Weld & Print Parameters
Aluminum Weld & Print Parameters
Weld parameters are dependent on the welder used and the part printed. For a 1"x1.25"x4" testblocks, we have found the following parameters to be a good starting point for multi-layer parts:
- Weld Power: Low - a setting of "1" on the Millermatic 190
- Wire Feed Rate: "55" on the Millermatic 190 ~ 125 mm/sec
- Print Speed: 10 mm/sec
- Wire Stick-Out (distance between weld gun tip and workpiece): 10mm
- Shield gas: Pure Ar at 0.24 L/sec flow rate. This could be increased but I wouldn't decrease this number.
- Layer Height: ~2-3 mm
- Lateral Bead Spacing: ~2-4 mm
- Pause after each layer: 60 sec
With aluminum you are fighting heat; aluminum tends to get hot easily and stay hot. In large, multi-layer parts you want to minimize heat input into the part. In welding, heat input is directly proportional to welding and inversely proportional to weld speed and wire stick-out. Increase power to increase the heat input, increase speed or wire stick-out to decrease heat input. The settings given above are not ideal for single-layers, but have been optimized for multi-layer parts. For single-layers increase power and wire feed rate.
Steel Weld & Print Parameters
Steel is relatively easier to work with. We recommend the following starting settings:
- Weld Power: 5 volts on the Millermatic 190
- Wire Feed Rate: "29" on the Millermatic 190 ~ 25 mm/sec
- Print Speed: 7 mm/sec
- Wire Stick-Out (distance between weld gun tip and work piece): 10 mm
- Shield gas: C25 at 30 CFH (Cubic Feet per Hour)
- Layer Height: 2 mm
- Lateral Bead Spacing: 1 mm
- Pause after each layer: at least 60 sec
You need to clean the nozzle and the head of the weld gun from spatters during the pause after each layer. Please make sure that the holes for shield gas are not clogged by spatters.
Preventing Porosity
Humid environments significantly contribute to porosity in welds. If you can get the system off of the ground floor of a building, employ a dehumidifier, or avoid printing on very humid days, your porosity levels will be lower. Keeping substrates and wires clean will also go a long way toward good prints. Choose good quality weld alloys. Products such as nozzle jellies are available at most hardware stores. You can use them to prevent spatter build up near the contact tip (ensuring a consistent even flow of shield gas), however use of these jellies is commonly known in the welding community to increase weld porosity.
Safety
Please see the section on safety on our original design. Any safety measures one would take for welding should also be adhered to for weld-based 3-D printing. The arc can cause sunburns and long-term exposure has been linked to skin cancer and thyroid cancer. Staring at the arc can result in very painful headaches and damage to the eye. Weld masks and welding curtains prevent this. Welding does produce fumes and weld-based 3-D printing produces more fumes than average welding. Print in a well-ventilated area. We print in a fume hood. Keep the path to ground clean and debris/oxide free. In our delta-based printer, the path to ground is the metal clamp mechanism that holds the substrate in place. Before putting a substrate on the printer, it i' a good idea to clean the clamps with a metal file and/or sandpaper. The welder will find ground; control the path you want it to take to ground to prevent equipment damage.
When in doubt, perusing the online welding forums and welding literature can be incredibly helpful. Standard solutions employed in welding often translate nicely to weld-based 3-D printing.


