
Las Malvinas Botica Popular 2015

| Type | |
|---|---|
| Authors | Carley Bramhill Lexie Folkerts Tanya Garcia allison nerby Annette Penny Kaileigh |
| Location | Las Malvinas, Santo Domingo, Dominican Republic |
| Status | Deployed |
| Years | 2015 |
| Cost | USD 726.68 |

This page discusses the Las Malvinas botica popular project from summer, 2015. This project entails finishing the building of the botica popular that was built by previous Practivistas students in 2013. This includes finishing all of the building's wall plaster, putting in a floor, and providing the necessary materials needed for the electric plan of the building as well.
Background
[edit | edit source]This project was included in Lonny Grafman's Practivistas summer program through Cal Poly Humboldt HSU. It took place from May 22-July 4, 2015 in the small community, Las Malvinas, located in the outskirts of Santo Domingo, Dominican Republic. The task at hand was to finish the botica popular, which was built in summer, 2013, by other Practivista students Las Malvinas botica popular hullkrete 2013. Working with the community, seven Practivistas students designed and implemented this project based on the current criteria at hand. The project team was composed of a group of six students studying at Cal Poly Humboldt, all members of Lonny Grafman's Practivistas program. The project entailed making and applying plaster to the botica, laying out a floor for it, and providing materials needed for the electric plan of the building.

Objective
[edit | edit source]The objective of this project is to complete the botica popular in Las Malvinas in a way that best fits the criteria discussed, while hopefully providing the community with a finished product of what will become a reliable source of much needed medicine.
Criteria
[edit | edit source]The criteria below represents key aspects of this project in weighted form, which is a list of the key elements providing support and foundation to the design and building decisions made throughout. It stands as a guide to all decision-making for this project.
| Criteria and Description | |||||
|---|---|---|---|---|---|
| Criteria | Weight | Description | |||
| Safety | 10 | The structure must provide security for those using it as well as trust in the structure. It is also important that the materials used to create the structure cause no harm to the public, or less harm than the standard, given that necessary safety precautions are taken. | |||
| Durability | 9 | The lifespan is suitable for the consumer given that the money needed to fix or replace the structure can be saved by the time the structure is in need. The structure is also able to withstand the extremes of average weather conditions. | |||
| Environmental Impact | 9 | To have a less negative affect on the world than the standard that's commonly used. | |||
| Aesthetics | 7 | Build a finished looking, smooth and trustworthy structure. | |||
| Time | 6 | The importance of spending all of the constrained amount of time on a given project. | |||
| Educational Value | 6 | The ability for the building to be easily understood and more deeply learned about and replicated if there was a desire to do so. | |||
| Cost | 5 | The importance of spending all of the constrained amount of money on a given project. | |||
| Accesibility of Materials | 5 | The time it takes to obtain a material must be within the constrained amount. As well the ability to transport the material should be taken into consideration for whether it can be carried or delivered in that set amount of time. | |||
Literature Review
[edit | edit source]See Las Malvinas Botica Popular 2015/Literature Review for the research done on this project.
Construction
[edit | edit source]- Picture and file of completed Botica in sketch up.

How To
[edit | edit source]Apply Plaster
[edit | edit source]Below is a table describing a common method for plastering a wall. This table is built on the assumption that one has already gathered materials/supplies and have already made the plaster being used. Also note that there are many different methods of applying plaster to a wall; the following table describes one of these ways.
| Steps | Instructions |
|---|---|
Step 1  |
Level Wall. This is done often in doorways and the tops of walls so that the applied plaster will be evenly distributed along the wall of interest's perimeter. |
Step 2  |
Use the trowel to mix the water in with the plaster to ensure the correct consistency; Use the trowel to lift some of the plaster and drop it. Do this three times until you have a smooth consistency. |
Step 3  |
Water down wall. This can be done easily by poking a hole through the cap of a water bottle and then spraying the wall. |
Step 4  |
Use the trowel to lift some of the plaster and drop it. Do this three times until you have a smooth consistency, now scoop some plaster onto the backside of a trowel and place against wall at an upward, acute angle so that the plaster is in between the wall and the trowel. Apply pressure while pressing upward (sometimes at a diagonal direction) along the wall. Plaster should stick well to the wall. |
Step 5  |
Smooth out small areas of plaster on the wall with a flat/rectangular trowel to give the plastered part a smoother/cleaner look and then repeat this and Step 4 until the entire wall is covered in a layer of plaster. |
Step 6  |
When the wall is covered in plaster, let it dry a little bit for approximately 20 minutes. Less, the wall might be a little too wet for the next step; but more time, the wall will be too dry, making the next step difficult to tackle. |
Step 7  |
Smoothing time for the wall. When smoothing, the wall must be wet to use the wood float, but it's much easier to use a sponge to both wet, and smooth the wall. Using this method, push a wet sponge against the wall in circular motion. Little pressure is needed, but it depends upon how wet the sponge is (more pressure if less wet). The plaster should look blended together and well-distributed, giving the entire wall a smoother/leveled look. During this step, the plasterer must look out for uneven indents or spots on the wall and fill them using Step 4 and 5, if needed. The entire wall needs to be evened and mixed using this sponge method. |
Step 8  |
When the plaster is dry, the wood levels can be taken down, and the wall can then be admired for eternity. |
How To
[edit | edit source]Plaster Test
[edit | edit source]The following table describes the two main tests performed on a dry, plastered wall. These tests will determine whether the plaster will be sufficient in providing enough strength and resilience to use on the wall.
| Steps | Instructions |
|---|---|
Step 1  |
The first of two tests performed for checking if the plaster used is sufficient, is called the "water test". Using a water bottle with a hole in it's cap or side is most useful. Stand in front of the wall and apply pressure to the water bottle so that it is hitting the same place on the plastered wall for about 60 seconds. The duration and distance from the wall are dependent upon the pressure of the water source. The most important thing is to keep these parameters consistent between tests, in order to make meaningful comparisons. If there is no significant indent made in the plaster, the plaster passed the water test. If the water burrows a hole in the plaster, the size of the indentations can be compared. |
Step 2  |
For the scratch test, the second test performed, one must use a metal brush to apply a consistent pressure on the wall while pressing up and down 100 times. If this creates an indent or hole in the plaster, then the plaster used will not pass this test. As with the water test, the degree of failure can be compared to determine the most promising recipes to iterate upon. |
Step 2  |
Scratched the wall 100 times with the wire brush. Almost all of the plaster came off. |
Timeline
[edit | edit source]The following is a timeline composed of the tasks assigned and achieved as well as the dates.
| Date | Tasks | |
|---|---|---|
| 28 May 2015 |
| |
| 29 May 2015 | Meeting with Eddie at Las Malvinas II
| |
| 03 June 2015 | Meeting with Gregorio and Enrique
| |
| 05 June 2015 | Made first iteration of caliche plaster recipe and applied to an inner wall of the Botica | |
| 06 June 2015 | UNIBE Architecture camping day | |
| 07 June 2015 | Research on plaster to decide on materials needed to purchase | |
| 08 June 2015 | Tested dried plaster on inner wall of Botica and gathered supplies | |
| 09 June 2015 | Made 6 different plasters to test that all include different materials such as two types of sand, flour, human hair collected from a local barber
|
|
| 10 June 2015 | Research on flooring to decide on materials needed to purchase | |
| 11 June 2015 | Tested 6 plaster tests, gathered supplies for floors and plaster
| |
| 12 June 2015 |
| |
| 13 June 2015 |
| |
| 14 June 2015 | Plastered three interior walls, window frame, one outside wall and began plastering on two other outside walls | |
| 16 June 2015 |
| |
| 18 June 2015 | Continued plastering and smoothing in the botica | |
| 19 June 2015 | Ordered materials to use for the floor in the Botica since the previously purchased cement was used in plastering | |
| 20 June 2015 | Beach day, required relaxation | |
| 21 June 2015 |
| |
| 23 June 2015 |
|
Costs
[edit | edit source]The following table includes all purchases made to contribute to the Botica Popular. Items are listed multiple times according to how many times they were purchased. Some items were purchased at the same location and some were not.
| Material | Source | Quantity | Costo (RD$) | Cost ($) |
|---|---|---|---|---|
| 25 lb Harina | Colmado Genesis | 1 | 500 | 11.14 |
| Caja Plastica 2" | Ferreteria Cuesta | 4 | 60 | 1.34 |
| Pala Cuadrada | Ferreteria Cuesta | 2 | 760 | 16.93 |
| Nicholson Hoja Segueta | Ferreteria Cuesta | 2 | 74 | 1.65 |
| Bellota Llana P/AL | Ferreteria Cuesta | 2 | 440 | 9.80 |
| Flota de Madera | Ferreteria Cuesta | 4 | 164 | 3.65 |
| Flota de Goma | Ferreteria Cuesta | 4 | 140 | 3.12 |
| 1/2 lb Clavos Acero | Ferreteria Cuesta | 1 | 28 | 0.62 |
| Martillo | Ferreteria Cuesta | 1 | 235 | 5.24 |
| Plywood 1/2" (4'x8') Okume o Brazil | Ferremix | 1 | 980 | 21.83 |
| Madera 1"x4" de 14' Bruta PinoAmer | Ferremix | 7 | 1505 | 33.53 |
| Cepillo de Acerco | Farmacia Carnina | 1 | 35 | 0.78 |
| Plana Albañil | Farmacia Carnina | 2 | 100 | 2.23 |
| Cubeta Plastica 4x5 | Farmacia Carnina | 2 | 300 | 6.68 |
| Cal de 10lb | Ferreteria Suazo | 1 | 60 | 1.34 |
| Cedazo para Albail de Madera | Ferreteria Suazo | 1 | 225 | 5.01 |
| Guantes Damas | Ferreteria Suazo | 3 | 135 | 3.01 |
| Plana China #7 | Ferreteria Suazo | 2 | 120 | 2.67 |
| Mascarilla Especial | Ferreteria Suazo | 7 | 420 | 9.36 |
| Cal Hidratada | Innova Centro | 2 | 576 | 12.83 |
| Funda de Cemento | Ferreteria Vasquez Martes | 6 | 1380 | 30.74 |
| Metero Cúbico de Arena | Ferreteria Vasquez Martes | 1 | 800 | 17.82 |
| 1 Libra de Harina | Ferreteria Vasquez Martes | 4 | 80 | 1.78 |
| Guantes Industrial de Latex | Super Potente el Defensor del Bolsillo | 2 | 132 | 2.94 |
| Pítcher Plastico | Super Potente el Defensor del Bolsillo | 1 | 145 | 3.23 |
| Martillo | Ferremix | 1 | 315 | 7.02 |
| Martillo | Ferremix | 1 | 187 | 4.16 |
| Guantes | Ferremix | 2 | 290 | 6.46 |
| Lona de 3x4 | Ferremix | 1 | 490 | 10.91 |
| Cinta Metrica 8mts. | Ferremix | 2 | 400 | 8.91 |
| Mini-Pala P/Jardin | Ferremix | 3 | 240 | 5.35 |
| Galon de Gasolina (cocina la harina) | Propa Gas | 12.2 | 1000 | 22.27 |
| Scoba | Tienda Local | 1 | 125 | 2.78 |
| Guantes Damas | Ferreteria La Formula | 2 | 100 | 2.23 |
| Llana | Ferreteria La Formula | 1 | 225 | 5.01 |
| Libra Empañete | Ferreteria Local | 1/4 | 225 | 5.01 |
| Libra de Harina | Colmado Genesis | 4 | 80 | 1.78 |
| Libra de Harina | Colmado Genesis | 3.5 | 60 | 1.34 |
| Fundas de Cemento | Ferreteria Vasquez Martes | 7 | 1610 | 35.87 |
| Fundas de Cemento | Ferreteria Vasquez Martes | 7 | 1610 | 35.87 |
| Metero Cúbico de Arena | Ferreteria Vasquez Martes | 1 | 800 | 17.82 |
| Fundas de Cemento | Ferreteria Vasquez Martes | 9 | 1980 | 44.09 |
| Metero Cúbico de Arena | Ferreteria Vasquez Martes | 1 | 800 | 17.82 |
| Mascarilla Desechable | Ferrecentro Peque | 70 | 70 | 1.56 |
| Guante Motorista Trupper | Ferreteria Suazo | 2 | 120 | 2.67 |
| Alambre Picodo | Ferreteria Vasquez Martes | 2 | 80 | 1.78 |
| Disco Corte | Ferreteria "Santa Ana" | 3 | 615 | 13.70 |
| Barra Cuadrada 1/2x20 | Forjados del Caribe | 8 | 2407 | 53.60 |
| Perfil Negro 1x1 | Forjados del Caribe | 8 | 742 | 53.60 |
| Tola Negra Lisa 1/20 4x8 57lb | Forjados del Caribe | 1 | 1132 | 25.21 |
| Tola Negra Lisa 1/20x48x48 (Mitad) | Forjados del Caribe | 1 | 597 | 1329 |
| Cerr. Yale Italy 610-40 | Forjados del Caribe | 1 | 1097 | 24.43 |
| Pestillo -PL-5/8 M/Largo | Forjados del Caribe | 1 | 110 | 2.45 |
| Domastur, Mant. Gris Claro | Forjados del Caribe | 2 | 494 | 11.00 |
| Thinner 1/2 Boltella | Forjados del Caribe | 2 | 102 | 2.27 |
| Brocha Zeus 2" | Forjados del Caribe | 2 | 68 | 1.51 |
| Total | 28781 | 640.93 |
| Material | Source | Quantity | Costo (RD$) | Cost ($) |
|---|---|---|---|---|
| Tomacoriente Blanco | Ferreteria Cuesta | 8 | 544 | 12.12 |
| Alambre Electrica (200 pies) | Ferreteria Cuesta | 2 | 2080 | 46.34 |
| Bticino Caja Plastica | Ferreteria Cuesta | 5 | 135 | 3.01 |
| Caja T/GE Breaker | Ferreteria Cuesta | 1 | 420 | 9.36 |
| Tijera Forjada Corte | Ferremix | 1 | 210 | 4.68 |
| Tape Electrico | Ferreteria Cuesta | 1 | 47 | 1.05 |
| Caja Electrica 2x4 | Ferremix | 3 | 102 | 2.27 |
| Tubos 1/2x19 | Ferremix | 5 | 294 | 6.55 |
| Total | 3832 | 85.75 |
Tests
[edit | edit source]Plastering Day 1: Recipe
[edit | edit source]All measurements have been taken using a 5 gallon bucket with a 12 inch diameter. Some measurements are in inches and some in centimeters for greatest degree of accuracy.
Todas las medidads estan echas usando un cubete de 5 galones con un diámetro de 12 pulgadas. Unas de las medidas estan en centímetros mientras otras estan en pulgadas para mayor grado de precisión.
| Componente | Amount | Español | Source = Fuente |
|---|---|---|---|
| Flour = Harina de Trigo | 6 lb 4 oz | 6 lb 4 oz | Colmado en Las Mavinas |
| Water = Agua | 3 gallons | 3 galones | Enrique y Marta |
| Lime = Cal | 1/4 bucket = 2.75 inches from bottom | 1/4 de un cubete = 2.75 pulgadas del base | Ferreteria |
| Caliche | 9.25 cm from the bottom | 9.25 cm del base | Donated by Vasquez |
| Sand = Arena | Donated by Vasquez |
Plastering Day 1
[edit | edit source]Steps
[edit | edit source]See Botica Plastering Day down page for more accurate wheat paste plaster instructions
-
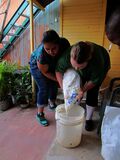 Fig 1a: measuring Flour to add to water to make paste. Boiled 1.5 parts water to flour which was 3 inches of flour in a 5 gal bucket to 4.5 inches water.
 -
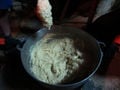 Fig 1b: Wheat paste consistency after cooking. We did this part wrong(correct method on day 2).
 -
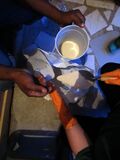 Fig 1c: Measuring cal (lime) to add to water then both to wheat pate. 1/50th parts lime to 1 part water which was about a half cup cal.
 -
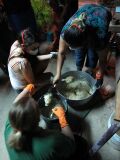 Fig 1d: Adding wheat paste to cal and caliche. Use protection, cal (lime) is toxic to eyes and lungs!
 -
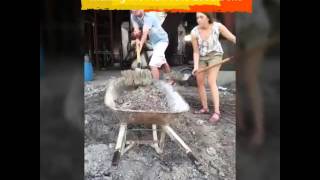
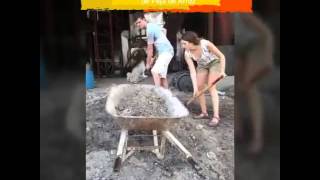
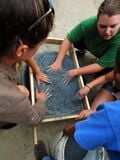 Fig 1e:Sifting sand. Should have sifted twice.
 -
 Fig 1f: Sifting sand close up.
 -
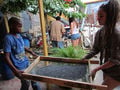 Fig 1g: Dumping large sand chunks after sifting. Should have saved these for use in concrete blocks later.
 -
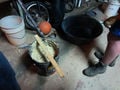 Fig 1h: Flour, cal, and caliche mixed together before adding sand.
 -
 Fig 1i: Mixing sand into plaster ingredients. Hard work! Consistency is almost there.
 -
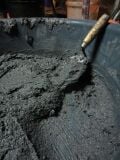 Fig 1j: Finished plaster. Adding sand was eyeballed until consistency was thick and stuck to itself but was still spreadable.
 -
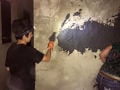 Fig 1k: Applying the plaster to the wall. Had to throw at wall hard. We were missing two crucial tools here that caused our plaster to finished cracked even though it was strong and the misture was good. Day two was done correctly with all necessary tools.
 -
 Fig 1l: Result of plastering, 3 days later (8 Junio). It is cracked because we were missing the lana and goma for he finishing process.


Plastering Day 2: Instructions
[edit | edit source]| Make Wheat Paste Based Eco-Plaster | |||||
|---|---|---|---|---|---|
| Steps | |||||
Step 1: Make wheat paste
| |||||
Step 2: Sift sand and caliche (we forgot to sift the caliche so we had to drain it out of our wet mixture and add more sifted caliche into it which required estimation).
| |||||
Step 3: Mix lime with water. Wear safety gear because lime is toxic to lung health, eyes, and will burn your skin! Then add lime mixture and caliche to flour paste.
| |||||
Step 4: Add sand to texture. You want the plaster to be thick and stick to itself but not be so thick you can't spread it.
| |||||
Step 5: Process your fiber. Wash, dry, and pull apart. We used hair from the local barber shop, but it was likely too short for adequate tensile strength.
| |||||
Step 6: Test your plaster!.
| |||||


Maintenance
[edit | edit source]Maintenance for the botica is fairly straight-forward. Since this building is so significant in the community, giving them access to cheap medicine locally, the utmost care must be given to the building. The building should be monitored for leaks on a consistent and normal basis... especially since the inner wall is covered in natural plaster, which didn't pass both plaster tests, so if exposed to weather, it can be degraded. Taking care of locking up the door at night and not letting children come play inside of the building can extend the life of its features as well.
Conclusion
[edit | edit source]Testing results
[edit | edit source]Below, are the recipes used and results gathered from the different wall plasters applied and tested. Please not flour paste, lime, and caliche were added together into one large batch, then separated into thirds, for 3 batches. Each of the three batches was then divided by 2, and half was used for each test (for example, one black sand with secante and without hair, the other one black sand with secante and with hair). Half of the flour paste mixture for the third batch (to be used to test both sands) was lost, resulting in a smaller batch and thus a smaller quantity of sand used. Quantities of sand recorded are for one third of the batch, not for each individual test.
| Ingredient | Type of Measurement | Plaster 1: Black Sand, no hair, with secante | Plaster 1.2: Black Sand, with hair, with secante | Plaster 2: Yellow/Sharp Sand, no hair, with secante | Plaster 2.2: Yellow/Sharp Sand, with hair, with secante | Plaster 3: Both sands, no hair, no secante | Plaster 3.2: Both sands, no hair, with secante |
|---|---|---|---|---|---|---|---|
| Yellow Sand | trowelfuls (eyeballed to thick goopy texture) | 0 | 4 | 1 | |||
| Black Sand | trowelfuls (eyeballed) | 6 | 4 | 1 | |||
| Human Hair | Handful | 0 | 1 | 0 | 1 | 0 | 0.5 |
| Secante (AS 600 Dryant) | Capful | 0.5 | 0.5 | 1 | 1 | 0 | 0.5 |
| Flour Paste mixture (containts wheat, water, caliche, lime) - follow steps pictured above and quantities listed below | portion of mixture | 1/3 | 1/3 | 1/2 of 1/3 due to accidental loss | |||
| Scratch Test | Passed? | Passed? | Passed? | Passed? | Passed? | Passed? | |
| Water Test | Passed? | Passed? | Passed? | Passed? | Passed? | Passed? | |
| Componente | Amount | Español | Source = Fuente |
|---|---|---|---|
| Flour = Harina de Trigo | Four 20 oz pitches of wheat | Quatre jarras de 20 onzas fluida | Colmado en Las Mavinas |
| Water = Agua | 2 pitches cold water, mixed with the flour until pancake batter consistency (very important! add more flour if not pancakey), then added to 2 pitchers boiling water. | 3 galones | Enrique y Marta |
| Lime = Cal | 3/4 of 20 oz pitcher | 3/4 de una jarra | Ferreteria |
| Caliche | One 5 gallon bucket (9.25 cm of bucket per batch x3 = 27.75 cm, one bucket=~25 cm) | Uno cubeta de 5 galones | Donated by Vasquez |
| Sand = Arena | Eyeballed to thick goopy consistency | Donated by Vasquez |
| Before | After Scratch Test | After Water Test |
|---|---|---|
 |
 |
 |
 |
 |
 |
 |
 |
 |
 |
 |
 |
 |
 |
 |
 |
 |
 |
Discussion
[edit | edit source]Both types of sand performed well when the recipe included secante and excluded a fiber. However, none of the recipes passed the water test adequately for outdoor use. It was decided that the fine sand recipe would be used for the indoor plastering, and a cement recipe would be used for the outside work.
Next steps
[edit | edit source]The current state of the Botica Popular is that the construction is completed, paint may be added if desired, the 2015 Solar Team installed a solar panel that provides electricity to the building as well as installed lighting. One of the members of the community, Enrique, installed a door and windows to the building which means that all solar equipment is protected. A floor was also installed into the Botica Popular so the only thing lacking is medicine and someone to sell the medicine. We hope the Botica Popular will be running soon.
Current State
[edit | edit source]Today the Botica Popular in Las Malvinas is completed. The Naturals Building team reinforced exterior and interior of necessary areas with plaster. We perfected windows and door-ways with symmetry. The Solar team installed a fully working system. This system provides the building with electricity. There is a door securing entry and all windows are finished. The Botica is ready for operation and business!
Team
[edit | edit source]The Las Malvinas natural building team, Practivistas 2015:

Natural Building Team Video
[edit | edit source]English
Español
| Authors | |
|---|---|
| License | CC-BY-SA-3.0 |
| Organizations | Practical Action, Practivistas Domincana Program, Cal Poly Humboldt |
| Cite as | Kgv40, Lexington333, APenny6, Henry Chinaski, Aen131 (2015–2025). "Las Malvinas Botica Popular 2015". Appropedia. Retrieved July 9, 2026. |