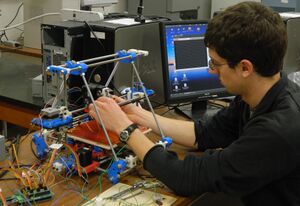
Build[edit | edit source]
- Assemble the complete extruder with motor and test before putting it on the x-axis carriage.
- Get a heated build platform.
- Don't tighten fasteners running through/in printed parts too much - it's plastic that will deform and break, sometimes surprisingly easily. It's better to use nylon locking nuts or jam nuts if there is concern about backing out.
- Resist the urge to manually push filament through the extruder when things aren't going right there. The x-axis carriage and ends take the bulk of the force, and they won't like it for very long.
- Use several layers of heat shrink tubing or acrylic tubing on the ends of the z-axis motors to build up the diameter. The two part, clamp-style couplings have recesses that are too large for the standard NEMA 17 motor shaft. If the z-axis clearance seems to constantly drift, check these couplings for slippage.
- Use fine steel wool (#000/#0000) on the smooth rods prior to assembly. This simple step makes for a noticeably smoother surface. Try it, you'll like it.
- Chamfer the ends of threaded rods with a file prior to assembly. This helps minimize cuts and scrapes later.
- A sharp razor knife (x-acto) is useful for cleaning out nut cages/traps, holes and deburring gears.
- The x-axis guide rods must be very secure in the x-axis motor and idler ends or there is a tendency to pull the ends towards each other upon tightening the x-axis belt (which must be very tight to produce quality prints). X-axis ends that have the snap-on z-axis PLA bushings will tend to pull those bushings off the z-axis guide rods at inopportune moments. There are alternative x-axis ends that address all or part of this issue, but a quick fix is to print out four bar clamps to fix to the motor side x-axis guide rod. The x-axis guide rods should be under compression rather than radially loading the z-axis guide rods and bushings.
- The Prusa kit as-supplied had snap-on PLA bushings on all of the guide rods. The y-axis carriage (bottom plate that bushings are attached to) was slightly warped and resisted efforts to straighten. There is some corner-to-corner wobble (+/-1mm) in the z-direction which hasn't caused significant print quality issues. Y-axis bushings will be replaced with LM8UU-style bushings to try and alleviate the problem.
Calibration[edit | edit source]
- Spend time on bed leveling and extruder calibration.
- Watch the printer for a long time and get a feel for what it's doing. Make little adjustments to E-steps/mm such that little to no tweaking is required in the slicing software. (IMO, good calibration doesn't require cheats to produce the desired result; good calibration is setting parameters such that predictable results can be reproduced time and again.)
- Print a few small parts like end stop holders, belt clamps or bar clamps for calibration tests. They tend to highlight issues with calibration, consume less filament and often are still useable even if ugly. The belt clamps are particularly useful for observing the accuracy of E-steps as they require a lot of solid infill but minimal filament to produce.
Printing[edit | edit source]
- Keep the print area draft free. Drafts exacerbate warping and increase power consumption to maintain heated bed and hot end temperature.
- Let the heated bed get to temperature before printing to minimize warping.
- Keep the heated bed at temperature until several layers (15-20) are laid down to minimize warping. Leave it at T for the full print for best results.
- If printing parts having small z-axis cross sectional area, print several at a time so that each has more time to cool between layers. Printing such parts singly will require a fan to cool the extrudate more rapidly, or be prepared for a very ugly print. Try printing a single guidler (http://www.thingiverse.com/thing:17030) and watch what happens to the guide with no forced convection cooling. There are some cooling options built into slicing software, but I haven't yet played with them.
- Don't make big changes in hot end temperature mid-print. Odd things happen.
- Don't over cool prints by pushing lots of air on them, inter-layer bonding takes a hit and they can delaminate.
- Watch the filament path and keep it tangle-free and unobstructed.
- It's possible to adjust build platform height while the first layer is printing if the bed is setup for single wrench/finger adjustment. If the first layer isn't sticking, quickly raise the build platform a little.
- Built a spool holder that fit on top of the Prusa. It was a disaster that highlighted carriage instability. The printer swayed to and fro like a drunkard when the x-carriage made fast moves back and forth (a frequent occurrence) and print quality went bye-bye. Don't put anything on top of the printer.
- If circular cross sections (in the z-direction) look oval, uneven or football shaped, check x and y-axes timing belt tension. They have to be tight.
Oh, I Wish[edit | edit source]
- For a magnetic build platform to stick foam insulation to with magnets (in the works).
- For more rigid x-axis carriage and ends (evaluating other designs).
- For a real calibration procedure (as in the type used with analytical instruments) so gcode that produces good results on one printer could be expected to produce good results on all printers with like mechanicals (in the works).
- For a single z-axis motor mounted on the bottom of the machine (evaluating other designs).
- For a single software solution in which parts can be designed parametrically (see Alibre's definition) and the press of a 'print' button magically sends the newly designed part to the printer.

