| Line 31: | Line 31: | ||
|lines=4 | |lines=4 | ||
|title=Fabrication Instructions | |title=Fabrication Instructions | ||
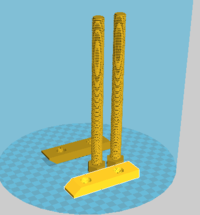
|Image:1_Pedal.JPG| | |Image:1_Pedal.JPG| 1. After downloading all .stl files from Youmagine, begin by printing two halves of the pedal with the orientation shown. Ensure there is enough support. Print time: 3 hrs 18 mins each half at 70 mm/s | ||
|Image:2_Pedal.JPG| Print the | |Image:2_Pedal.JPG| 2. Print six clips with the orientation shown. Print time: 1 min each at 70 mm/s | ||
|Image:3_Pedal.JPG| | |Image:3_Pedal.JPG| 3. Print one axle with the orientation shown (for smoothest surfaces). Print time: 38 mins at 70 mm/s | ||
|Image:4_Pedal1.JPG| | |Image:4_Pedal1.JPG| 4. Place all six clips and the axle on one half of the pedal as shown. | ||
|Image:5_Pedal.jpg| | |Image:5_Pedal.jpg| 5. Place second half of pedal on top as shown. | ||
|Image:6_Pedal.jpg| | |Image:6_Pedal.jpg| 6. Apply force to snap clips into place. The final product is as shown. Assembly should take a total of no more than 2 minutes. | ||
}} | |||
{|style="border:1px solid #73BF73; background-color: #E6FFE6; margin-left:.1em; margin-top:2px; -moz-border-radius:15px;" align="right" width="150px" | {|style="border:1px solid #73BF73; background-color: #E6FFE6; margin-left:.1em; margin-top:2px; -moz-border-radius:15px;" align="right" width="150px" | ||
!<big>Example video summary of textbook</big> | !<big>Example video summary of textbook</big> | ||
| Line 65: | Line 47: | ||
=== Common Problems and Solutions=== | === Common Problems and Solutions=== | ||
* | * Don't forget to put support everywhere on the pedal halves. Be sure to select "Everywhere" instead of "Touching Buildplate". | ||
* Ensure all pieces are printed with the orientation shown. | |||
== Cost savings== | == Cost savings== | ||
Revision as of 01:55, 5 December 2019
Bike Pedals
Project developed by [Mitchell DeNooyer]
Template:Statusboxtop Template:Status-design Template:Status-prototype You can help Appropedia by contributing to the next step in this OSAT's status. Template:Boxbottom
Abstract
- A bike is a very useful mode of transportation that many people in first-world countries take for granted. There has been a goal set to create a cheap bike using primarily 3D printed parts. This bike pedal is a good prototype for what the possibilities are for this project. This pedal is fully 3D printed and clips together around a bar/axle. The goal is that this pedal would be easy to switch out and allows for rotation around the axle but not in other directions. This is still a rough prototype and would need more work to be implemented fully onto the bike.
- Picture of completed print using your printer

Bill of Materials
- Plastic Filament (PLA preferred)
- Upload and link to all source files from open source CAD
- Upload and link to all STLs
Tools needed for fabrication of the OSAT
- MOST Delta RepRap or similar RepRap 3-D printer
- Knife of some sort to clean up parts
Skills and Knowledge Necessary to Make the OSAT
- Be sure you are able to load an STL into a slicer and orient it the correct way
Technical Specifications and Assembly Instructions


| Example video summary of textbook |
|---|
Error in widget YouTube: Unable to load template 'wiki:YouTube' |
Common Problems and Solutions
- Don't forget to put support everywhere on the pedal halves. Be sure to select "Everywhere" instead of "Touching Buildplate".
- Ensure all pieces are printed with the orientation shown.
Cost savings
- If your solution is not a low cost one then it is not really appropriate.
- Estimate your costs
- Find a commercial equivalent, cite it and put the [url in square brackets]
- Calculate $ savings and % savings
Benefited Internet Communities
- Name and add links to at least 5 using single brackets around [url name]
References
- The sources of information (e.g. engineering handbooks, journal articles, government documents, webpages, books, magazine articles etc.). References should use the <ref> </ref> and <references/> tags and can be in any format but should include all the information necessary for someone else to find the same information you did. For example: [1]
- ↑ web page: Department of Energy (DOE) Landscaping and Energy Efficiency, DOE/GO-10095 (1995) Available: http://www.eren.doe.gov/erec/factsheets/landscape.html
Based on the developmental needs addressed (e.g. food, heat, electricity, clean water, health care, etc.) be sure to label your device in the proper categories e.g. use [[Category:Water]]. Be sure to categorize your device so that it will be easy to find – for example “Low voltage connection basics” is categorized in [[Category:How tos]] [[Category:Electricity]] [[Category:Electric lighting]].