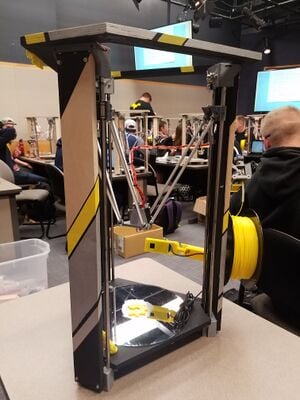
The Athena II 3D printer is a RepRap derived from the Athena Delta Printer, requiring CNC router-cut wooden parts. It is designed to be even easier to assemble, having around 50 fewer fasteners, requiring less wood, fewer printed parts and fewer cables.
Franklin firmware, while developed for all 3D printers, is a perfect fit for the Athena. It natively supports delta printers with built-in positioning algorithms that calculate delta movements (instead of tricking Cartesian firmwares into doing delta movements as has typically been done). It presents the control interface as a web page, meaning that no software installation is required on the client. It also includes all of the features necessary to take full advantage of Athena's flexibility. For more information, visit Franklin firmware github repository.
Novice builders should be aware that while this design is simple to assemble as compared to historical RepRaps, it is still not trivial. Review the MOST RepRap Primer and familiarize yourself with terminology and methods. Assembly instructions are detailed and include many images. This is a living document so if a step is missing or difficult to understand, please make an attempt to correct it.
For questions on use: email: most-delta-users-l@mtu.edu
Printer capabilities/statistics[edit | edit source]
- Print media: PLA; ABS with PLA raft; addition of a heated bed will expand media options
- Filament diameter: 1.75mm
- Nozzle diameter: 0.4mm (can be changed)
- Print volume: 220mm diameter, 210mm high semi-cylindrical shape
- A variety of print controllers can be used; this version uses a Melzi combined with a Beaglebone Green running Franklin firmware
- Energy use: During printing it uses about 40W and slightly more on warm up. e.g. 4 hour print uses 0.23 kWh
Files and Bill of Materials[edit | edit source]
Available at Github. Files include OpenSCAD designs and STLs of all components along with the BOM.
Tools[edit | edit source]
Same as MOST Delta
Consumables[edit | edit source]
Same as MOST Delta
Before You Begin[edit | edit source]
Review the process below and collect all of the tools and consumables you need to begin the build. The list of tools above is not necessarily exhaustive.
Required Software[edit | edit source]
- Firmware of your choice. Franklin firmware [1] should be preinstalled for workshops.
- A slicer for converting solid models to g-code for printing: Cura slicer or slic3r or other.
- A printer interface: the choice of interface depends upon the firmware selected. Franklin requires only a non-Microsoft web browser (i.e. not MS Edge or MS Internet Explorer).
Assembly[edit | edit source]
Assembly is organized by functional group.
For those participating in workshops, some of the assembly is completed before the workshop. Only those parts of the process highlighted green are required.
Note that all of the pictures in the process can be enlarged by clicking on them.
| Preparatory Materials | ||
| Printer Primer | ||
| Overview | ||
| AthenaII Printed Parts Glossary | ||
| Non-Workshop Tasks | ||
| Assembling hot end | ||
| Soldering and tinning | ||
| Workshop Tasks | ||
| Track 1 | Track 2 | Track 3 |
| Connecting Rods | Frame | Epoxying Magnets |
| Epoxying Magnets | Connecting Rods | End Effector |
| Extruder Drive and Spool Holder | Epoxying Magnets | Frame |
| End Effector | Extruder Drive and Spool Holder | Connecting Rods |
| Frame | End Effector | Extruder Drive and Spool Holder |
| Final Mechanical Assembly | ||
| Before 2019 | Starting 2019 | |
| Wiring/Melzi + BB | Wiring/Athena Board | |
| Firmware and Calibration | Firmware and Calibration - (Wireless Setup) - (Update Franklin) | |
| Software and First Print | ||
| Follow-up information | ||
| Printing Basics | ||
| Maintenance | ||