
NREMT Skillset/Vital Signs Assessment
| Part of | NREMT Skillset |
|---|---|
| Subskill of | Airway Breathing Circulation Head Trauma Spinal Trauma |
| Subskills | Blood Pressure Auscultation Lung Sound Auscultation Capillary Refill Assessment Respiratory Rate Assessment Skin Sign Evaluation Blood Pressure Palpation Pulse Points and Palpation Pupil Evaluation |
| Equipment | EMS Jump Bag |
| Acting roles | EMR EMT emergency medical responder emergency medical technician paramedic |
| Pathologies | congenital |
| Body systems | circulatory system respiratory system |
| Body parts | arm(s) chest eyes head thorax upper extremities |
Vital Signs (VS) include the measurement of pulse, respiratory rate, blood pressure, and temperature. These numbers provide critical information (hence the name "vital") about a patient's state of health. Vital signs are included in this California-based EMT program as mastery of this skill is required for several of the higher level skills tested for California Registration.[1]
As a first responder in the field, an extended set of vital signs are typically taken as part of the secondary assessment which also includes notation/auscultation of lung sounds while taking respiratory rate, examination of pupil reaction, evaluating skin signs, and when appropriate and available, measuring blood oxygen saturation (SPO2) using a Pulse Oximeter.
It is important to recognize that these findings are part of the complete patient History and Physical. Remember to evaluate the patient as a whole - a patient may have normal VS findings, but still have an underlying issue that will need further assessment to determine the overall patient condition. In short, don't be quick to react to the patient only because of their vital signs alone.
Normal Vital sign values at various ages
[edit | edit source]| Age | Pulse Rate
(Beats/minute) |
Respirations
(breaths/minute) |
Systolic Blood
Pressure (mmHg) |
Temperature
(°F/C) |
|---|---|---|---|---|
| Neonate (0 to 1 month) | 90 to 180 | 30 to 60 | 50 to 70 | 98 to 100°F / 37 to 38 C |
| Infant (1 month to 1 year) | 100 to 160 | 25 to 50 | 70 to 95 | 96.8 to 99.6°F / 36 to 37.5 C |
| Toddler (1 to 3 years) | 90 to 150 | 20 to 30 | 80 to 100 | 96.8 to 99.6°F / 36 to 37.5 C |
| Preschool Age (3 to 6 years) | 80 to 140 | 20 to 25 | 80 to 100 | 98.6°F/ 37 C |
| School Age (6 to 12 years) | 70 to 120 | 15 to 20 | 80 to 110 | 98.6°F/ 37 C |
| Adolescent (12 to 18 years) | 60 to 100 | 12 to 20 | 90 to 110 | 98.6°F/ 37 C |
| Adults (19+ years) | 60 to 100 | 12 to 20 | 90 to 140 | 98.6°F/ 37 C |
Pulse
[edit | edit source]The pulse can be felt at any place where there is a large artery (e.g. carotid pulse, brachial pulse, radial pulse, femoral pulse) or detected by listening over the heart with a stethoscope. As part of the primary assessment it is helpful to feel both radial arteries simultaneously to detect asymmetries or to alert you to any abnormalities such as a particularly weak, slow, or bounding pulse. In an awake adult patient with normal blood pressure, the pulse rate is typically measured as part of the secondary assessment by palpating the radial pulse and counting the beats in a standard time window. In infants, palpate the brachial or femoral pulse. Palpate the carotid pulse in children older than 1 year.[3]
- To obtain a radial pulse, place the tips of two to three fingers, (usually your index, middle, and ring finger if you use three) just proximal to the patients wrist on the thumb side, orienting them so that they are both over the length of the vessel.
- Press your fingers in the groove closest to the edge of the arm close to the wrist
- The pulse is measured by rate, or Beats Per Minute (BPM), regularity, and strength. To obtain a pulse rate, count the beats your finger tips feel for 30 seconds and multiple by 2. That will give you the patients rate for one minute. In a more emergent situation, counting beats for 15 seconds and multiplying by 4 is acceptable, but potentially less accurate.
- The pulse rate can be measured if you are using a pulse oximeter, but be careful of inaccurate readings in shock situations. The pulse oximeter will not measure regularity or strength.
Respiratory Rate
[edit | edit source]Respirations are recorded as breaths per minute. Respirations is measured by rate, effort, and the presence or absence of adventitious or abnormal lung sounds. To obtain an accurate rate, it is important that the patient is not aware that you are counting their respirations so that they do not consciously alter their rate of breathing. This can be done by observing the rise and fall of the patient's chest while you still appear to be taking their pulse. To obtain a patient's respiratory vital signs:
- Keep your fingers on the patients wrist, and observe the patient's chest/abdomen area.
- Watch the rise and fall of the chest/abdomen and count the breaths (a full in and out cycle is one breath) for 30 seconds and multiple by 2, will give you the patients rate for one minute.
- Note if the breathing is labored, irregular, has abnormal sounds on inspiration or expiration, or if the patient is using accessory muscles to breathe.
- Auscultate breath sounds with your stethoscope in the upper and lower fields of each lung.
Normal for adults is between 12 and 20 breaths per minute with "clear lung sounds".[4] Adventitious, or abnormal, breath sounds should be noted.
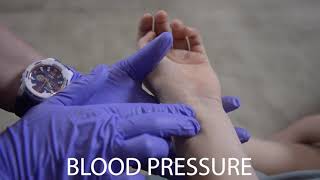
Blood Pressure (BP)
[edit | edit source]The blood pressure is the pressure in the vascular system and is reported in millimeters of Mercury (mmHg) as both the systolic and diastolic pressure. The systolic pressure is the measurement of the peak pressure in the artery generated by the contraction of the left ventricle (systole), whereas the diastolic is the residual pressure within the arteries in between contractions (diastole). The EMT is taught two methods to obtain a BP, palpated (to feel) and auscultated (to listen).
Palpated BP method
[edit | edit source]The palpated method can be used if you do not have a stethoscope, the environment is to noisy to hear using a stethoscope, or you want to quickly obtain a baseline BP on a critical patient during the primary assessment. The palpated method will only give you the systolic blood pressure (SBP).
- Select the correctly sized cuff. The cuff should wrap 1 to 1.5 times around the arm, and take up 2/3 the distance from the elbow to the armpit. Too large a cuff may give you artificially low readings, and too small a cuff can read high.
- The BP cuff should be placed directly on the skin on an uninjured arm (i.e. do not put it over clothes or proximal to an injury). Sliding a loose fitting t-shirt up so that the skin is exposed is fine. However, try not to roll tight fitting or bulky shirts up over the bicep. If you are unable to roll clothing up, have the patient remove their clothing if awake and responsive, or cut the clothing off in an unstable patient situation.
- Wrap the cuff around the patient's upper arm so that the line marked "artery" is roughly over the brachial artery, located towards the medial aspect of the antecubital fossa (i.e. the crook on the inside of their elbow). The placement does not have to be exact nor do you actually need to identify this artery by palpation.
- Turn the valve on the pumping bulb clockwise (may be counter clockwise in some cuffs) until it no longer moves. Caution should be taken to not force the valve in the open or closed position as it can become stuck. This is the position which allows air to enter and remain in the bladder.
- Place your finger tips on the radial pulse. Pump up the BP cuff paying close attention to the pulse. Once you feel the pulse go away, pump the BP cuff 20 to 30 above the number.
- Now slowly deflate the blood pressure cuff (i.e. a few mm Hg per second) by turning the valve in a counter-clockwise direction while feeling over the radial artery and watching the pressure gauge. The first pulse your fingers feel is the return of blood through the no longer completely occluded radial artery. The needle on the manometer (gauge) at this moment is the SBP. Note, although the needle may oscillate prior to this time, it is the feel of blood flow that indicates the SBP.
- Once you have that number you can open up the valve and let the remaining air out of the cuff.
In a field setting it's common to obtain the palpated BP (only systolic reading) first and it is documented as systolic pressure/P to indicate palpated (i.e. 110/P). When you subsequently obtain your auscultated BP, pump up the cuff 20 to 30 mmHg above the palpated reading.
Auscultated BP method
[edit | edit source]The placement of the blood pressure cuff (steps 1-4 above) is the same for the palpated method. To auscultate:
- Slide the bell of your stethoscope under the edge of the blood pressure cuff over the site of the brachial artery (located towards the medial aspect of the antecubital fossa), and hold in place with your left hand. Use your right hand to pump the bulb until you have generated 150 mmHg on the manometer (or to 20 to 30 mm Hg above your previous systolic pressure if this is a repeat measurement). This is a bit above the top end of normal for SBP.
- Then listen. If you immediately hear a pulsatile sound, you have underestimated the SBP. Close the valve and pump up an additional 20 mmHg and repeat.
- Now slowly deflate the blood pressure cuff (i.e. a few mm Hg per second) by turning the valve in a counter-clockwise direction while listening over the brachial artery and watching the pressure gauge. The first sound that you hear is the return of blood through the brachial artery which is no longer being occluded by the pressure in the cuff. The needle on the manometer (gauge) at this moment is the SBP. Note that although the needle may oscillate prior to this time, it is the sound of blood flow that indicates the SBP.
- Continue listening while you slowly deflate the cuff. At the point when the sound completely disappears, you have reached the diastolic blood pressure (DBP). This is the point when the pressure within the vessel is greater than that supplied by the cuff, allowing the free flow of blood without turbulence and thus no audible sound. Your auscultated BP would be documented as systolic pressure/diastolic pressure (e.g. 110/70).
Pupils
[edit | edit source]Pupils in a healthy patient should be equal, round and reactive to light. When testing the pupils, use a fairly weak light source such as a pen light and keep the the illumination brief. A very bright light can cause discomfort or damage to the eyes. More information can be found at this link: pupillary light reflex, and in the skill video.
- To test for pupil reaction shine your light into one eye briefly advancing it from the side of the patient head and look for constriction. Repeat this on the opposite side of the patient head. Normal pupils will constrict rapidly.
- An additional assessment would be to shine your light into one eye and observing the other eye for constriction or consensual response.
- Test for accommodation by having the patient focus on a distant object and then on your finger as you move it from a distance to the bridge of their nose. When they focus on the distant object, their pupils should dilate, but as they focus on the close object, the pupils should constrict.
Pupils can be checked if you do not have a light. In a well-lit room you can have the patient close their eyes and open them on command, observing for any abnormalities. You can also do this outside as long as you don't have the patient look directly at the sun.
Skin signs
[edit | edit source]The skin can tell you a lot about the patient's wellbeing and allow you to evaluate how well the blood is circulating and reaching the tissues (perfusion), presence or absence of sweating (diaphoresis), and any temperature abnormalities that might indicate fever (hyperthermia) or cold exposure (hypothermia). Your first observation of skin signs typically happens when you are forming your general impression, in the secondary assessment you are working through them more methodically.
- Capillary Refill/perfusion: Perfusion is observed both with baseline color and with a capillary refill test. Independent of the patient's general pigmentation, the skin of the palms, nail beds, inside of the lips, and eyelids can be examined and with normal circulation they should be "pink" from the presence of oxygenated blood. In the presence of hypoxia, these areas may appear bluish or "cyanotic". To perform a capillary refill test on the fingers briefly press the nail bed. Observe the return of blood back into the nail bed. It should be under 2 seconds for male adults and children, 3 seconds for females, and 4 in the elderly, but can be significantly delayed if the extremities are cold.
- Diaphoresis: Profuse sweating (diaphoresis) in the absence of heat or exercise can be a response to shock or emotional distress. Absence of sweating on a hot day can be a sign of heat stroke. At baseline, most people have fairly dry skin. Take note of the character of the skin, and if it is out of step with what you would expect from conditions.
- Temperature: Even without a thermometer, abnormally high or low body temperatures can be detected by the first responder in reference to your own body temperature. When checking warmth, you should use the back of your hand on the patient's forehead. It's also common to assess several areas on the body as exposed extremities may be a different temperature as circulation problems, temperature of the environment, and/or the patient's clothing can alter this finding.
Document any abnormalities found throughout your assessment as deviations from the normal skin signs of "pink, warm, and dry with normal capillary refill."
Temperature
[edit | edit source]This is generally obtained using an oral or a non-contact forehead scan thermometer that provides a digital reading. Temperature is measured in either Celsius or Fahrenheit, with anything above 100.4°F (38°C) considered abnormal.[5] Rectal temperatures, which most closely reflect internal or core values, are approximately 1 degree F higher than those obtained orally or at the armpit or forehead.[6] Both low and high temperatures may be clinically significant. While no longer included in the most updated definition of sepsis, abnormal temperatures (< 96.8° F (36° C) or > 100.4° F (38° C)) are still a part of SIRS criteria used by many prehospital providers as part of their local protocols.[7]
Oxygen Saturation (SpO2)
[edit | edit source]A patient's peripheral blood Oxygen saturation, or SPO2 can be measured via a pulse oximeter which is a noninvasive means of measuring both pulse rate and the arterial oxygen saturation of hemoglobin at the peripheral capillary level. It consists of a portable monitor and a photoelectric sensing probe that clips onto the patient's finger, toe or earlobe. The sensing probe measures the amount of red and infrared light being absorbed as blood flows through the capillary beds allowing a ratio of oxyhemoglobin to deoxyhemoglobin and therefore the peripheral oxygen saturation percentage (SpO2) to be calculated. As the total absorption fluctuates with the pulse, the monitor calculates the time between the peaks of light absorption and displays a pulse rate in beats per minute. A SPO2 reading below 94% could mean there isn't enough oxygen in the blood to meet the body's needs. The following are situations that may alter the reading:
- Nail polish
- Cold fingers
- Poor peripheral circulation at baseline or secondary to shock
- Darkly pigmented skin (in a recent study it was found that hypoxia is missed in 12% of Black patients and approximately 4% of white patients[8])
- Falsely elevated readings from bound but unusable hemoglobin e.g. CO poisoning.
Alternate sites such as the toes or earlobe may be tried if the fingers are either injured, or suspected of giving an erroneous reading secondary to peripheral perfusion. In darkly pigmented patients, do not overly rely on an apparently normal pulse oximetry reading if the patient's other clinical signs indicate respiratory insufficiency.
Documentation
[edit | edit source]Documentation of the Vitals should be included in the Patient Care Report (PCR) in the form:
- Many PCR/EPCR systems have integrated vital signs menus. If this is the case, try not to "double up" on your vital sign reporting (once in the menu, once in the narrative). PCRs are legal documents, and reporting one vital sign in a menu and another in your narrative could weaken your case if brought to court for one reason or another. In the case of paper PCRs or documentation in the narrative, be sure to fully describe the vital sign in question with all qualifiers.
- For example, writing "HR 72" lets the reader know nothing but the physical number of beats of the patient's heart. There is a significant difference between "HR 72 strong, regular" and "HR 72, weak and thready". In both cases, the physical rate was identical, but the second patient is much more likely to need intervention or transport.
Self Assessment
[edit | edit source]- Pulse — Test your ability to detect the radial pulse in yourself and family members/classmates. If you have a pulse oximeter, check your accuracy against the pulse oximeter reading.
- Blood Pressure — Use the blood pressure cuff on yourself and have a friend inflate and slowly release the valve. Observe the pulsatile movement of the needle starts to occur before you hear anything. Then lower, note the point at which you feel the blood beginning to flow again and verify that it corresponds with the point at which you first hear the sound of the pulse at the brachial artery (if not, adjust the positioning of your stethoscope). Palpate the radial artery and note when you feel a return of the pulse (likely to be several mm Hg lower than when you feel the return of blood flow)
- Lung Sounds Test yourself with the Lung Auscultation Skill Sheet
- Pupils — In a relatively dimly lit room with a mirror, practice bringing a pen light in from the side to induce pupillary change in yourself. This will help calibrate you to how long to shine a light for a normal response without causing discomfort in your patient.
- Test your knowledge with these quizzes:
Tips and Tricks
[edit | edit source]- As with many aspects of emergency care, investigate abnormal findings. Ask your patient if they know what their normal blood pressure is, or if they have noticed changes to blood pressure recently. A patient with a blood pressure of 120/80 who is normally at 186/110 has experienced a significant drop from their norm.
- If you have difficulty determining if someone has "normal" skin signs, ask family members/friends. These people are valuable sources of information about your patient; after all, chances are they have known the patient significantly longer than you have!
Additional Resources
[edit | edit source]- To investigate the physiology behind blood pressure and the different types of blood pressures and monitoring (venous, palpated, auscultated, invasive arterial), go here.
References
[edit | edit source]- ↑ https://emsa.ca.gov/wp-content/uploads/sites/71/2017/07/Skills-Form-7.1.17.pdf
- ↑ Pollak, Andrew N. (ed.) (2021). Emergency Care and Transportation of the Sick and Injured (12th ed.). p. 254. ISBN 9781284246223.
- ↑ Pollak, Andrew N. (ed.) (2021). Emergency Care and Transportation of the Sick and Injured (12th ed.). pp. 1299-1300. ISBN 9781284246223.
- ↑ Pollak, Andrew N. (ed.) (2021). Emergency Care and Transportation of the Sick and Injured (12th ed.). p. 632. ISBN 9781284246223.
- ↑ Pollak, Andrew N. (ed.) (2021). Emergency Care and Transportation of the Sick and Injured (12th ed.). p. 1327. ISBN 9781284246223.
- ↑ Citation needed.
- ↑ Gül, F. et al. (2017). Changing Definitions of Sepsis. Turkish journal of anaesthesiology and reanimation, 45(3), 129–138. https://doi.org/10.5152/TJAR.2017.93753
- ↑ Sjoding, M. W. et al. (2020). Racial Bias in Pulse Oximetry Measurement. The New England journal of medicine, 383(25), 2477–2478. https://www.nejm.org/doi/10.1056/NEJMc2029240
| Authors | Global Surgical Training Challenge |
|---|---|
| License | CC-BY-SA-4.0 |
| Cite as | GSTC, Dwh904, JHantke, Caleb (2020–2026). "NREMT Skillset/Vital Signs Assessment". Appropedia. Retrieved July 17, 2026. |