
NREMT Skillset/Pulse Points and Palpation
| Subskill of | Blood Pressure Palpation Vital Signs Assessment Circulation |
|---|---|
| Subskills | Carotid Pulse Palpation Radial Pulse Palpation Brachial Pulse Palpation Femoral Pulse Palpation Dorsal Pedal Pulse Palpation Posterior Tibial Pulse Palpation |
| Equipment | Wristwatch with second hand |
| Acting roles | EMR EMT emergency medical responder emergency medical technician paramedic |
| Body parts | abdomen arm(s) brachial artery carotid artery chest feet femoral artery hands head leg(s) lower extremities posterior tibial artery radial artery thorax upper extremities |
The pulse is a pressure wave generated by the left ventricle as it ejects blood into the arteries. It can be palpated (felt) at any place where a large artery such as the carotid, brachial, radial, or femoral arteries pass close to the surface of the body and can be pressed against a firm underlying structure such as a bone or fascia. The pulse points are named for the artery being palpated. In general, to palpate pulses:
- Place the tips of two to three fingers, (usually your index, middle, and ring finger if you use three) over the pulse point - never use your thumb as it is easy to confuse your own pulse for that of the patient's if you use your thumb.
- Keep it light. Too much pressure, especially in instances of low blood pressure can cut off the pulse at the site you are checking, so it is important to try lightening your finger pressure when having difficulty palpating a pulse.
- Try shifting. Humans are very variable, and the anatomical landmarks for finding pulses will often only get you 'close'. Try shifting slightly around the landmark if you have difficulty finding it
- Note the rate, regularity, and strength of the pulse as well as location. To obtain a pulse rate in beats per minute (BPM), count the beats your finger tips feel for 30 seconds and multiple by 2. In a more emergent situation, counting beats for 15 seconds and multiplying by 4 is acceptable, but potentially less accurate.
- In a trauma situation where the patient is unstable, consider marking the site where you successfully palpated the pulse to aid in re-checks
Alternate measures:
- The pulse rate can be measured if you are using a pulse oximeter, but be careful of inaccurate readings in shock situations. The pulse oximeter will not measure regularity or strength.
- The pulse may also be detected by listening over the heart with a stethoscope, although this cannot determine the effectiveness of the heartbeat, only its presence. Only palpation can alert you to any abnormalities such as a particularly weak, slow, or bounding pulse.
Different pulse points have different roles in clinical situations.
The Unconscious patient
[edit | edit source]Your first goal in checking an unconscious patient's pulse is determining whether they have one. In most unconscious patients, where shock and hypoperfusion may be causing the Altered Level of Consciousness (ALOC), the first pulse point to check is a central pulse such as the carotid pulse as it is closest to the heart and the least likely to give you a false negative finding. In Infants below 1 year, the first point to check is the brachial pulse.
Trauma and Medical Emergencies
[edit | edit source]In trauma or medical emergencies that are neurologic or cardiovascular in nature, not just the presence of a pulse central pulse (such as Carotid or Femoral), but the symmetry and distribution of the pulses in the extremities that gives you essential clinical information.
- The diminished pulses in all extremities can be a sign that the patient is close to shock
- Asymmetric pulses can indicate that the trauma to a limb, or vascular damage such as an aortic dissection is leading to uneven blood distribution or even complete loss of perfusion to a limb.
Older versions of the Advanced Trauma Life Support (ATLS) taught that if the patient's carotid pulse is palpable then the systolic blood pressure is above 60-70 mmHg and that Radial and Pedal pulses become palpable above 80mm Hg. Although the radial pulse always disappears before the femoral, which always disappears before the carotid, several studies showed that most patient's BP is lower than that predicted by these guidelines, and they were removed from current ATLS training.
Carotid Pulse
[edit | edit source]When palpating the carotid pulse, you are feeling for the common carotid artery that sits in a groove between the trachea and the neck muscles and is backed by the anterior surface of the cervical vertebrae. To palpate a carotid pulse:
- Place the tips of two to three fingers, (usually your index, middle, and ring finger if you use three) in the center of the throat over the trachea.
- Slide your fingers towards yourself into the groove between the trachea and the neck muscles.
- Press your fingers gently into the groove.
- You may need to adjust the position of your fingers slightly up or down to find the pulse
Radial Pulse
[edit | edit source]When palpating the radial pulse, you are feeling for the radial artery that comes close to the surface on the lateral side of the inner forearm just before the wrist. To obtain a radial pulse:
- Place the tips of two to three fingers, (usually your index, middle, and ring finger if you use three) just proximal to the patients wrist on the thumb side, orienting them so that they are both over the length of the vessel.
- Press your fingers in the groove between the lateral edge of the distal radius, and the wrist tendons, close to the wrist
- Lighten your pressure if you are having difficulty
The radial pulse is the most common initial pulse point to check in a conscious patient, it is also an essential check in verifying the Circulation/Motor/Sensory status of an injured limb.
- As part of the primary assessment it is helpful to feel both radial arteries simultaneously to detect asymmetries in strength.
- In an unconscious patient, or one who appears to be in shock, the carotid pulse should be your first check.
Brachial Pulse
[edit | edit source]When palpating the brachial pulse, you are feeling for the brachial artery that comes close to the surface just above the antecubital fossa (inside of the elbow) to the medial side of the biceps muscle insertion point (this is the same point over which you are auscultating when taking an auscultated blood pressure). To obtain the brachial pulse:
- Place the tips of two or three fingers on the bicep tendon in the area of the antecubital fossa.
- Move the pads of your three fingers medial (about 2 cm) from the tendon and about 2–3 cm above the antecubital fossa to locate the pulse.
- The brachial artery can be fairly deep in the muscle, so pushing the muscle to the side with the finger tips and pressing more firmly than you do for other pulses may aid you in finding it. Once you have found it, lighten the pressure.
Taking pulses in infants can be challenging, but the brachial pulse is one of the most consistently findable pulse points for first responders.
Femoral Pulse
[edit | edit source]When palpating the femoral pulse, you are feeling for the femoral artery that comes close to the surface in the femoral crease (the line between the end of the abdomen and the beginning of the inside of the thigh) midway between the pubic symphysis and the Anterior Superior Illiac Spine (ASIS). To palpate the femoral pulse:
- Place the tips of two to three fingers, (usually your index, middle, and ring finger if you use three) in the crease where the leg joins the anterior abdomen midway between the two bony landmarks of the pubic bone and the ASIS
- Slide the fingers slightly below the ligament that runs between the bony landmarks (if there is a lot of subcutaneous fat, you will need to push firmly).
- If not palpable, shift your fingers along the line from the PS to the ASIS
Press deeply, below the inguinal ligament and about midway between symphysis pubis and anterior superior iliac spine. Use two hands one on top of the other to feel the femoral pulse.
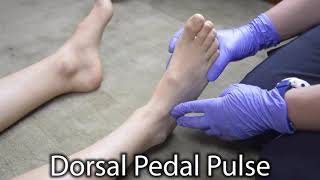
Dorsal Pedal Pulse
[edit | edit source]When palpating the dorsal pedal pulse, you are feeling for the dorsalis pedis artery that comes close to the surface between the extensor hallucis longus and the extensor digitorum longus tendons on the dorsal surface of the foot distal to the edge of the navicular bone which serves as the best point at which to begin palpation. To palpate the dorsal pedal pulse:
- Feel for the distal edge of the navicular bone, and place the tips of two fingers just distal to the edge of the navicular bone, between the tendons of the big toe and the second toe. The hallucis longus tendon can be located by flexing the big toe up slightly which will make it more prominent.
- If not palpable, and a foot injury does not prevent the movements, slightly flex the foot so that it is 90 degrees to the lower leg.
- If still not palpable, try the other foot and if located it may help you find the landmarks on the first foot
- If you had any difficulty locating the pulse, consider marking the foot where it was located to make rechecks easier.
Self Assessment
[edit | edit source]- Try feeling all of these pulse points on yourself and your classmates.
- Note where you need to make adjustments.
- Get practiced finding the anatomical landmarks quickly
| Authors | Global Surgical Training Challenge |
|---|---|
| License | CC-BY-SA-4.0 |
| Cite as | GSTC (2020–2026). "NREMT Skillset/Pulse Points and Palpation". Appropedia. Retrieved July 17, 2026. |