
CrashSavers Trauma/Tourniquet/Simulator

| Part of | CrashSavers Trauma |
|---|---|
| Required time | <span class="EditParam" data-template="Medical knowledge data" data-param="required-time" data-value="45-90 minutes Simple Version 15-20 hours Extended Version" data-separator="">45-90 minutes Simple Version 15-20 hours Extended Version |
| Equipment | CrashSavers DIY Tourniquet Simulator |
| Pathologies | Hemorrhage |
| Interventions | $50 Simple Version; $94 Extended Version |
| Part of | CrashSavers Trauma |
|---|---|
| Parent | CrashSavers Trauma/Tourniquet |
| Required by | About the VR App Simulator |
| Making instructions | Video instructions |
|---|---|
| Assembly instructions | Document |
| Hardware license | CERN-OHL-S |
| Certifications | Start OSHWA certification |
Prototyping and Iterations
[edit | edit source]Our Tourniquet Simulator was designed by an engineering team that created 9 prototypes and iterations to led to our finalized model. Our engineers reported weekly advances and details for each prototype delivery. Two final versions of the simulator were created–a simple version and an advanced version. The latter includes an Arduino sensor that incorporates a pressure-sensing component to the model to provide biophysical feedback for the learner through the VR app.
We deliberately developed two versions of the simulator so that learners can build and utilize the version they find most preferable. While there is irrefutable value to the advanced version of the simulator, the feedback we received from both initial pilot users and judges of the Global Surgical Training Challenge during the Prototype Showcase suggested the advanced version may be too complex for learners who do not have an engineering background. Hence, we designed a simple version of the simulator that relies primarily on a dynamic, pump-based mechanism in the model. The simple version still provides a high-fidelity approach to constructing a readily reproducible simulator, while avoiding the risk of electrical mishaps and other intricate mechanisms with the advanced version.
-
 Evaluating the initial concept and pressure system.
 -
 Building a better compression mechanism in the fourth prototype.
 -
 Improvements in mechanics, coding, and simplification.
 -
 Final Simple version
 -
 Final Advanced version


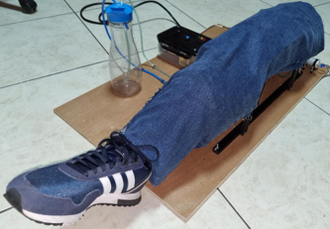
Simple Version
[edit | edit source]The simple version is easier, quicker, and cheaper to construct. While it is not directly connected to the VR app, a data collection checklist is included in the VR app to help learners assess their ability to correctly apply and use a tourniquet.[1]
-
 Components of the CrashSavers DIY Tourniquet Simulator Simple Version
 -
 External Cover of the CrashSavers DIY Tourniquet Simulator


Construction Manual
[edit | edit source]The following Construction Manual guides learners through building our simple, fast, and cheap lower extremity simulator for tourniquet application. After the simulator model has been built, learners can continue through the clinical case scenarios within the CrashSavers VR app to practice application of hemorrhage control techniques. In the Construction Manual, learners will find all relevant materials on pricing, online providers, and step-by-step instructions for building the simple version of the tourniquet simulator. An additional manual provides instructions for calibration.
Materials Shopping List
[edit | edit source]-
 Materials shopping list with prices.
Tools and Materials
[edit | edit source]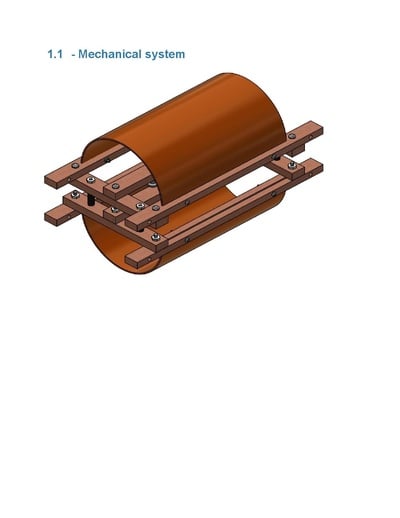
-
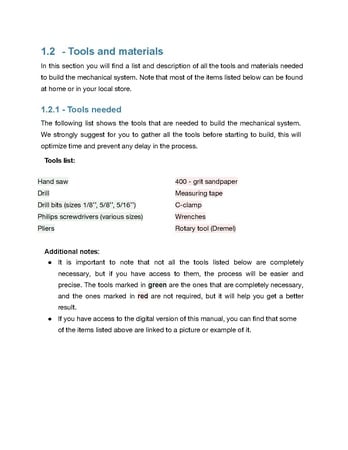 Tools needed for assembly.
 -
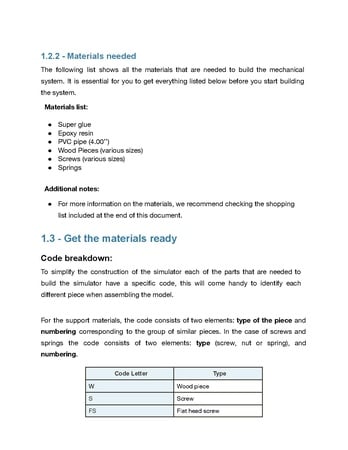 Materials needed for assembly.
 -
 Part code system and additional materials.
 -
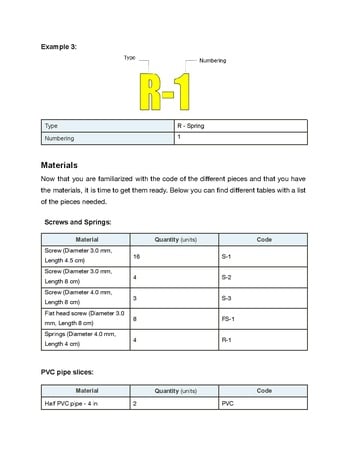 Detailed parts inventory with codes.
Mechanical Build Steps
[edit | edit source]-
 Build Steps 1–2: Assemble base frame.
 -
 Build Steps 3–4: Double-layer frame with vertical posts.
 -
 Build Steps 5–6: Vertical supports and frame walls.
 -
 Build Steps 7–8: Diagonal brace and sliding mechanism.
 -
 Build Steps 9–10: PVC half-pipes and spring compression.
 -
 Build Step 11: Final mechanical assembly.
Fluid System
[edit | edit source]-
 Fluid system tools and materials.
 -
 Fluid system materials and hose connection.
 -
 Fluid Steps 2–3: Threading hose through mechanism.
 -
 Fluid Step 4: Complete fluid system with reservoir.
Final Result
[edit | edit source]
Additional Diagrams
[edit | edit source]-
 Top-down view of mechanical frame (without PVC).
 -
 Front view with PVC half-pipes mounted.
Wood Cutting Diagrams
[edit | edit source]-
 Wood pieces W-1 and W-2 dimensions.
 -
 Wood pieces W-2 (continued) and W-5 dimensions.
 -
 Wood pieces W-3 and W-7 dimensions.
 -
 Wood piece W-4 vertical support dimensions.
 -
 Wood piece W-6 base board dimensions.
Video Instructions
[edit | edit source]Advanced Version
[edit | edit source]The advanced version was designed to simulate active arterial blood flow and to sense changes in pressure as the learner applies the tourniquet to the model. When the learner achieves the appropriate amount of tourniquet pressure to stop blood flow, the Arduino sensor sends a signal to the VR app that the skills-based task has been adequately completed. The learner can then continue through the clinical case scenario within the VR app.
-
 CrashSavers DIY Tourniquet Simulator Advanced Version
 -
 Views of the CrashSavers DIY Tourniquet Simulator Advanced Version

Construction Manual
[edit | edit source]The following Construction Manual guides learners through building a lower extremity simulator that simulates and senses adequate pressure needed for appropriate tourniquet application. After the simulator model has been built, learners can continue through the clinical case scenarios within the CrashSavers VR app to practice application of hemorrhage control techniques. In the Construction Manual, learners will find all relevant materials on pricing, online providers, step-by-step instructions, and blueprints for building the advanced version of the tourniquet simulator.
We understand that there are inherent difficulties when working with electronic devices. The manual provides recommendations for assembly and online support. Additionally, we plan to create a printed circuit board (PCB) that will allow us to create a simplified modular version of the simulator so that it can be more easily assembled.
Video Instructions
[edit | edit source]Connect the VR App with the Advanced Simulator
[edit | edit source]Once the simulator has been constructed, it can be connected to the CrashSavers VR app for a realistic experience on applying hemorrhage control techniques. Step-by-step instructions to establish this connection are provided here:
Android devices:
- Open "Settings" and go to "Connections".
- Tap on "Bluetooth" and turn it on.
- Search for devices.
- Tap on the device "CrashSavers Simulator".
- Simulator will be paired.
- Open the CrashSavers VR app.
- Use on clinical case scenarios when feasible.
Apple devices:
- Open "Settings".
- Tap on "Bluetooth" and turn it on.
- Search for devices.
- Tap on the device "CrashSavers Simulator."
- Simulator will be paired.
- Open the CrashSavers VR app.
- Use on clinical case scenarios when feasible.
Construction Logistics
[edit | edit source]Building Time and Costs
[edit | edit source]All materials needed to create the simulator were chosen for their ready availability worldwide. Everything is easy to find at local stores in Guatemala, and many have also been listed in online stores. To the best of our knowledge, there is not a comparable physical model for training hemorrhage control techniques that provides as comprehensive of an educational experience at this price.
| Simple Version | Advanced Version | |
|---|---|---|
| Time | 45 - 90 minutes | 15 - 20 hours |
| Costs | ~$50 | ~$94 |
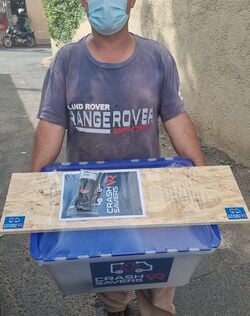
Reproducibility
[edit | edit source]Our team is conscious and mindful of the need for ease and reproducibility of our simulator model in order for it to be appropriately used by learners of different abilities and experiences. We addressed this by piloting the simulator model with 2 different groups–engineers who devised the simulator, and firefighter trainees. The firefighter trainees were instructed to construct the simulator without any assistance. They reported that assembling the simple version of the simulator was straightforward, despite not having any engineering background, experience, or expertise. The firefighters were able to complete the simulator construction in 1.5 hours.
-
 Building Kits for the CrashSavers DIY Tourniquet Simulator Simple Version
 -
 CrashSavers Manuals for Guatemalan Firefighters
 -
 Guatemalan Firefighter and the CrashSavers DIY Tourniquet Simulator Simple Version
 -
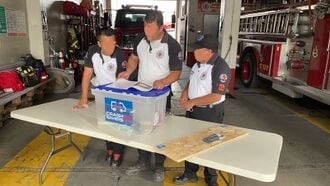 Firefighters Assembling the DIY Tourniquet Simulator Simple Version
 -
 Guatemalan Firefighters' Final Product of the CrashSavers DIY Tourniquet Simulator Simple Version


References
[edit | edit source]- ↑ Weinman, S. (2020). Retention of Tourniquet Application Skills Following Participation in a Bleeding Control Course. Journal of Emergency Nursing, 46(2), 154–162. https://doi.org/10.1016/j.jen.2019.10.020
| Authors | CrashSavers |
|---|---|
| License | CC-BY-SA-4.0 |
| Organizations | Global Surgical Training Challenge |
| Derivative of | CrashSavers - VR App installation and Simulator Building |
| Cite as | CrashSavers (2021–2026). "CrashSavers Trauma/Tourniquet/Simulator". Appropedia. Retrieved July 9, 2026. |