Locally Delicious solar dehydrator for kids with adult supervision/pt

Nossa equipe de design, Fujis and Fugees, é formada por quatro estudantes de engenharia da Cal Poly Humboldt. Para nossa turma de Engenharia 215 na primavera de 2011, recebemos a tarefa de projetar um desidratador de alimentos movido a energia solar que pudesse ser replicado em casa por crianças com a ajuda de um adulto. Como parte de nossa tarefa, trabalhamos em estreita colaboração com o grupo Locally Delicious . Nosso design final será integrado ao próximo livro de receitas do Locally Delicious, juntamente com instruções sobre como construir nosso desidratador solar. Na página a seguir, você pode ver nosso processo de design documentado. Se você quiser construir nosso projeto, confira a página Tear The Roof Off Solar Dehydrator Instructions . Os testes provaram que nosso design final é eficaz na desidratação de alimentos. Em média, nosso desidratador foi capaz de desidratar completamente maçãs fatiadas em 18 horas de exposição ao sol. Nosso design atendeu e excedeu os critérios desenvolvidos por nosso cliente e nosso grupo. Mas você não precisa acreditar em nossa palavra, sinta-se à vontade para construí-lo você mesmo!
Objetivo
O objetivo do nosso projeto é projetar um desidratador solar simples, mas eficaz. Nosso modelo terá um design eficiente e será facilmente replicado por uma criança com a assistência de um adulto. Esperamos que, ao projetar este desidratador solar, ajudemos as crianças a aprender sobre energia solar e escolhas alimentares saudáveis.
Critérios
A tabela a seguir é uma lista classificável de nossos critérios de design, que foram desenvolvidos por nosso grupo de design e nosso cliente, Locally Delicious.
| Critérios | Peso | Restrições |
|---|---|---|
| Custo | 9 | Menos de $100 |
| Valor Educacional | 8 | Ensinar sobre medições, radiação solar, desidratação solar, bem como alimentação saudável, em um nível de 4ª a 8ª série |
| Reprodutibilidade | 9 | Uso mínimo de ferramentas, materiais facilmente obtidos |
| Manutenção | 6 | Menos de 30 minutos de manutenção necessários por uso |
| Durabilidade | 7 | Deve durar pelo menos 12 utilizações |
| Segurança | 10 | Não deve exceder 200 graus Fahrenheit e também deve ser estruturalmente sólido |
| Funcional | 10 | Deve ser capaz de desidratar adequadamente frutas e vegetais |
| Portabilidade | 5 | Deve ser móvel por duas ou menos pessoas |
Design

Nosso design incorpora um modelo simples, mas eficaz, que requer muito poucos materiais para construir, mas é muito eficiente para desidratar uma quantidade pequena a moderada de alimentos. Nosso design tem 2'x3'x4" e é construído em uma base de madeira compensada, com uma estrutura de 2"x4", cobertura corrugada, telas de alimentos de malha de náilon removíveis emolduradas em 1/2"x1", com uma tampa de vidro acrílico transparente mantida no lugar por suportes em L e orifícios de ventilação na parte superior e inferior para promover o fluxo de ar. Este modelo é simples de construir e os materiais são facilmente encontrados em sua loja de ferragens local, ou material reciclado pode ser usado para reduzir custos. O ângulo ajustável de inclinação permite a captura máxima de luz solar ao longo do ano, para dados sobre o ângulo de inclinação do sol em sua área específica, confira esta Calculadora .
Custo
A tabela a seguir é uma lista dos materiais usados para construir nosso projeto e seus custos de varejo relativos. Em nosso projeto, usamos madeira reciclada e telhado corrugado, o que reduziu significativamente o custo do nosso projeto.
| Quantidade | Material | Fonte | Custo ($) | Total ($) |
|---|---|---|---|---|
| 2 | Tábuas de 2"x4"x8' | Ás | 6,99 | 13,98 |
| 2 | Moldura 1"x1"x4' | Ás | 3,44 | 6,88 |
| 1 | Madeira compensada de 1/2"x4'x4' | Ás | 12h55 | 12h55 |
| 1 | Telha ondulada para telhados | Ferro-velho | 5,99 | 5,99 |
| 1 | Malha de nylon 3'x6' | Tecidos Jo-Ann | 7.28 | 7.28 |
| 1 | Acrílico transparente 2'x4' | Ás | 28,99 | 28,99 |
| 8 | Parafusos para chapas metálicas | Ás | .11 | .88 |
| 16 | Parafusos de madeira | Ás | .08 | 1.28 |
| 8 | Arruelas | Ás | .09 | .72 |
| 1 (Caixa) | Suportes em L | Ás | 3,79 | 3,79 |
| Custo total | $ 82,34 | |||
Instruções

Para este projeto você precisará das seguintes ferramentas:
- Serra (serra manual ou elétrica)
- Tesoura de lata ou moedor (para cortar telhados de metal)
- Furadeira (com broca e ponta Phillips)
- Cortador de acrílico (especialmente feito para cortar acrílico)
- Tesoura
Siga os seguintes passos gerais:
- Corte uma base de compensado de 2' de altura x 3' de largura.
- Corte dois pedaços de 36" de comprimento, 2"x4".
- Corte dois pedaços de 21" de comprimento, 2"x4".
- Fixe a estrutura de 2"x4" (de modo que os segmentos de 21" de comprimento fiquem na parte interna dos segmentos de 36" de comprimento) pré-perfurando furos e fixando com parafusos de madeira.
- Fixe a base de compensado à estrutura de 2"x4" com parafusos de madeira. (não há necessidade de pré-perfuração)
- Corte um pedaço de cobertura de metal corrugado para que ele caiba na parte interna da estrutura de 2"x4", que deve ter 21" de altura x 33" de largura. (certifique-se de que a orientação do metal corrugado seja tal que os canais subam e desçam pelo desidratador)
- Fixe a cobertura ondulada fixando parafusos autoatarraxantes para chapas metálicas através dos canais do desidratador e no compensado.
- Corte dois pedaços de madeira de 21" de comprimento, 1"x1/2". (1"x1" pode ser usado)
- Corte dois pedaços de madeira de 76 cm de comprimento, 2,5 cm x 1,8 cm.
- Fixe a estrutura de 1"x1/2" (de modo que os comprimentos de 30" fiquem na parte interna dos segmentos de 21" de comprimento, criando uma estrutura de 21" de altura x 32" de largura) pré-perfurando e fixando com parafusos de madeira.
- Corte uma folha de malha de náilon que cubra adequadamente a estrutura de 1"x1/2".
- Fixe a malha de nylon à estrutura usando parafusos de madeira com arruelas (para melhores resultados, comece em um canto e estique o material enquanto fixa o restante com parafusos)
- Corte uma folha de acrílico transparente de 24" de altura x 36" de largura usando seu cortador de acrílico. (O acrílico também pode ser encontrado em folhas pré-cortadas de 24"x36", dependendo de onde você comprar, essa opção é muito mais fácil se você puder encontrá-la)
- Fixe os suportes em L na parte superior da moldura para manter a tampa de acrílico no lugar, permitindo que ela deslize para fora de um lado. (sugerimos fixar dois suportes em L na parte inferior da moldura e um em cada lado, permitindo assim que o acrílico deslize para fora pela parte superior) (consulte a imagem)
- Faça furos de ventilação de 1" no fundo do desidratador, certificando-se de que os furos estejam alinhados com as calhas do telhado de metal corrugado. (A quantidade de furos de ventilação pode variar dependendo do seu ambiente, se você planeja usar este desidratador em uma área que fica muito quente, então sugerimos adicionar mais furos de ventilação. Enquanto isso, se você planeja usar isto em um clima mais frio, você pode adicionar menos furos de ventilação, entretanto sugerimos não menos que três)
- Faça furos de ventilação de 1" na parte superior do desidratador ao longo das mesmas calhas dos furos na parte inferior do desidratador. (Novamente, a quantidade pode variar)
- Coloque as frutas fatiadas no desidratador e ajuste o ângulo de inclinação para que o desidratador receba o máximo de luz solar.
Vídeo
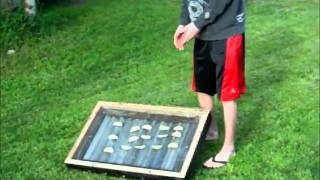
Aqui está um vídeo mostrando nosso grupo de design e nosso desidratador solar em ação.