
Aleiha's parabolic solar cooker

| Type | Solar cooker |
|---|---|
| Authors | aleiha wayman |
| Status | Deployed |
| Years | 2007 |
| Cost | USD 65 |
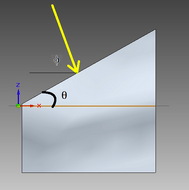
The paraboloid is an interesting shape with some amazing qualities. It has the power to concentrate light, electronic waves, sound, etc. to its focus at the center. To find the focal point of a paraboloid, one must use the formula, , where p is a constant. The variable y is the depth of the dish, and x measures the distance from the center axis to the maximum circumference of the dish. You have to pretend that there is an x axis going through the center of the base of the dish and a perpendicular y-axis passing from the center of the base of the dish to the focal point. The two numbers, x and y, represent a point on the paraboloid, and from that, you are able to determine where the focus is (see parabolic shape calculation).
Parabolic cookers have been used for centuries now. The idea to concentrate light using curved mirrors was developed by the Greeks, Aztecs, Incas, Romans and Chinese. The Incas used bronze and gold for their mirrors and they built structures that were several stories high. This technology seems to have appeared around the same time for each of the civilizations. It is thought that Archimedes harnessed the technologyW to defend Syracuse from invading Roman fleets in 212 BC.
My Parabolic Solar Cooker
[edit | edit source]
A Brief Description
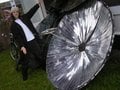
[edit | edit source]At first, I was open to anything to construct the solar cooker. I was thinking about constructing my paraboloid out of cobb and then sticking small pieces of glass into it as I've seen others do. However, it takes a lot of time to collect the cobb materials and build a paraboloid out of it, let alone one whose focus was accurate. A donated dish was viable, but would not have the heat capacity I was going for, so I set out to find another dish. While rummaging around Arcata Scrap and Salvage one day, I came across an old mesh satellite dish and I knew I had found my cooker. My mentor Bart Orlando and I hauled it to the Bike Library where my cooker began to take shape.
Location and Help
[edit | edit source]Most of the construction and testing took place at the Arcata Bike Library with the help of Bart Orlando. However, I did most of the cutting of the sheet metal at the HSU sculpture lab. We also used the pedal-powered tools there to construct the mount hot plate grill.
Materials Used
[edit | edit source]- Satellite dish (6 ft. in diameter)
- Sheet aluminum
- Conduit piping
- A bike rim
- Aluminum rivets and washers
- Nuts & bolts
Method
[edit | edit source]The basic idea was to use a satellite dish and rivet sheet aluminum to it. This is because a satellite dish is already a paraboloid shape with a fairly exact focus. The sheet aluminum was to be cut into triangular pieces and then drilled in 3-5 places for the rivets. They would conform to the shape of the paraboloid and not lessen the integrity of the focal point. We wanted the aluminum to be as exact as possible to ensure that it would reflect enough light to fry some potatoes. I wanted to do more than boil water with my cooker.
The hot plate grill was to be constructed out of conduit and bike rims. We would flatten the ends of the conduit for easier attachment to the center pipe and rims, and then bolt it all together. We decided that a gimble would be the best for this project, so that we could move the pan (or pot) in any direction necessary to receive optimal sunlight. This is a more difficult design, but it gives the dish more freedom and a higher heating capacity.
We began the project by testing a dish that Bart had at the Bike Library. It was slightly oblong and wasn't concave much, so we decided to test how accurate the focus was. I taped a few pieces of mylar on it and Bart and I took it out into the sun. It turned out that the dish had many foci because of its' oblong shape. I had to set out to find another dish if I wanted to be able to fry food with it. The one we had just wasn't going to cut it. That's when I made a trip to Arcata Scrap and Salvage and found the perfect dish for my project.
Final Construction
[edit | edit source]
Getting Ready
[edit | edit source]
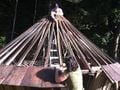
We started by disassembling the focal point of the dish. There was an awkward pole sticking out of the center which was not appropriate for the design we were going for. We got a grinder out and sawed through the metal so that we could manipulate the pipe into a hot plate grill. Since the pole was bent near the base, we figured that it might not work for our design specifics. Luckily, we found that we could remove the pole by loosening a bolt at the base, and that allowed for it to slide right out. We were able to locate a longer pole later on, but at the time, we were planning on using the one that came with the dish. We also had to remove a bunch of miscellaneous pipes and widgets sticking out the back side of the dish. They were things that helped keep the dish balanced in place but were not needed in our design. After that, the dish was ready to for transformation.
The Hot Plate Grill
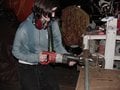
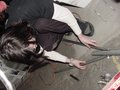
[edit | edit source]The next step was to construct a hot plate grill. The original focal point was somewhere between 27-31" but we forgot exactly. In order to make the mount, we needed to know how long to make it, so I decided to find the theoretical focus by using the formula: . It worked out to be 29 3/4". We decided that it would be best if we used conduit to form a "v" shape and then fit in a few bike rims for the hot plate. We had to flatten the ends of the conduit and make sure that they were the right angle for the focus. This was done using a clamp and we were able to bend both pieces of conduit at the same time. The conduit pipes were a little too long so we had to shorten them using a Sawz-All at the Bike Library. After the sizing, it was time to drill some holes using a pedal powered drill press. We discovered that the center pipe we wanted to use was slightly shorter than we wanted, but being that we were in such a resourceful area, we rummaged around and found a pipe that was the perfect size and width. The next step was to drill holes in the flattened sides of the conduit and our newly-found pipe and fit the pieces together. They fit quite nicely. We had to make sure that both the conduit pipes were bent at the same angle or else the structure would be unstable. The next step was to drill holes in the bike rim so that we could bolt it to the mount structure we just created. We drilled the holes using a drill press at the HSU sculpture lab and it was ready to be bolted together.
-
 Drilling holes in the conduit using pedal power.
 -
 Making sure the conduit is bent at the right angle.
 -
 Sizing down the mount pole.
 -
 Now all we have to do is bolt it all together.


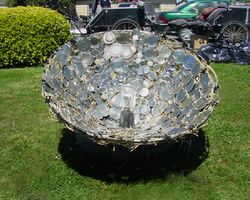
The Mirror Finish
[edit | edit source]Bart had acquired a bunch of sheet metal that he had wanted to use on a previous project, but decided that my dish could use them. There wasn't quite enough cut pieces to cover the entire surface area of the dish and I had to take some scrap sheet aluminum to the HSU sculpture lab to cut them into triangular shapes. After they had been cut, they needed to be prepared for riveting. It took about a half an hour to drill holes in all of the pieces and they were quickly ready to be fastened to the dish. While putting the pieces in place, we noticed that the holes we had drilled did not always match the pattern of the mesh, and there were areas where the mesh was covered with pieces of solid metal. These areas had to be dealt with differently. In some areas, we were able to drill holes through the metal for the rivets, and in others, we devised a way of using a thin wire to attach the pieces. I used a paperclip I found on the ground and stuck it through the hole and then through the mesh slightly above the triangle. Using pliers, I twisted the ends of the paperclip to form a tight grasp on the metal; it worked quite well. I was also able to get rivets with a larger gripping range and that helped with the thicker areas. After the pieces were all riveted into place, we noticed that there was a gap - there wasn't quite enough sheet metal to cover the whole dish. I drilled some more holes in the scrap pieces I had and was able to fasten them to the dish. There's still a little gap, but that really won't matter since the dish is so big, and most of it is coated anyway. The last step was to buff the aluminum to a sweet finish.

Bart Orlando mentoring.

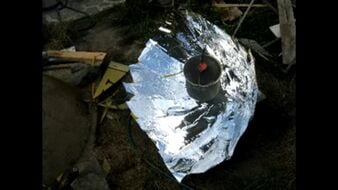
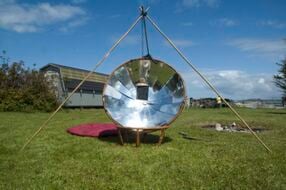
The Final Product
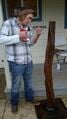
[edit | edit source]Now the dish is ready for cookin'. It could use a little shining up with some Citra-Sol or something of that nature, but even without a shine job, the focus gets pretty hot. In terms of setting the dish up, all we need is to lean it up on something. There's a mount on the back of it with the capability of being staked in the ground. For that, I would have to find a long piece of pipe about 3 1/2" in diameter and at least 1/4" thick.
-
 The Final Product.
 -
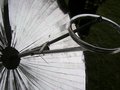 The finished hot plate grill.

Testing
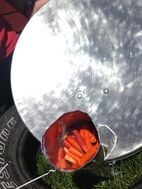
[edit | edit source]My solar cooker is spectacular for cooking veggie burgers and beans. At 1:00 pm, the dish heats up to 400 oF. Around 2:00-3:00 pm, the dish heats up to 350 oF. I've found that the cooker doesn't burn food too easily. When I've forgotten abut something that's cooking, the sun moves in the sky. That automatically reduces the heat at the focus. Things have gotten caramelized, but it's hard to burn something.
Final Costs
[edit | edit source]| Quantity | Materials | Source | Cost ($) | Total ($) |
|---|---|---|---|---|
| 1 | Satellite dish | Arcata Scrap and Salvage | 40 | 40 |
| 1 | Rivets and washers | Hensel Ace Hardware | 25 | 25 |
| 1 | Other parts | Donated | 0 | 0 |
| Total cost | 65 | |||
Everything else we had lying around at the bike library and was free (i.e. nuts & bolts, bike rims, pipes, tools). Bart gave me sheet metal that he was going to use for a different dish so that I could make mine.
Conclusions
[edit | edit source]The first time you construct a solar cooker, you learn a lot in terms of what methods and materials to incorporate in construction. The next cooker I make will probably be a lot easier since I've already been through it. Next time, I would like to use a lighter aluminum for the mirror finish. The dish is relatively light for it's size, but it's certainly difficult to handle on your own. I would also consider a dish without reinforcing structures. They got in the way when I was riveting, and as unable to attach the aluminum in some areas. In order to be exact, the mirror finish needs to coat the entire surface area of the dish. This increases the heat capacity. But considering my dish's size, I don't think that it will have a hard time reaching high temperatures. And it hasn't. I've been cooking lunch with it for the past few days now, without a shine job on the sheet aluminum.
Discussion
[edit | edit source]This project was the coolest thing I've done all year. Cooking food with my solar cooker is the best feeling in the world. It's cool to see something that I created work so well. The thing that I would like to add is a mount pole for the back of the dish. I am able to lean it up against a chair and stuff like that, but if i have to put it up at a hard angle, I might have a little more trouble. So that's something I'll have to think about, but for now, I'm having a blast in the afternoons cooking gardenburgers and fried potatoes.
Things to Keep in Mind/Common Errors to Avoid
[edit | edit source]- Watch out for stray rays of light that come off your cooker. They could possibly start a fire if you aren't careful. It isn't much of a worry if your dish is more concave, but the flatter the dish is, the more likely that you will have stray rays of light.
- Wear sunglasses when cooking because it gets really bright and hard for your eyes to handle.
- Use a cast-iron or some other type of black cooking pot/pan. Any other color might reflect the light and that's not what you want. The black absorbs the light and brings the temperature up in the pot/pan.
Related projects
[edit | edit source]

See also
[edit | edit source]- Compound parabolic concentrators
- Compound parabolic reflectors for solar cookers
- Parabolic solar cookers
- How to build a paraboloid Generate the diagram needed to build a paraboloid from a flat sheet given the distance from the vertex to the focus.
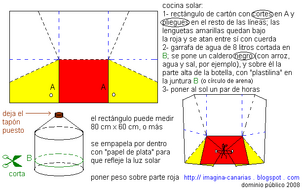
Other Solar Cooker Plans Links
[edit | edit source]- Projects with Bart
- Free and Easy DIY Parabolic Solar Concentrator Plan
- How to harness Sun's energy by making a solar concentrator
- How to make a solar oven
| Authors | |
|---|---|
| License | CC-BY-SA-3.0 |
| Organizations | Cal Poly Humboldt |
| Cite as | Aleiha, Lonny (2006–2025). "Aleiha's parabolic solar cooker". Appropedia. Retrieved July 13, 2026. |