[[File:athena software overview.svg|thumb|Overview of software and their relationships.]]
{{Device data}}
''' Note '''
* There are many ways to create and edit 3-D models for printing. This page describes just one way of doing it. Experimenting with other methods is encouraged.
=Note=
== Procedure ==
* There are many ways to create and edit 3-D models for printing. This page describes just one way of doing it. Experimenting with other methods is encouraged.
=Procedure=
# There are multiple steps from an idea to a printed object. The installation and basic usage of some important programs is covered below. The relations between the files (black) and programs (blue) is shown in the figure on the right.{{clear}}
# [[File:athena_software_overview.svg|thumb|right|Overview of software and their relationships.]]There are multiple steps from an idea to a printed object. The installation and basic usage of some important programs is covered below. The relations between the files (black) and programs (blue) is shown in the figure on the right.{{clear}}
# Install Cura from [http://web.archive.org/web/20150908013738/https://ultimaker.com/en/cura-software/list].
# Install Cura version 15.0.4 from [https://ultimaker.com/en/cura-software/list].
# Other free and open source software that is worth installing is [http://www.openscad.org/ OpenSCAD], [http://freecadweb.org/ FreeCAD] and [http://blender.org Blender]. These will not be covered in these instructions, but both have a lot of documentation available on the web.
# Other free and open source software that is worth installing is [http://www.openscad.org/ OpenSCAD], [http://freecadweb.org/ FreeCAD] and [http://blender.org Blender]. These will not be covered in these instructions, but both have a lot of documentation available on the web.
==Cura==
== Cura ==
The program to convert an STL file into G-Code is called a slicer. There are several options available. Cura is one of them. The following is a basic Cura setup for AthenaII printer, but there are extensive options that should be explored.
The program to convert an STL file into G-Code is called a slicer. There are several options available. Cura is one of them. The following is a basic Cura setup for AthenaII printer, but there are extensive options that should be explored.
# After downloading and installing, start Cura. It will show the First Start Wizard. If it doesn't, you can manually start the wizard by choosing Add new machine from the Machine menu. You can later remove the original machine from the Machine settings menu.{{clear}}
# After downloading and installing, start Cura. It will show the First Start Wizard. If it doesn't, you can manually start the wizard by choosing Add new machine from Settings>Printer>Add Printer...{{clear}}
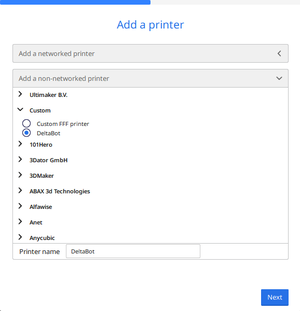
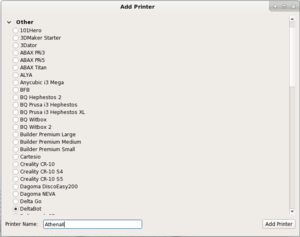
# [[File:athenaII_cura_othermachine.png|thumb|right|Other machine information.]]For other machine information, choose DeltaBot.{{clear}}
# [[File:athenaII cura othermachine.png|thumb|Other machine information.]]Under the Other list, choose DeltaBot and name the printer AthenaII.{{clear}}
# [[File:athenaII_cura_preferences.png|thumb|right|Preferences.]]Open Preferences from the file menu and disable Auto detect SD card drive.{{clear}}
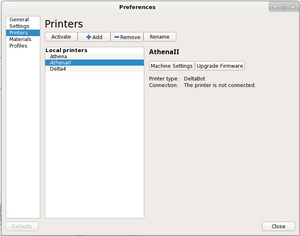
# [[File:athenaII cura printer.png|thumb|Manage printers.]] Open Settings>Printer>Manage Printers... Select AthenaII and click Machine Settings.{{clear}}
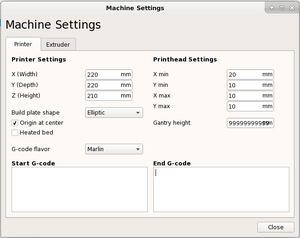
# [[File:athenaII_cura_machine_settings.png|thumb|right|Machine settings.]]Open Machine settings from the Machine menu and set the maximum width and depth to 250, the height to 200 and disable the heated bed.{{clear}}
# [[File:athenaII cura machine settings.png|thumb|Machine settings.]] Set all X ()width), Y (Depth) and Z (Height) to 210 mm. Uncheck Heated bed and clear all of the text from the Start G-code and End G-code text boxes.{{clear}}
# [[File:athenaII_cura_basic.png|thumb|right|Basic settings.]]Under the Basic tab:
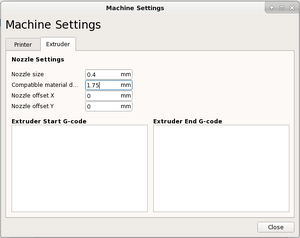
# [[File:athenaII cura extruder settings.png|thumb|Extruder settings.]] Click on the Extruder tab in the Machine Setting dialog. Set the nozzle size to 0.4 mm and the Compatible material diameter to 1.75 mm. Close both the open menu dialogs.{{clear}}
#* Layer height (mm): 0.25
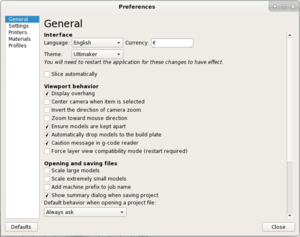
# [[File:athenaII cura preferences.png|thumb|Preferences.]] Open the Preferences menu item, select General and uncheck Slice Automatically.{{clear}}
#* Shell thickness (mm) 1.0
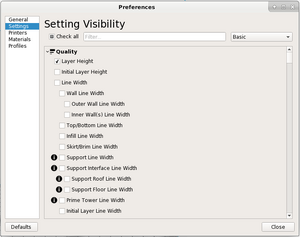
# [[File:athenaII cura view.png|thumb|Set visible tools.]] Open Settings>Configure setting visibility... In the upper right, select Basic from the drop down list, and close the dialog.{{clear}}
#* Bottom/Top thickness (mm): 0.5
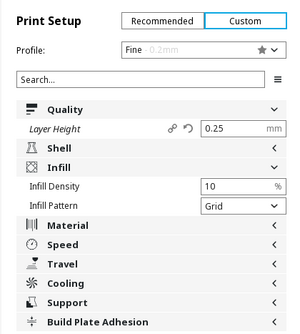
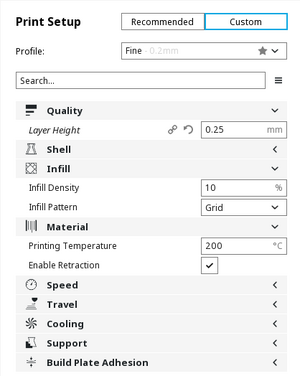
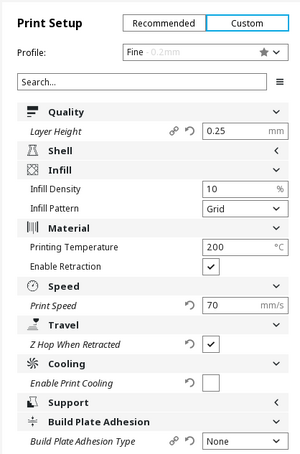
# [[File:athenaII cura layer height.png|thumb|Set layer height to 0.25 mm.]] In the settings bar on the right side of the window, expand Quality and set Layer Height to 0.25 mm.{{clear}}
#* Fill density (%): 25
# [[File:athenaII cura infill.png|thumb|Set infill to 25%.]] Expand Infill and set Infill Density to 25%.{{clear}}
#* Print speed (mm/s): 70
# [[File:athenaII cura temperature.png|thumb|Set temperature.]] Expand Material and set Printing Temperature to 210° C.{{clear}}
#* Printing temperature (C): 210
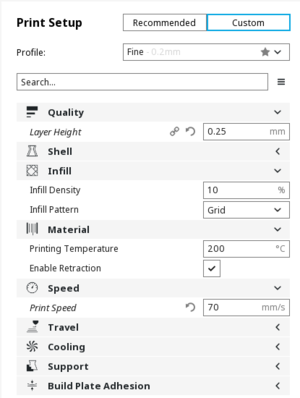
# [[File:athenaII cura speed.png|thumb|Set print speed.]] Expand Speed and set Print Speed to 70 mm/s.{{clear}}
#* Filament Diameter (mm): 1.75
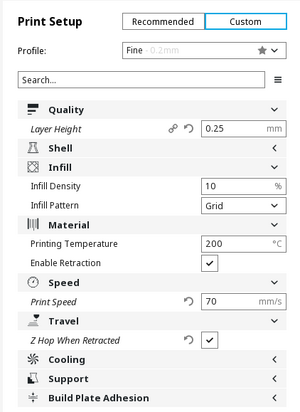
# [[File:athenaII cura zhop.png|thumb|Set z-hop.]] Expand Travel and check Z Hop When Retracted.{{clear}}
#* Flow (%) 100
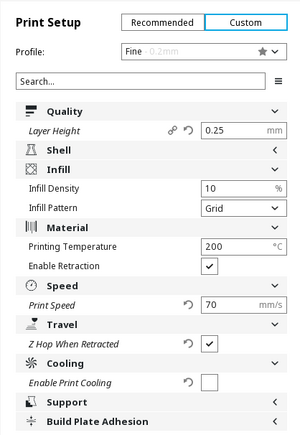
# [[File:athenaII cura cooling.png|thumb|Turn off cooling.]] Expand Cooling and uncheck Enable Print Cooling.{{clear}}
#* Nozzle size (mm) 0.4{{clear}}
# [[File:athenaII cura adhesion.png|thumb|Turn off brim.]] Expand Build Plate Adhesion and set Build Plate Adhesion Type to None.{{clear}}
# [[File:athenaII_cura_advanced.png|thumb|right|Advanced settings.]]Under the Advanced tab:
#* Nozzle size (mm): 0.5 (Older versions of Cura)
#* Retraction speed (mm/s): 80
#* Distance (mm): 4.5
#* Travel speed (mm/s): 200{{clear}}
# [[File:athenaII_cura_start_gcode.png|thumb|right|Start G-Code.]]Under the Start/End GCode tab, select start.gcode. Lines starting with a semicolon (;) are comments, they are not executed code. Remove lines except those starting with the commands shown below (commented code does not need to be deleted):
#* G21 (informs Athena to set the units to metric)
#* G90 (informs Athena to use absolute positioning)
#* G28 (informs Athena to seek its home position before starting - Franklin places it at park position instead){{clear}}
# [[File:athenaII_cura_end_gcode.png|thumb|right|End G-Code.]]Select end.gcode and remove everything except the two executable lines shown in the image and reproduced below (Franklin ignores these and instead executes the default actions selected at the top of the settings page):
#* M104 S0 (informs Athena to set the hot end temperature to 0, effectively shutting off the hot end)
#* G28 (home Athena){{clear}}
# [[File:athenaII_cura_expert.png|thumb|right|Expert settings.]] Open expert settings (Expert>Open expert settings... or ctrl+e). Uncheck everything in Fix Horrible (lower right). Set Z hop when retracting to 0.5. Save the settings.{{clear}}
=Printing=
== Printing ==
==Loading the Filament==
== Loading the Filament ==
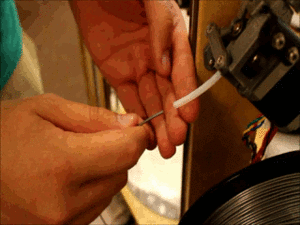
# [[File:Athena_load_filament_small.gif|thumb|right|Loading the Filament.]]Take 1.75mm filament, and feed it into the short length of PTFE tubing until it stops.{{clear}}
# [[File:Athena load filament small.gif|thumb|Loading the Filament.]]Take 1.75mm filament, and feed it into the short length of PTFE tubing until it stops.{{clear}}
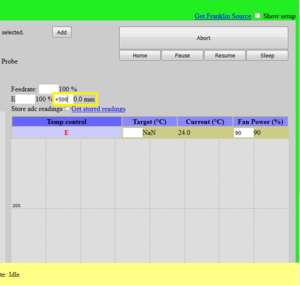
# [[File:Athena_load_filament_extrude_cropped.png|thumb|right|Location to type in extrude distance]]In Franklin, find the extrude text box located above the temperature graph. It is marked with 0.00 mm on the right. If it displays NaN on the right of the text box, instead of 0.0 mm, '''home the printer before continuing.''' Click in the textbox, and type in +500. Press enter, and begin to push the filament into the extruder. The extruder should grab it and push it into the bowden sheath.{{clear}}
# [[File:Athena load filament extrude cropped.png|thumb|Location to type in extrude distance]]In Franklin, find the extrude text box located above the temperature graph. It is marked with 0.00 mm on the right. If it displays NaN on the right of the text box, instead of 0.0 mm, '''home the printer before continuing.''' Click in the textbox, and type in +500. Press enter, and begin to push the filament into the extruder. The extruder should grab it and push it into the bowden sheath.{{clear}}
#Once the extruder drive stops, find the extrude text box where +500 was previously typed in and click in it. Press enter again and the filament should advance another 500 mm. Press the Page Up key and increment the extruder by 10mm until the motor makes a grinding sound. The filament is now loaded.
# Once the extruder drive stops, find the extrude text box where +500 was previously typed in and click in it. Press enter again and the filament should advance another 500 mm. Press the Page Up key and increment the extruder by 10mm until the motor makes a grinding sound. The filament is now loaded.
==Slicing a File==
== Slicing a File ==
# The first file to print will be an Upper Michigan key chain. Right click on the following link, and open in new tab: [http://www.thingiverse.com/thing:47405/#files Upper Michigan Keychain]. Once there, find the yooper_peninsulaa.stl file and click on it to begin the download. If a dialogue box opens, select "Save As".
# The first file to print will be an Upper Michigan key chain. Right click on the following link, and open in new tab: [http://www.thingiverse.com/thing:47405/#files Upper Michigan Keychain]. Once there, click on THING FILE and find the yooper_peninsulaa.stl file and click on it to begin the download. If a dialogue box opens, select "Save As".
# [[File:AthenaII_cura_load.png|thumb|right|The "Load File" button on Cura.]] Start Cura, and press the "Load File" button located on the top left of the object view window.{{clear}}
# [[File:AthenaII cura load.png|thumb|The "Load File" button on Cura.]] Start Cura, and press the "Load File" button located on the top left of the object view window.{{clear}}
# [[File:AthenaII_cura_load_2.png|thumb|right|The load file screen that opens.]] An "Open 3D Model" dialogue box opens. Navigate to where the file to print is saved (The Upper Michigan Keychain should be located in the downloads folder), and click "Open"{{clear}}
# An "Open 3D Model" dialogue box opens. Navigate to where the file to print is saved (The Upper Michigan Keychain should be located in the downloads folder), and click "Open"{{clear}}
# [[File:AthenaII_cura_load_3.png|thumb|right|The model is loaded into Cura, and "Save Toolpath" button is highlighted]] The model should load into Cura. Now press the "Save Toolpath" button located to the right of the "Load File" button.{{clear}}
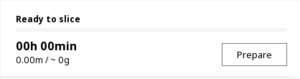
# [[File:AthenaII cura prepare.png|thumb|Click the Prepare button.]] Click the Prepare button in the lower, right corner. Cura will slice the model and replace the Prepare button with a Sav button.{{clear}}
# [[File:AthenaII_cura_toolpath_save_2.png|thumb|right|The save file screen that opens.]] A dialogue box opens to save the file. Press "Save" and the file is now ready to be printed.{{clear}}
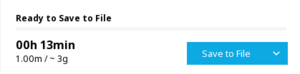
# [[File:AthenaII cura toolpath save 2.png|thumb|Save the g-code.]] If a button saying Save to Removable Drive appears, click the down arrow next to it and select Save to File. Save the g-code to a memorable location.{{clear}}
==Starting a Print==
== Starting a Print ==
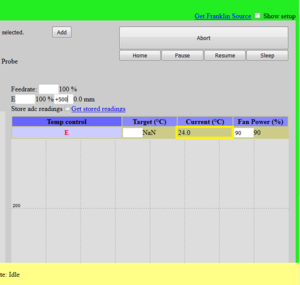
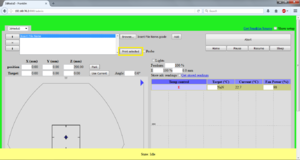
# [[File:Athena_franklin_temp_2.png|thumb|right|The current temperature and what it should be]] '''BEFORE THE FIRST PRINT,''' check to make sure that the thermistor is working properly. This can be checked by looking at the current temperature located on the left middle of the page. It should read within 5 to 10 degrees of 20. (depending on room temperature). If it reads a negative number, then there is something wrong with the thermistor.{{clear}}
# [[File:Athena franklin temp 2.png|thumb|The current temperature and what it should be]] '''BEFORE THE FIRST PRINT,''' check to make sure that the thermistor is working properly. This can be checked by looking at the current temperature located on the left middle of the page. It should read within 5 to 10 degrees of 20. (depending on room temperature). If it reads a negative number, then there is something wrong with the thermistor.{{clear}}
# Using a gluestick, apply a thin layer of glue to the mirror that covers the whole mirror.
# Using a gluestick, apply a thin layer of glue to the mirror that covers the whole mirror. See this [https://www.youtube.com/watch?v=T5jFf6L5LYU video by rm2kdev] for reference.
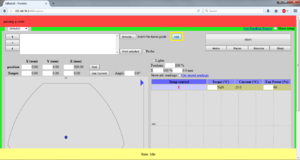
# [[File:Athena_franklin_browse.png|thumb|right|The location of "Browse" button. (It may be a "Choose File" button)]] Open Franklin, and locate the "Browse" button. '''The "Browse" button may be a "Choose File" instead!''' {{clear}}
# [[File:Athena franklin browse.png|thumb|The location of "Browse" button. (It may be a "Choose File" button)]] Open Franklin, and locate the "Browse" button. '''The "Browse" button may be a "Choose File" instead!''' {{clear}}
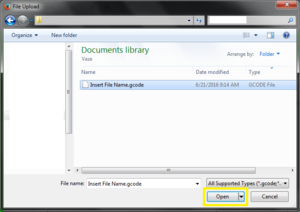
# [[File:Athena_franklin_browse_load.png|thumb|right|The "Browse" dialogue box.]] A dialogue box opens. Navigate to where the .gcode file from Cura is saved. Load the File. The filename should appear to the right of the Browse/Choose File button. {{clear}}
# [[File:Athena franklin browse load.png|thumb|The "Browse" dialogue box.]] A dialogue box opens. Navigate to where the .gcode file from Cura is saved. Load the File. The filename should appear to the right of the Browse/Choose File button. {{clear}}
# [[File:Athena_franklin_add.png|thumb|right|Adding a .gcode file]] Locate the "Add" button to the right of the browse button and file name and press it. A red bar will appear on the top of the screen, that says "parsing g-code". When it finishes, the file should appear in the white box on the top left of the screen. {{clear}}
# [[File:Athena franklin add.png|thumb|Adding a .gcode file]] Locate the "Add" button to the right of the browse button and file name and press it. A red bar will appear on the top of the screen, that says "parsing g-code". When it finishes, the file should appear in the white box on the top left of the screen. {{clear}}
# [[File:Athena_franklin_print.png|thumb|right|The "Print" button.]] Select the filename to print in the box on the left (multiple files can be loaded at any one time). The Filename should be highlighted. Press the "Print Selected" button on the bottom right corner of the box. {{clear}}
# [[File:Athena franklin print.png|thumb|The "Print" button.]] Select the filename to print in the box on the left (multiple files can be loaded at any one time). The Filename should be highlighted. Press the "Print Selected" button on the bottom right corner of the box. {{clear}}
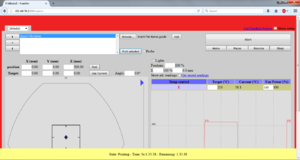
# [[File:Athena_franklin_printing.png|thumb|right|The Printing Screen]] The green background of the webpage will change to red, and the printer will begin to heat up. Once the printer reaches temperature (may take a few minutes), the print will begin. If filament had just been loaded, it may take a few seconds for the printer to start extruding. {{clear}}
# [[File:Athena franklin printing.png|thumb|The Printing Screen]] The green background of the webpage will change to red, and the printer will begin to heat up. Once the printer reaches temperature (may take a few minutes), the print will begin. If filament had just been loaded, it may take a few seconds for the printer to start extruding. {{clear}}
There are many ways to create and edit 3-D models for printing. This page describes just one way of doing it. Experimenting with other methods is encouraged.
There are multiple steps from an idea to a printed object. The installation and basic usage of some important programs is covered below. The relations between the files (black) and programs (blue) is shown in the figure on the right.
Other free and open source software that is worth installing is OpenSCAD, FreeCAD and Blender. These will not be covered in these instructions, but both have a lot of documentation available on the web.
The program to convert an STL file into G-Code is called a slicer. There are several options available. Cura is one of them. The following is a basic Cura setup for AthenaII printer, but there are extensive options that should be explored.
After downloading and installing, start Cura. It will show the First Start Wizard. If it doesn't, you can manually start the wizard by choosing Add new machine from Settings>Printer>Add Printer...
Machine choice.For machine, choose Other.
Other machine information.Under the Other list, choose DeltaBot and name the printer AthenaII.
Manage printers. Open Settings>Printer>Manage Printers... Select AthenaII and click Machine Settings.
Machine settings. Set all X ()width), Y (Depth) and Z (Height) to 210 mm. Uncheck Heated bed and clear all of the text from the Start G-code and End G-code text boxes.
Extruder settings. Click on the Extruder tab in the Machine Setting dialog. Set the nozzle size to 0.4 mm and the Compatible material diameter to 1.75 mm. Close both the open menu dialogs.
Preferences. Open the Preferences menu item, select General and uncheck Slice Automatically.
Set visible tools. Open Settings>Configure setting visibility... In the upper right, select Basic from the drop down list, and close the dialog.
Set layer height to 0.25 mm. In the settings bar on the right side of the window, expand Quality and set Layer Height to 0.25 mm.
Set infill to 25%. Expand Infill and set Infill Density to 25%.
Set temperature. Expand Material and set Printing Temperature to 210° C.
Set print speed. Expand Speed and set Print Speed to 70 mm/s.
Set z-hop. Expand Travel and check Z Hop When Retracted.
Turn off cooling. Expand Cooling and uncheck Enable Print Cooling.
Turn off brim. Expand Build Plate Adhesion and set Build Plate Adhesion Type to None.
Loading the Filament.Take 1.75mm filament, and feed it into the short length of PTFE tubing until it stops.
Location to type in extrude distanceIn Franklin, find the extrude text box located above the temperature graph. It is marked with 0.00 mm on the right. If it displays NaN on the right of the text box, instead of 0.0 mm, home the printer before continuing. Click in the textbox, and type in +500. Press enter, and begin to push the filament into the extruder. The extruder should grab it and push it into the bowden sheath.
Once the extruder drive stops, find the extrude text box where +500 was previously typed in and click in it. Press enter again and the filament should advance another 500 mm. Press the Page Up key and increment the extruder by 10mm until the motor makes a grinding sound. The filament is now loaded.
The first file to print will be an Upper Michigan key chain. Right click on the following link, and open in new tab: Upper Michigan Keychain. Once there, click on THING FILE and find the yooper_peninsulaa.stl file and click on it to begin the download. If a dialogue box opens, select "Save As".
The "Load File" button on Cura. Start Cura, and press the "Load File" button located on the top left of the object view window.
An "Open 3D Model" dialogue box opens. Navigate to where the file to print is saved (The Upper Michigan Keychain should be located in the downloads folder), and click "Open"
Click the Prepare button. Click the Prepare button in the lower, right corner. Cura will slice the model and replace the Prepare button with a Sav button.
Save the g-code. If a button saying Save to Removable Drive appears, click the down arrow next to it and select Save to File. Save the g-code to a memorable location.
The current temperature and what it should beBEFORE THE FIRST PRINT, check to make sure that the thermistor is working properly. This can be checked by looking at the current temperature located on the left middle of the page. It should read within 5 to 10 degrees of 20. (depending on room temperature). If it reads a negative number, then there is something wrong with the thermistor.
Using a gluestick, apply a thin layer of glue to the mirror that covers the whole mirror. See this video by rm2kdev for reference.
The location of "Browse" button. (It may be a "Choose File" button) Open Franklin, and locate the "Browse" button. The "Browse" button may be a "Choose File" instead!
The "Browse" dialogue box. A dialogue box opens. Navigate to where the .gcode file from Cura is saved. Load the File. The filename should appear to the right of the Browse/Choose File button.
Adding a .gcode file Locate the "Add" button to the right of the browse button and file name and press it. A red bar will appear on the top of the screen, that says "parsing g-code". When it finishes, the file should appear in the white box on the top left of the screen.
The "Print" button. Select the filename to print in the box on the left (multiple files can be loaded at any one time). The Filename should be highlighted. Press the "Print Selected" button on the bottom right corner of the box.
The Printing Screen The green background of the webpage will change to red, and the printer will begin to heat up. Once the printer reaches temperature (may take a few minutes), the print will begin. If filament had just been loaded, it may take a few seconds for the printer to start extruding.