
NREMT Skillset/Trauma Patient Assessment
| Part of | NREMT Skillset |
|---|---|
| Subskill of | Circulation |
| Subskills | Alertness and Orientation Assessment (A&O) Alertness Assessment (AVPU) Lung Sound Auscultation Airway Opening with Jaw Thrust C-Spine Manual Stabilization Cervical Collar Sizing and Placement Capillary Refill Assessment Respiratory Rate Assessment Skin Sign Evaluation Head to Toe Assessment Non-Rebreather Mask O2 Administration Oxygen Administration Scene Assessment Upon Arrival (PENMAN) Dorsal Pedal Pulse Palpation Radial Pulse Palpation Pupil Evaluation SAMPLE History Taking Stethoscope Use |
| Acting roles | EMR EMT emergency medical responder emergency medical technician paramedic |
| Pathologies | abrasion bleeding bruise burn contusion crepitus cyanosis cyanotic decompensation diaphoresis diaphoretic dilated pupil dislocation exsanguination guarding hemiparesis hemoptysis hypotension hypothermia laceration lesion lividity pain pale pneumothorax puncture swelling tachycardia tenderness tension pneumothorax vomiting wheezing |
| Body systems | nervous system circulatory system muscular system skeletal system respiratory system |
| Body parts | abdomen arm(s) chest ears eyes feet finger hands head leg(s) lower extremities mouth neck nose pupil thorax toe upper extremities |
Trauma Patient Assessment is included in this California-based EMT program as it is required for skills verification for California Registration.[1]
HOW TO USE THIS PAGE
This page covers the secondary assessment in the Trauma Patient Assessment. In approaching every patient, you should start with the following:
- Perform a scene size up (using the PENMAN mnemonic)
- Rapidly form a General Impression (a rapid identification of potential life threats and severity to determine priority)
- Initiate contact with the patient to start the Primary Assessment (ABCDE and Alertness and Orientation)
- Make an initial priority/transport decision
When you have completed your primary assessment, determined that your patient's chief complaint is trauma related, and you have addressed any immediate threats to life, you should proceed to the Trauma patient Assessment:
- SAMPLE history
- Performing a full Head to Toe assessment.
SAMPLE History
[edit | edit source]After the primary assessment, the history relevant to their chief complaint should be explored with the patient. The mnemonic SAMPLE is used by first responders to remember to ask the important questions, as well as to give a framework for an orderly report. In a trauma situation, care can be complicated by underlying medical conditions, so these should be asked about. When possible, ask about the details of the traumatic event and mechanism of injury and allow this to guide the secondary assessment further. If the patient is unable to communicate, it is even more critical to get as much pertinent information as possible from bystanders. SAMPLE stands for:
S – Signs/Symptoms (Symptoms are important but they are subjective.)
A – Allergies
M – Medications
P – Past Pertinent medical history
L – Last Oral Intake
E – Events Leading Up To Present Illness / Injury
Some specific areas to explore in trauma include:
- For blunt trauma, important questions may include speed, seatbelt use, object damage, and/or height of a fall.
- For penetrating trauma, it is helpful to know what penetrated the patient, length of the knife or penetrating objects, and potentially the number of gunshots heard.
- It is important to know if the patient is on any anticoagulants or anti-platelet medications, as well as any other medications that might affect the physiologic response to hemorrhage.
Following the SAMPLE History, take vital signs and move on to a thorough head to toe exam
Head to Toe Assessment, Trauma
[edit | edit source]As a first responder, you perform a more detailed trauma exam to look for other findings that may lead to changes in your pre-hospital care, as well as to provide more complete information for your hand-off to definitive care. A well done and documented exam can save the trauma team time, and prevent serious, but secondary injuries from being missed later.
During your exam, you must:
- Maintain a patent airway at all times with appropriate adjuncts.
- Provide oxygen if indicated.
- Maintain C-Spine Precautions
Starting at the top of the head, use the mnemonic DCAP-BTLS to remind you to look for and note all of the following results of trauma:
- Deformities
- Contusions
- Abrasions
- Penetrations
- Burns
- Tenderness
- Lacerations
- Swelling
Scalp and Skull
- Palpate the scalp and superior aspect of the skull. You are looking for cuts, contusions, depressions, deformities, and unstable segments of skull. Check your gloves for blood after palpation, as scalp lacerations can be hidden in hair
- Inspect and palpate the posterior aspect of the scalp and skull, to the extent that C-spine precautions allow.
- Inspect the lateral aspects of the skull.
- Inspect the ears, looking for blood, or cerebral spinal fluid or bruising behind the ears
Face
- Inspect the forehead, the face, nose, and orbits.
- Check the nose for irregular shape or discharge of any blood or fluid or any mid-face instability.
- Check the mouth, opening it to check for loose dentures/teeth, fluid, and any other potential obstructions.
- Check the maxillae, and mandible for instability.
- Examine the face for droop
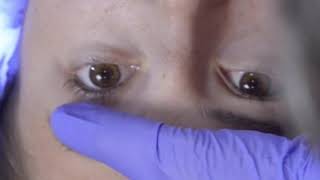
- Evaluate pupillary response, noting unequal pupils, discoloration of sclera, foreign bodies in the eyes, or orbital bruising
- Note abnormal skin signs such as flushing, cyanosis or diaphoresis (profuse sweating).
Neck
- Look for JVD (jugular vein distention)
- Note accessory muscle use for breathing, such as sternocleidomastoid muscles, as these could indicate inadequate breathing
- Look for tracheal deviation, indicating a pneumothorax
- Note any stomas (surgical hole below larynx).
- Note the contents of any medical alert necklaces as these can provide additional history and warnings on allergies, medications, etc.
Chest
- Assess for accessory muscle use, such as intercostal retractions (between the ribs), or abnormal diaphragm movement assisting breathing.
- Inspect the surface for blood; palpate the anterior aspect of the chest.
- Check for symmetrical rise and fall of the chest with each respiration. Both of your hands should rise and fall with the chest, symmetrically.
- Auscultate lung sounds on both sides of the chest listening for diminished or adventitious (abnormal) breath sounds
- Perform a barrel-hoop test by placing hands on either side of the chest and asking the patient to take a deep breath twice. On the first breath, assess for pain, symmetry of movement and absence of crepitus. On the second breath, compress inwards to assess for instability or pain.
Abdomen
- Inspect for blood, bruising, and eviscerations.
- Palpate for masses or rigidity, checking one quadrant at a time noting pain, tenderness, rigidity, or distention which can indicate internal bleeding or peritonitis. It is important to note in which quadrant you elicit a finding.
- Palpable pulsating mass in the midline of the abdomen is a sign for aortic aneurysm (weakened area of the abdominal aorta) which should trigger a discontinuation of the on-site physical exam and initiation of rapid transport.
- An extremely distended abdomen could indicate pregnancy or ascites (fluid build up in abdomen).
Pelvic region
- Palpate each hip checking for instability, look for asymmetric leg length, or feet rotated laterally.
- Check the pelvis for stability with firm pressure on both superior iliac crests simultaneously, applying gently increasing but firm pressure downward.
- Observe and assess for any distention or tenderness in the pelvic region. Note - The pelvis creates a bowl in the lower portion of the abdomen and has the ability to hide nearly 2000cc of blood. Patients may be in danger of shock due to bleeding within the abdominal cavity with no outward visual evidence.
- Inspect the genitals for wounds, priapism (erection due to a spinal cord injury only in the male patient) or other injuries.
- Incontinence (loss of control with bladder and/or bowel)
Extremities
- Feel for crepitus or movement in each portion of the upper and lower limbs. Look for blood as you do so.
- Check pulses, motor, and sensory (PMS) in all 4 limbs. Check pulses at the distal anatomical structures (radial pulse in the hand, posterior tibial, or dorsalis pedis in the foot)
- Ask the patient to squeeze your hand or push against your hand.
- Look for edema (swelling): excessive edema indicates congestive heart failure, fluid overload, or pain, redness or swelling to one calf indicating a DVT (deep vein thrombosis),
- Be alert for any shunts or fistulas which could indicate the patient is on dialysis or track marks from possible illegal drug use
- Note any abnormal tissue discoloration.
Back
Be certain that sufficient help is available to safely log-roll your patient while maintaining cervical spine immobilization. A minimum of two people is required to safely log roll the patient.[citation needed]
- Log roll the patient to expose the back and palpate the length of the spine feeling for step-off, deformities or tenderness.
- Inspect the back for discoloration, edema or wounds
- Roll the patient back onto a backboard, secure the patient to the backboard and prepare for movement to the ambulance.
The four most commonly missed diagnoses during the survey are blunt abdominal trauma with internal organ injury, penetrating abdominal trauma, penetrating thoracic trauma, and extremity trauma such as fractures and compartment syndrome.[citation needed]
The stable trauma patient should have a re-check of vitals and be re-evaluated every 15 minutes, or more often if you have any concerns to follow up on the patients situation. The unstable trauma patient should be reassessed every 5 minutes.
Documentation
[edit | edit source]Documentation of a trauma assessment should be included in the Patient Care Report (PCR) in the form:
- A complete description of all injuries including bleeding status if applicable and size. Example: "Actively bleeding 3 cm laceration to the left index finger" vs "Laceration to the left index finger". Hemostatic wounds are those that have stopped bleeding.
- If placing assessment in the narrative, attempt to paint a picture of the patient in the same way you assess them: from head to toe. Be sure to include pertinent negatives, for example "abdomen non-tender and non-distended" and so-called normal findings "lower extremities unremarkable". Pertinent negatives and unremarkable findings are documented as proof that you have checked these locations in the possibility of a lawsuit.
Self Assessment
[edit | edit source]- Practice the Trauma Assessment Skill sheet until you are comfortable with the workflow
- For additional practice, have a fellow student test you with a Practice Trauma Scenario
- Have a colleague evaluate you using the Integrated Out of Hospital Scenario form while you practice scenarios
- Test your knowledge with this quiz
Tips and Tricks
[edit | edit source]- SAMPLE history is important and may lead to many other follow up questions depending on what the patient answers. Examples of this may be asking the patient if he/she takes prescribed medications, and if so which ones. If the patient answers affirmatively and states "I take atorvastatin, Pradaxa (a blood thinner), and carvedilol". Examples of good follow up medication questions are "Do you take your medications as prescribed?", "Have there been any recent changes to your medications?", and "Do you take any un-prescribed medications or recreational drugs?"
- When gathering history, try to get history from both the patient and one or more bystanders. This mitigates the possibility of a patient lying, misremembering, or unintentionally altering the story due to stress and adrenaline. As a real life example, a patient who stated that she was only knocked down by a light rail train was in fact dragged under the train for almost 30 feet per witnesses and the train driver.
- The dorsalis pedis pulse is oftentimes the easiest to find due to less anatomical crowding. If you utilize this pulse point, mark the site of the dorsalis pedis on each foot in permanent marker. This makes it significantly easier for both prehospital and hospital personnel to re-evaluate distal pulses.
Additional Resources
[edit | edit source]References
[edit | edit source]- ↑ EMT Skills Competency Verification Form (PDF). California Emergency Medical Services Authority. Retrieved 26 December 2021.
| Authors | Global Surgical Training Challenge |
|---|---|
| License | CC-BY-SA-4.0 |
| Cite as | GSTC, JHantke (2020–2025). "NREMT Skillset/Trauma Patient Assessment". Appropedia. Retrieved July 15, 2026. |