
NREMT Skillset/Spinal Immobilization Adult
| Part of | NREMT Skillset |
|---|---|
| Subskills | Back Assessment in Trauma C-Spine Manual Stabilization Airway Opening with Jaw Thrust Cervical Collar Sizing and Placement Circulatory Motor Sensory Testing (CMS) Donning and Doffing PPE Patient Movement Using Log Roll Patient Repositioning on a Longboard Scene Assessment Upon Arrival (PENMAN) Strap Attachment to Longboard Securing Hands for an Immobilized Patient Helmet Removal |
| Equipment | Prehospital PPE Long Backboard Backboard Straps Sta-Blok Head Immobilizer C Collar |
| Acting roles | EMR EMT emergency medical responder emergency medical technician paramedic |
| Pathologies | broken spine (potential) |
| Body systems | skeletal system nervous system |
| Body parts | c-spine head spine trunk |
Spinal Immobilization of the Adult patient is included in this California-based EMT program as it is required for required for skills verification for California Registration.[1]
This skill page covers long backboard immobilization for the supine patient. Review Seated Spinal Immobilization module for techniques for the sitting patient.
Placing the supine patient on a backboard
[edit | edit source]When the mechanism of injury for a trauma patient indicates that there could be spinal involvement, a backboard is often indicated for safely moving the patient. The primary goal throughout examination, transfer and securing to the backboard and finally transport of the patient is that the head, torso and pelvis move as a unit to prevent causing additional injuries. As such, management of a patient with potential spinal injuries requires 3-4 rescuers, and careful coordination by the person providing inline stabilization of the cervical spine. To safely transfer a supine patient to a backboard:
- Assess the scene using the PENMAN mnemonic. Don appropriate PPE and ensure the scene is safe before attempting a rescue.
- If the patient is conscious, instruct them to not move their head or body, and explain the back boarding and extrication process to them.
- Apply manual stabilization. Have a second rescuer position themselves above the patient's head and hold the patient's head and neck to maintain inline stabilization of the cervical spine. While kneeling or lying behind the patient, the rescuer's hands should be placed on the side of the face/neck with thumbs extended to provide support to the side of the head. Fingers should be spread out to cover a greater surface area and be in contact with the bony areas of the jaw and skull. Avoid placing pressure on the soft tissues of the neck.
- Assess pulse, motor, sensory function in all extremities as part of a rapid head to toe trauma exam (omitting the back exam).
- Measure, size and apply the appropriately sized cervical collar, have the second rescuer continue to provide in-line stabilization following application with their hands returned to the original position over the c-collar. Manual c-spine control CANNOT be released until the patient is fully immobilized.
- If time permits, perform a full head to toe trauma physical exam. If the patient is unstable, resume the rapid head to toe exam at the back exam.
- Gently log-roll the patient with a minimum of two, preferably three, providers kneeling at the patient's side and an EMT at the head maintaining C-spine stabilization, and controlling the timing of the roll. The providers on the side will reach across and take hold of the patient (providers arms on the inside will cross over to allow greater stabilization of the patient). On the count of the EMT at the head, roll the patient onto their side, toward the providers.
- Following the physical exam of the back, place the edge of the backboard against the patient and upon the count of the EMT at the head, roll the patient back into their original position, now supine on top of the backboard. The patient should be positioned centrally on the backboard with neither their head nor feet hanging over the ends of the board. For very tall patients, prioritize having the patient's head on the board
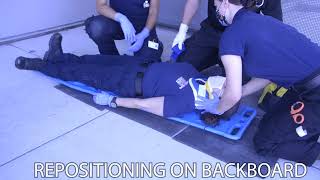
- If the patient needs to be repositioned they should NEVER be pushed from the side, as this compromises c-spine control. Instead use a "V" shaped path, sliding the patient down and over, then back up and over to the correct spot. As with the log-roll, all movements should be coordinated by the rescuer maintaining cervical stabilization. Have one provider at the shoulders and torso, and another at the pelvis and feet. Working together, the two providers will adjust the patient up or down as needed. Providers need to hold the patient by their body parts, not grab the patient by their clothes.
- Pad all void spaces and pressure points between the patient and the backboard. Do not attempt to straighten any natural or traumatic spinal curvature. Lumbar support and/or support under the knees may significantly increase patient comfort. As necessary, padding can be placed under the head and/or shoulders to maintain neutral position. Then proceed to securing the patient to the backboard.
Securing the patient's body to the backboard
[edit | edit source]Many different strap systems are available for securing patients to backboards ranging from multi-strap fast connect or seatbelt type systems to single-piece integrated spider-strap systems (techniques for each will be described below). Be familiar with how the straps you carry are used, and the preferences of the EMS system within which you operate. Strapping systems and techniques vary widely, and may be improvised from seatbelt straps, cravats, or even duct tape in disaster situations, but in all situations that require securing a patient to a long backboard, the order remains the same:
- Secure the shoulders/torso first
- Then secure the pelvis and legs
- Lastly, definitively stabilize and secure the head and neck
This order creates the securest attachment of the patient to the board while placing the least stress on the cervical spine.
Special considerations to prevent injury during transport
[edit | edit source]A critical, universal principle of strapping is that the anchor points of the straps to the board must be placed so that the patient cannot shift on the board if it is tilted. The EMT should always make sure that the immobilization system being used is being applied correctly. In addition to preventing further injury, or neurological compromise to the patient, the EMT needs to be present to assist the patient if they should start to vomit. This can become a life threatening situation if not managed correctly. Having your patient securely immobilized as one unit is an important step. Having one portion of the patient shifting while another portion is still restrained can cause exactly the type of injuries or airway management concerns the backboard is intended to prevent. This requires that the rescuer choose appropriate anchor points for their strapping system in anticipation of the board being tilted:
- Near the shoulders, straps should be placed at the top of the anchor slots in the board (most towards the head), but still at or slightly below the shoulders. This restrains the shoulders and prevents compression of the C-spine by preventing the straps from sliding cranially (towards the head) if the patient is tilted head down, and ensures that there are no straps that will interfere with the head stabilization step later.
- At the feet, the straps that run below the patient's feet should be anchored at the bottom of the slots (most towards the feet) in the board. This provides a sling for the patient to "stand" on and prevent them from sliding caudally (towards the feet) if the patient is tilted feet down. (some counties favor a system that passes straps between the legs to create a sling for the pelvis to achieve this same effect)
- At the torso, the straps should be threaded through the slots in the board as close to the patient's body as possible, and padded to take up the space. This prevents side to side shifting of the patient if the board is tilted. Unless the patient's torso overhangs the board on both sides, the strap loops should be threaded into their respective anchor slots so that the portion of the strap that wraps across the patient emerges from inside the anchor hole rather than wrapping around the outside of the handles of the board.
- Straps across the chest and abdomen should never be so tight as to restrict breathing.
Securing with a 5 strap fast-connect system
[edit | edit source]This technique uses 5 straps in which each strap consists of a matched pair of half straps with a male or female fast connect buckle end and a looped end. The loop is used to secure the strap to the board by running the buckle end through it around the slot on the board. This describes a two rescuer technique which minimizes movement and reaching across the patient, and assumes that there is a third rescuer maintaining cervical spine immobilization.
To secure a properly padded patient placed on a backboard with a 5 strap system:
- Place the first strap at the top of the slot at, or very slightly below, the shoulder. Pass the loop down through the anchor hole, bring around the outside, pass the full strap through, shift the loop laterally to the upper end of the slot, and snug it down to the board.
- Run the full strap across the torso in a diagonal direction towards a slot near the upper hip on the opposite side.
- Have your partner detach the distal half strap, and similarly secure it through the hip slot and then loosely connect their strap to the strap from shoulder.
- Repeat this process, having your partner start with the slot at the second shoulder, and passing the strap across the patient's body to you to perform the hip anchor at the same level.
- Tighten the "X" across the torso using . Have the patient inhale deeply and hold their breath as you tighten the torso straps. This will ensure that the straps are not so tight that they will impede the patient's respirations.
- Place pads as necessary to ensure no voids between the torso and straps. Provide lumbar support if necessary for comfort.
- Similarly to the "Torso X", place two straps in a "Mid-body X" that captures the pelvis and thighs. The strap lines should cross slightly below the crotch region and insert into a board slot adjacent to the lower thigh. Do not cross the knees.
- If necessary, the lower anchor holes that were used for Torso "X" may be used for the upper straps of the mid-body "X" provided the straps are not crossed in the anchor point which could cause them to twist or pull on each other when securing the patient to board.
- Tighten the "Mid-body X" before moving on.
- Secure the 5th strap to the bottom end of a slot just below the patient's knee. Run the strap in a diagonal direction across their lower legs/ankles and around the bottom of feet/shoes and back across itself to bring the other end to the same level anchor point on the opposite side.
- Anchor and snug the single foot strap, ensuring the straps are at the bottom end of the anchor points so that if tilted, the patient should be able to "stand" on these straps without sliding.
- Proceed to securing the head.
Securing with single piece Spider Straps
[edit | edit source]Spider straps vary in construction and application, but most consist of a pair of "V" straps which pass over the shoulders, attached to a central midline strap which typically connects to 4 parallel straps, the bottom of which is fixed and intended to secure the patient at the calf-ankle range. The 3 intermediate straps are adjustable to catch the patient below the armpits, at the pelvis, and at the lower thigh. Some models have color coded straps, others integrate in a foot sling. The straps secure with a hook and loop closure that doubles back and attaches to itself. Spider straps are easiest to apply with two rescuers working in parallel on either side of the patient.
To secure a properly padded patient placed on a backboard with spider straps:
- Lay the spider straps out on the patient, and adjust the intermediate straps to match their level. Ensure that there are no twists in the central midline strap and that the ends of the straps are all face up on the patient.
- Secure the shoulder straps first. Peel the end of the strap away from the rest of the strap to open the hook and loop fastener. Pass the end down through the anchor hole, bring around the outside, shift the loop laterally to the upper end of the slot, and reattach it to itself securely. As with the 5 strap technique, the top end of the shoulder strap anchor point should be flush with or slightly below the shoulder to allow proper placement of head blocks and prevent the patient from sliding cranially (towards the head).
- Secure the ankle/feet straps next. These should be placed so that the center strap extending from the head to feet is pulled taut and is snug against the body and midline. For very tall patients where this strap might pass over the kneecap, lengthen the shoulder straps to extend the bottom.
- There is no specific order for applying the three remaining straps, however they need to be in the proper place to secure the main movable structures of the body. Strap placement may be varied to prevent passing over injured areas, but must always pass over hard bony surface areas on the body.
- The top strap should be placed over the chest (ribs) as close to the armpits as is comfortable for the patient. In systems without a foot sling, this strap helps prevent the patient from sliding caudally (towards the feet).
- The upper middle strap should be fixed over the top part of the pelvic bone (the bony crest - not the soft abdomen)
- The lower middle strap will need to be over the lower thighs. Straps should never be placed over the kneecap.
- Proceed to securing the head
Head Immobilization
[edit | edit source]Following securing of the body, it is now safe to secure the patient's head to the backboard. There are commercial head stabilization systems such as the Sta-Blok system (described here) which use adhesive to attach a base to the backboard and then adjustable blocks to attach stabilizers to the base. Without such systems, the head may be stabilized using rolled blankets or other firm padding in place of the adjustable head blocks and tape. Independent of the method used, the goal is the same - to maintain the patient's cervical spine in line with the torso without flexing, twisting laterally or experiencing compression during transport.
To immobilize the patient's head:
- If using an immobilizer system, first attach the base of the system to the backboard using the provided adhesive. Have the rescuer who is maintaining inline immobilization very slightly lift the patient's head off of the backboard to allow a second rescuer to slide the base with the blue hook and loop surface facing up, and the adhesive surface (with the protective liner still intact) face down, under the head centered just above the ears.
- Holding the base securely in place, pull the liner tabs on each side of the base to remove the liner covering the adhesive, and press the base firmly down to attach to the backboard.
- Secure the head against lateral movement. Place head blocks (or rolled blankets if not using an immobilizer system) on the left and right side of the head at the level of the temples, just above the ears. As a head block is being placed on each side of the head, the provider manually maintaining c-spine will place their hand over the head block continuing to manually maintain c-spine with head blocks in place.
- Secure the head against flexion. Use the hook and loop strap to secure the forehead to the blocks, and then back up the attachment using cloth tape. There are many variations on how this tape is placed, and your EMS system may have different conventions, however the goal of all of the taping methods for both immobilizer systems and using improvised rolls is to firmly secure the head against flexion (i.e. to prevent the back of the head from rising off of the backboard or base, as well as to prevent any pivoting of the head on the neck such as would be seen in a "nodding" motion).
- Using a single long piece of tape, attach one end to the backboard at the level of the forehead (wrapping it securely around an anchor point and attaching it to itself), run it across the forehead (avoiding the eyebrows), and attach similarly to the board on the other side at the same level.
- Anchor a second continuous piece of tape to the backboard at the level of the patient's chin, route it at an angle up to the forehead piece, joining it at the temple, adhere it to the forehead piece across the forehead, then angle it down at the opposite temple to similarly secure it to the backboard on the opposite side at the same level. DO NOT put tape across the chin.
- If tape needs to removed, tear tape in center of the forehead and pull towards the lateral edge of the backboard. This will cause the least amount of damage to the eyebrow hair.
- Provider may release manual c-spine once the head blocks and tape have been secured.
The patient may now be transported
Documentation
[edit | edit source]Documentation of spinal immobilization should be included in the Patient Care Report (PCR) in the form:
- "Arrived to find patient lying prone with left arm trapped underneath body approximately 25 feet from vehicle. Patient is responsive to pain only. Manual C-Spine stabilization begun. Patient exhibits no respiratory distress, skin signs warm, dry and normal colored with strong, rapid radial pulse. Patient is a 17 yo Male who was ejected from his vehicle after a rollover collision at highway speeds. Reporting party states that they witnessed the patient's vehicle "drifting from lane to lane" for several minutes before crash. Vehicle exhibits significant damage over the entirety of the vehicle with intrusion into the passenger compartment. Seatbelt pretensioners have not fired, front and side airbags deployed. Backboard placed next to patient, rapid trauma exam of the back shows step offs to the cervical and thoracic vertebrae. Patient log rolled onto backboard. C-collar applied. Patient assessment reveals minor abrasions to the arms and legs with unilaterally reactive pupil on the right. Patient placed in full spinal motion restriction precautions and moved to EMS gurney. Circulation and motor reflexes intact x4 before and after immobilization. Patient loaded into ambulance and transported.
Self Assessment
[edit | edit source]- Work through the Supine Spinal Immobilization Lab workflow
- Test your knowledge with this quiz
Tips and Tricks
[edit | edit source]- When holding C-Spine, avoid covering the patient's ears fully, if possible. Remember that the patient is most likely already stressed and you are removing their ability to look around. Removal of another sense will be detrimental to the patient's emotional state.
- If the patient is found prone and has no potential life threats/airway complications, a rapid trauma assessment of the back and placement of a backboard before supination of the patient allows for more streamlined patient care.
- If the patient is unresponsive, take care to secure the patient's hands/arms. These appendages can, and will, "flop free" and catch in the most inconvenient ways at the most inconvenient times (e.g. while moving the patient through a doorway. Now you have a patient with additional trauma). Another strap, tape, or even a nasal cannula can be used to secure the patient's hands in a way that they will not impede patient movement.
Additional Resources
[edit | edit source]TBD - extra videos to watch, links to other pages for more reading
| Authors | Global Surgical Training Challenge |
|---|---|
| License | CC-BY-SA-4.0 |
| Cite as | JHantke, Dwh904 (2020–2025). "NREMT Skillset/Spinal Immobilization Adult". Appropedia. Retrieved July 13, 2026. |