
NREMT Skillset/Seated Spinal Immobilization (KED)
| Part of | NREMT Skillset |
|---|---|
| Subskills | C-Spine Manual Stabilization Cervical Collar Sizing and Placement Circulatory Motor Sensory Testing (CMS) Scene Assessment Upon Arrival (PENMAN) |
| Equipment | Prehospital PPE Kendrick Extraction Device (KED) C Collar |
| Acting roles | EMT emergency medical technician paramedic |
| Pathologies | broken spine (potential) |
| Body systems | skeletal system nervous system |
| Body parts | c-spine head spine trunk |
Seated Spinal Immobilization is included in this California-based EMT program as it is required for skills verification for California Registration.[1]
A short backboard immobilization device should be used on a patient found in a sitting or semi-sitting position with suspected cervical spinal injuries (such as in a car collision) prior to moving the patient. Exceptions to this are when a patient needs to be rapidly extricated because scene is unsafe, the patient is unstable, or a critical patient is blocked by another less critical patient.
These instructions are for a KED spinal immobilization device. Any commercially manufactured short backboard device should be used according to the manufacturer's guidelines.[2] All rescuers should fully understand the guidelines and instructions from the manufacturer for the device they are using.
Spinal immobilization
[edit | edit source]- Assess the scene using the PENMAN mnemonic. Don appropriate PPE and ensure the scene is safe before attempting a rescue.
- If the patient is conscious, instruct them to not move their head or body, and explain the back boarding and extrication process to them.
- Apply manual stabilization. Have a second rescuer position themselves behind the patient and hold the patient's head and neck to maintain inline stabilization of the cervical spine. Thumbs should be extended to provide support to the back of the head. Fingers should be spread out to cover a greater surface area. Avoid placing pressure on the soft tissues of the neck. Fingers should be placed over the bony areas (jaw or skull)
- Assess pulse, motor, sensory function in all extremities as part of a rapid head to toe trauma exam.
- Measure, size and apply the appropriately sized cervical collar, have the second rescuer continue to provide in-line stabilization following application.
- Prepare the KED device for placement by positioning all strapping so it will not become entangled while passing the device between the patient and the seat.
- Have the first rescuer place a forearm on the patient's chest with the hand on the front of the cervical collar and the and the other hand on the patient's back. At the count of the rescuer holding manual inline cervical stabilization, tilt the patient forward (pivoting from the hips) only far enough to admit the backboard device behind the patient.
- With the straps facing away from the patient, have a third rescuer slide the short backboard behind the patient and between the arms of the rescuer holding manual inline stabilization until it is centered on the patient's back, and the top of the torso "wings" are positioned just below the patient's armpits.
- Guide/pivot the patient back upright to the device on the count of the rescuer holding manual inline cervical stabilization.
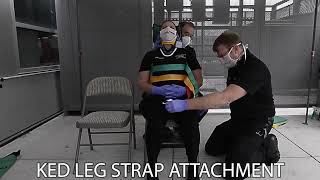
- Depending on your local protocols, you will either use a "criss-cross" or a "same side" configuration for the leg straps:
- Criss Cross. Slide the black leg straps under the leg gently, pass back out over the top of the opposite thigh and loosely fasten to the white clips - this will form a "criss-cross" of the leg straps under the patient.
- Same side. If the crossed straps are passing over a groin injury, or your local protocols dictate, the straps may be routed to the same side clip. Extra care must be taken in the same-side configuration to ensure that the leg straps are close to the midline of the body.
- Clip the three (green/yellow/red) torso straps loosely to their same colored fastener. (Note: with pregnant patients, or patients with significant abdominal injuries, the straps may be crossed to avoid passing over pressure sensitive areas).
- Tighten the torso straps, starting with either the center (yellow) strap or the bottom (red) strap with the top (green) last. Have the patient inhale deeply and hold their breath as you tighten the torso straps. This will ensure that the straps are not so tight that they will impede the patient's respirations. An alternate technique to preserve breathing comfort is delaying tightening the green (top) strap until just prior to moving the patient.
- Tighten the leg straps making sure that the straps are fed straight from the anchor point to the clips and not hung up on items in patient's pockets or seat components.
- As a last step, secure patient's head in the neutral position - bring the head "wings" around either side of the head in coordination with the rescuer maintaining manual stabilization and apply the top strap across the forehead with the attachments angled down. Some patients, but not all, will require padding placed between their head and the short backboard to firmly secure their head in a neutral position within the stabilizing wings without extending the patient's neck.
- If indicated in your EMS protocols, apply the C-collar strap across the C-collar angled up to secure the head both side to side and prevent flexion/extension. (It should be noted that many EMS systems in California use of the C-collar strap is forbidden as it potentially will inhibit a patient being able to manage their airway if vomiting should occur).
- When the head strapping is in place, the rescuer providing manual inline cervical stabilization may release the patient's head/neck.
- Reassess all four extremities for distal pulse, motor function and sensory function.
Extrication from the Vehicle
[edit | edit source]Once the patient's C-spine and torso have been stabilized, it is now safer to move the patient. Removing a patient from a vehicle takes a coordinated approach with a minimum of 3 rescuers. Every situation will be different, and technique will need to be adapted to conditions at the site. Things to consider:
- Place a rescuer at the head to maintain and support c-spine immobilization and to direct the movement of the patient with coordinated count.
- Depending on vehicle design, the patient may need to be removed either head- or feet-first to work around the vehicle's interior design, such as the stick shift or center console. Examine the vehicle cockpit, and, as a rescuer group, discuss and plan the best direction for extrication.
- Remove a patient's bulky items like, wallet, phone, etc. - these items can cause injury or can snag making the patient removal process difficult.
- It can be very crowded at the vehicle door, you can more effectively use additional rescuers by using a long backboard slid under a portion of the patient's buttocks to allow extricating the patient along the backboard stabilized by other rescuers.
- To get the extrication started, a rescuer will need to be on each side of the patient with one hand on the handles attached to the KED and the other hand underneath the patient's legs. The hands underneath the patient's legs should be grasped together and held tight while lifting. The patient is then lifted out of the car or other confined space.
- If you are not able to lift the patient from the vehicle as discussed in the previous bullet, coordinated short moves and turns on the command of the person stabilizing the head until the patient is on the board in a seated position. Continuing with coordinating moves the patient is then slid up the board until their head is close to the top. The responders will then move the board away from the vehicle to safe location and placed on the ground. If a gurney was used in the process, the board and patient are moved until positioned correctly on gurney.
- In both situations the patient needs to secured to board and then gurney properly according to your EMS systems protocols.
After extrication from the vehicle, immobilize the patient on a long backboard for complete spinal immobilization. You do not need to remove the KED to do so: simply fully loosen the leg straps to allow the legs to be moved into a straight position on the backboard, and loosen the torso straps to allow freer breathing before securing the patient with the KED still in place to the long board.
Documentation
[edit | edit source]Documentation of blood glucose should be included in the Patient Care Report (PCR) in the form:
- Example: "Patient placed in KED and extricated from vehicle to gurney. Patient placed in full spinal motion restriction precautions. CSM intact x4 prior to procedure and after immobilization."
Self Assessment
[edit | edit source]- Be familiar with the workflow from the Seated Spinal Immobilization Lab
- Test your knowledge with this quiz
Tips and Tricks
[edit | edit source]- An easy mnemonic for remembering the order of the straps in a KED is My Baby Looks Hot Tonight. This stands for Middle, Bottom, Legs, Head, Top.
- If there is the potential for airway compromise due to excessive vomiting, a KED is a good alternative to a backboard for patient transport. The KED will allow the patient more ability to control their airway than a backboard. Although a backboard may be wedged upward or rolled to allow for evacuation of the airway, both of these procedures are fairly difficult and dangerous when performed in the back of a moving ambulance.
Additional Resources
[edit | edit source]TBD - extra videos to watch, links to other pages for more reading
References
[edit | edit source]- ↑ https://emsa.ca.gov/wp-content/uploads/sites/71/2017/07/Skills-Form-7.1.17.pdf
- ↑ FERNO KED® Pro Users' Manual (PDF). Ferno Rescue. Retrieved 26 December 2021.
| Authors | Global Surgical Training Challenge |
|---|---|
| License | CC-BY-SA-4.0 |
| Cite as | GSTC, Dwh904, JHantke (2020–2025). "NREMT Skillset/Seated Spinal Immobilization (KED)". Appropedia. Retrieved July 15, 2026. |