J.M.Pearce (talk | contribs) mNo edit summary |
Sophivorus (talk | contribs) m (Rename "affiliations" parameter to "organizations", to unify terminology throughout Appropedia) |
||
| (42 intermediate revisions by 9 users not shown) | |||
| Line 1: | Line 1: | ||
[[File:Eassy1.jpg|thumb]] | |||
{{Project data | |||
| authors = User:Nick D. | |||
| completed = 2015 | |||
| made = Yes | |||
}} | |||
{{MOST}} | {{MOST}} | ||
This Effector for a column delta printer, like the [[Delta Build Overview:MOST|MOST delta RepRap]] allows different hotend nozzle sizes to be used. It does this without | |||
This Effector for a column delta printer, like the [[ | |||
# The effects of localized heating or | |||
# The unused nozzles colliding with the part due to warping or bed-leveling issues and | |||
# Helps reduce the effect of nozzle drool/ooze. | |||
This design new no firmware or other hardware feedback sensors needed -- so it is an easy upgrade to perform for those who do not want to modify their firmware. | |||
Please note: the center to center distance of the carriage joints must be the same as the effectors otherwise the effector will not move across the bed in a plane. | |||
<center> | |||
<gallery> | |||
File:Eassy1.jpg|Assembled Extruder | |||
File:Eassy2.jpg|runing extruder | |||
File:Eassy3.jpg|Assembled Extruder | |||
File:eassy4.jpg|Assembled Extruder | |||
</gallery> | |||
</center> | |||
== Bill of Materials == | |||
* 6 x 8 x 1/8 inch aluminum plate | |||
* 6 x 8 x 1/8 inch aluminum plate | |||
* 10/32 Grub screws x 6 | * 10/32 Grub screws x 6 | ||
* 8/32 x 4 inches x 3 | * 8/32 x 4 inches x 3 | ||
* 1/8 bsp pushfit connectors x3 | * 1/8 bsp pushfit connectors x3 | ||
* E3D version 5 or 6 hotends x3 | * E3D version 5 or 6 hotends x3 | ||
* 1.5 inch by 6inch by .015 inch shim stock steel | * 1.5 inch by 6inch by.015 inch shim stock steel | ||
* 12 8/32 locknuts x 12 | * 12 8/32 locknuts x 12 | ||
* 1/2 inch ball bearings | * 1/2 inch ball bearings | ||
* 2 part epoxy | * 2 part epoxy | ||
* 1/4 x 4 x .02 inch shim stock steel | * 1/4 x 4 x.02 inch shim stock steel | ||
The STL file for the parts can be found here: | |||
* [[File:Bplate.stl|Assembled Extruder|500px|left]] | * [[File:Bplate.stl|Assembled Extruder|500px|left]] | ||
* [[File:Tplate.stl|Assembled Extruder|500px|center]] | * [[File:Tplate.stl|Assembled Extruder|500px|center]] | ||
* [[File:EAssy.stl|Assembled Extruder|500px|center]] | * [[File:EAssy.stl|Assembled Extruder|500px|center]] | ||
== Tools needed for fabrication of the effector == | |||
# Mill | |||
# Mill | |||
# Drill Press | # Drill Press | ||
# Files | # Files | ||
# Wrenches | # Wrenches | ||
# Allen Wrenches | # Allen Wrenches | ||
# Screwdrivers | # Screwdrivers | ||
# Punch Block | # Punch Block | ||
# Layout Die | # Layout Die | ||
# Sheet Metal Scissor/Shears | # Sheet Metal Scissor/Shears | ||
== Skills and knowledge needed == | |||
* Machining | * Machining | ||
* Basic knowledge of Additive Manufacturing | * Basic knowledge of Additive Manufacturing | ||
== Technical Specifications and Assembly Instructions== | == Technical Specifications and Assembly Instructions == | ||
* Mill 2 Plates on manual mill with rotary table or cnc mill, or with waterjet cutter. | |||
* Tap holes in base plate | * Mill 2 Plates on manual mill with rotary table or cnc mill, or with waterjet cutter. | ||
* Cut threaded rod to clear the tops of hotends by 10mm | * Tap holes in base plate | ||
* Bend metal clips using gage pin and vice or sheet metal bender. | * Cut threaded rod to clear the tops of hotends by 10mm | ||
* Using layout die and punch block punch out the springs for each hotend. | * Bend metal clips using gage pin and vice or sheet metal bender. | ||
* Apply washer to threaded rod followed by spring followed by nut and tighten securely | * Using layout die and punch block punch out the springs for each hotend. | ||
* Apply washer to threaded rod followed by spring followed by nut and tighten securely | |||
* Assemble heatsink to hotend while in the spring and apply clips to secure hotends | * Assemble heatsink to hotend while in the spring and apply clips to secure hotends | ||
* Apply top plate so that gap is minizied from top plate to top of hotends while providing clearance for the hotends to move making sure top plate is parallel to base plate and tighten in place. | * Apply top plate so that gap is minizied from top plate to top of hotends while providing clearance for the hotends to move making sure top plate is parallel to base plate and tighten in place. | ||
=== Common Problems and Solutions=== | === Common Problems and Solutions === | ||
Make sure to use locktite on set screws for each spring to keep them from | |||
Make sure to use locktite on set screws for each spring to keep them from vibrating out during long use. | |||
Paint the springs to prevent rust. | Paint the springs to prevent rust. | ||
{{Page data | |||
| keywords = 3D printer modification, hotend effector, nozzle, metal | |||
| sdg = SDG09 Industry innovation and infrastructure, SDG11 Sustainable cities and communities | |||
| published = 2015 | |||
| organizations = Michigan_Tech's_Open_Sustainability_Technology_Lab, MTU | |||
| license = CC-BY-SA-3.0 | |||
| language = en | |||
}} | |||
[[Category:MOST Delta Build]] | [[Category:MOST Delta Build]] | ||
[[Category:MOST methods]] | [[Category:MOST methods]] | ||
[[Category:How tos]] | [[Category:How tos]] | ||
Latest revision as of 18:57, 29 January 2024


This Effector for a column delta printer, like the MOST delta RepRap allows different hotend nozzle sizes to be used. It does this without
- The effects of localized heating or
- The unused nozzles colliding with the part due to warping or bed-leveling issues and
- Helps reduce the effect of nozzle drool/ooze.
This design new no firmware or other hardware feedback sensors needed -- so it is an easy upgrade to perform for those who do not want to modify their firmware.
Please note: the center to center distance of the carriage joints must be the same as the effectors otherwise the effector will not move across the bed in a plane.
-
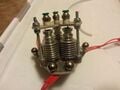
Assembled Extruder
-
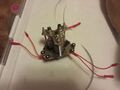
runing extruder
-
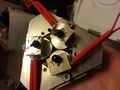
Assembled Extruder
-
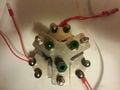
Assembled Extruder


Bill of Materials[edit | edit source]
- 6 x 8 x 1/8 inch aluminum plate
- 10/32 Grub screws x 6
- 8/32 x 4 inches x 3
- 1/8 bsp pushfit connectors x3
- E3D version 5 or 6 hotends x3
- 1.5 inch by 6inch by.015 inch shim stock steel
- 12 8/32 locknuts x 12
- 1/2 inch ball bearings
- 2 part epoxy
- 1/4 x 4 x.02 inch shim stock steel
The STL file for the parts can be found here:
Tools needed for fabrication of the effector[edit | edit source]
- Mill
- Drill Press
- Files
- Wrenches
- Allen Wrenches
- Screwdrivers
- Punch Block
- Layout Die
- Sheet Metal Scissor/Shears
Skills and knowledge needed[edit | edit source]
- Machining
- Basic knowledge of Additive Manufacturing
Technical Specifications and Assembly Instructions[edit | edit source]
- Mill 2 Plates on manual mill with rotary table or cnc mill, or with waterjet cutter.
- Tap holes in base plate
- Cut threaded rod to clear the tops of hotends by 10mm
- Bend metal clips using gage pin and vice or sheet metal bender.
- Using layout die and punch block punch out the springs for each hotend.
- Apply washer to threaded rod followed by spring followed by nut and tighten securely
- Assemble heatsink to hotend while in the spring and apply clips to secure hotends
- Apply top plate so that gap is minizied from top plate to top of hotends while providing clearance for the hotends to move making sure top plate is parallel to base plate and tighten in place.
Common Problems and Solutions[edit | edit source]
Make sure to use locktite on set screws for each spring to keep them from vibrating out during long use. Paint the springs to prevent rust.