This zero-electricity fridge addresses the issue of people in third world countries not having electricity. They go to markets and buy food and then the food goes bad 2-3 days later. Having to make multiple trips to a market per week means that they both have to spend the money to get there and buy food along with lose the money they could be making working during that time. With this device, they will have a means to keep food cold for a pretty low price because the only material needed after the 2 parts were 3D printed is water and dirt or gravel which they could just find around. The water doesn't even need to be clean, it just needs to be able to evaporate. A company is working on this project currently except not 3D printing its components and it is called Evaptainer and their units retail between $25-$35 USD. At a budget of about $50 a week even that would be considered a decently steep investment.
- One thing I'd like to mention is that the size I made is fairly small. My printer did not have the capability to print too much larger of one. This is more of a concept print to show that it can be done and for very cheaply. To print one that could hold a reasonable amount of food it would need scaled to a bigger size. Mine is big enough to hold roughly an apple.
- A second note: The design I used was purely because my printer could print it easily without messing it up at all. The design for the object was from Thingiverse and I then used blender to scale it bigger.
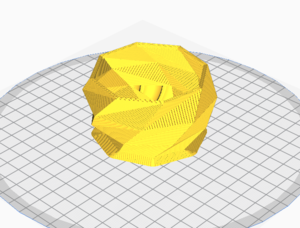
- Picture of stl in Cura
Bill of Materials[edit | edit source]
- 3D printer
- Dirt or rocks small enough to fit between components
- All stl and CAD files can be found on Thingiverse here [1]
Tools needed[edit | edit source]
- MOST Delta RepRap or similar RepRap 3-D printer
Skills and knowledge needed[edit | edit source]
- Ability to operate a 3D printer
- Ability to CAD your own containers if you want different looks
Technical Specifications and Assembly Instructions[edit | edit source]
- To print, download the stl files and open them in a slicing app. Then slice and print.
- Print settings: 0.2mm layer height, 10% infill, 8mm Brim, print temp: 200C, Speed: initial layer=15mm/s; Rest=30mm/s
- Repeat step one for the second smaller object.
- Put dirt/rocks into the bigger object until when the smaller one is placed inside the tops are flush. Once the tops are even, fill in around the outside of the smaller one with dirt.
- Put any food inside the smaller part and watch it stay good for days longer without the use of a fridge.
- Print time is roughly 14 hours total: 10 for the big one and 4 for the small.
- Assembly time is ~5 minutes.
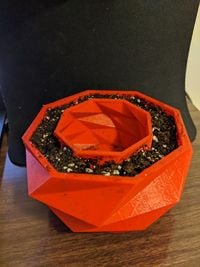
- Picture of completed print

Common Problems and Solutions[edit | edit source]
- Problem: Finding a container my printer could print reliably when scaled. Solution: I tested 3 different shapes until I found one. The shapes included a cube, a cylinder, and then this low-poly shape I ended with.
- Problem: Too much dirt in bigger container. Solution: Take dirt out.
- Problem: Too little dirt in bigger container. Solution: Put more in.
- Problem: Over-saturating the dirt/water overflow. Solution: Drain water out or just let it evaporate.
- Problem: Got dirt in the inner container. Solution: Wash stuff you take out before eating.
Cost savings[edit | edit source]
- Big container: $1.32
- Small container: $0.48
- Rock/dirt: free
- Water: ~$0.10 or free depending where you get it from
- Total: $1.90
- A commercial equivalent to my product is Evaptainer. They are making these out of a more cloth like material, kind of like a cooler. They are selling them for about $25 each. While my containers are a lot smaller, to print a decently big scale of mine would run about $10-$15, which is still $10-$15 cheaper than their design. [2]
- Assume a full $15 one is printed. That still puts the savings at $10 per unit or 40%. If it cost $10 then the savings goes up to $15 and they cost 60%.
Benefited Internet Communities[edit | edit source]
- Evaptainer, they could pursue 3D printing theirs rather than using what they currently are [3]
- Mission trips to 3rd world countries. Example [4]
- 3D printing communities [5] or [6] for two examples
- Disaster aid teams if there is no electricity available [7]
- Teachers for a classroom demonstration that could be used everyday. [8]
References[edit | edit source]
- The sources of information (e.g. engineering handbooks, journal articles, government documents, webpages, books, magazine articles etc.). References should use the and <references />tags and can be in any format but should include all the information necessary for someone else to find the same information you did. For example:
- Web page: Explains how the container works to cool the things inside it. Available: http://www.evaptainers.com/the-technology-1</ref>
- Web page: Evaptainer website. Available: http://www.evaptainers.com/</ref>