
User Manual: DIY Portable I-V Curve Tracer Version 1

Introduction
[edit | edit source]- a fundamental method for characterizing solar PV module behavior
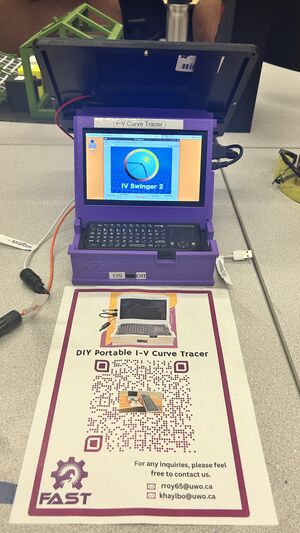
DIY Portable I-V Curve Tracer_ Version 1.0 Prototype - plots the relationship between current (I) and voltage (V) across the module under varying conditions
- cost-effective portable DIY design

I-V Curve Tracer Instruction Manual
[edit | edit source]Steps for Operation
[edit | edit source]Step 1: Powering Up the Device
[edit | edit source]- First, turn on the device by sliding the switch to the ON position.
Step 2: Pairing the Keyboard
[edit | edit source]- When the screen is on, turn on the keyboard and mouse by sliding their power switch upwards. The keyboard's power switch is on the left side.
- Note: If the keyboard is turned on before the main power supply, it won't be able to pair with the screen.
Step 3: Launching the Software
[edit | edit source]- Double-click on the "PV Tester App" on the screen to open the app.
- If it doesn't open, right-click the icon and choose "Execute."
Step 4: Checking for Connectivity
[edit | edit source]- Wait until the "Swing!" sign turns red, indicating the device is ready to operate.
Step 5: Voc Measurement Using Multimeter
[edit | edit source]- Measure the open-circuit voltage (Voc) using a multimeter.
Step 6: Calibration
[edit | edit source]- Click on "Calibrate" in the app and choose "Voltage - basic."
- Enter the measured voltage in the box and press "OK."
Step 7: Connecting the PV Module to the Device
[edit | edit source]- Connect the PV module to the input connectors.
Step 8: Selecting the Mode of Operation: Cell or Module
[edit | edit source]- Select the mode of operation by changing the position of the 3-way switch to either the cell (C) version or the module (M) version.
-**Middle Position**: Clicking on "Swing" will show "Voc is Zero."
-**C Position**: Measures the I-V characteristics of the reference cell, and the curve will be displayed on the screen.
-**M Position**: Plots the I-V curve of the connected module.
Step 9: Renaming the Test Results
[edit | edit source]- Go to "Result Wizard" after every swing and rename the test result for better understanding.
- Do not skip this step.
Step 10: Overlaying the Curves
[edit | edit source]- To overlay the curves, go to "Result Wizard."
- Press and hold the "Ctrl" button on the keyboard and select the test results.
- Click on "Overlay."
Tutorial Video
[edit | edit source]Click on the thumbnail to watch the video
Notes
[edit | edit source]- Charge the device for at least an hour before using it.
- Charge the keyboard if it is not turning on.
- Ensure there is sufficient light so that the large modules generate at least 3 amps.
- The tilt angle of the reference cell can be changed just by rotating the cell carefully.
- If the screen is not turning on or is blinking, turn off the device and charge it properly.
- As the device is not connected to any network, the time zone is not correctly set. If you don't rename the test results, they will be replaced by other test results.
| Authors | Riya Roy, Koami Soulemane Hayibo |
|---|---|
| License | CC-BY-SA-4.0 |
| Location | London, ON |
| Organizations | FAST |
| Cite as | Riya Roy, Koami Soulemane Hayibo (2024). "User Manual: DIY Portable I-V Curve Tracer Version 1". Appropedia. Retrieved July 11, 2026. |