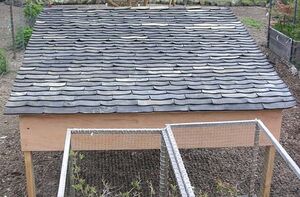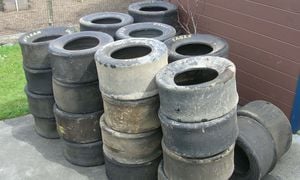
One day, I saw a bunch of old tires used as a retaining wall and that got me thinking about what other uses old tires are good for. I had a few thoughts about what to make but I liked the idea of tire shingles the best. The fact that they would be malleable really hooked me. I couldn't wait to get started!
Information on Tires[edit | edit source]


The fabric of the tire is steel, nylon, aramid fiber, rayon, fiberglass, or polyester combination. The rubber is natural and synthetic (hundreds of polymer types). There are plenty of chemicals such as reinforcing chemicals, anti-degradants, adhesion promoters, curatives, and processing aids such as oil. During my research I also found the typical percentages of the (Synthetic Rubber and Natural Rubber) rubber mix in various types of tires. Passenger car tires are 55% to 45%, Light truck tires are 50% to 50%, Race tires are 65% to 35%, and off highway tires 20% - 80%. Next I wanted to know what other problems they may cause other than the environmental impact due to the composition of a tire. I hadn't thought about this but it makes perfect sense. I discovered that tires make the perfect breeding ground for mosquitos. With all of the diseases that mosquitoes are carrying now-a-days these tires are causing a potential threat to public health and safety. Finally, I wanted to know what other methods of tire recycling are out there. I found a company called Rubbur Concepts that uses a compression mold to turn used tires into replica cedar and slate shingles. I also found that old tires are shredded and used in combination with asphalt to pave roads.
Materials for Shingles[edit | edit source]
- 36 Race Car Tires
- Sharp Razor Blades
Materials for Roof[edit | edit source]
- (3) 3/4" Plywood sheets
- (2) 8ft 2"x4"
- Screws
- Miscellaneous wood that I had
Clients/Site[edit | edit source]
As you can see these are my clients. The owners of the chickens wanted the run of the coop covered. I discussed my idea with them and they agreed to let me build it. Little did I know...
Trial and Error[edit | edit source]
As with any project there are always mistakes, or learning curves as some might say. So here is where I tell you about what didn't work (for me). The initial tire concept was based on utilizing radial tires and that changed very quickly. The first tire I tried to cut was, to say the least, very smelly. I tried using a cutting wheel on the end of a drill (spinning at about 30,000RPM) and I found that while it would cut through the bead of the tire and all of the steel belts it wouldn't cut the rubber, it just melted it. After breathing a cloud of burning rubber and trying it again wearing a breathing mask, I decided that it may not be the most "appropriate" method. That particular method took about an hour and a half with only 8 small shingles being produced. The next method I tried was a jigsaw; it didn't even cut through the rubber. The tire was too flimsy and would shake, so the jigsaw couldn't cut it if the tire didn't stay still. I didn't even get one shingle out of that attempt. The last method I used on the radial tires was a hack saw and let's just say that it would have taken more than a year to cut the shingles that I needed. I then learned that there is only one part of a radial tire that doesn't have steel belts and that is the side wall between the tread and bead. I did try to use a utility blade (box cutter) and cut just the side wall but it was harder to cut curves and keep them some what straight edged.
The Method Used[edit | edit source]
After several failed attempts with radial tires, I spoke with a local tire dealer and found that Racing tires only have Steel belts in the side walls, not in the tread. He happened to have an old tire so I took it home to see what I could do. I drilled a hole in the tread and used a key hole saw to start cutting. It went rather smoothly but it did take two people and still took about 45 minutes to make 12 – 14 shingles. I knew these were the type of tires I needed but I needed a lot of them, it turns out the the guy at the local tire dealer knew someone who had a ton of old Racing tires. Before I went to the store to buy brand new hole saws, I tried a utility blade (box cutter) (just for laughs actually) and found that it cut through the tire like a hot knife through butter (Image 1). This method cut the time down to minutes. After cutting the side walls off, I had a round thin circle of rubber(Image 2). Then cut it so it was a long flat sheet about 8" x 80" (Image 3).
-
Image 1
-
Image 2
-
Image 3
Now that I had a sheet of rubber all that was left to do was make the actual shingles. As you can see in Image 3 I used a piece of chalk to mark where I needed to make the cuts and this is a good time to have someone with you. I averaged 14 shingles per tire and the shingles were 5" x 8". My friends and I used a method that we called "the bend and spread". As you can see, below in Image4 the "bend" portion refers to actually bending the rubber strip to help keep the rubber from kinking while cutting. Image 5 is showing the spread part, while being cut the person bending the rubber should also help spread it so it is easier and faster to cut. I didn't time how long each individual tire took to cut, but with four people and in four hours we cut all 36 tires and made 460 shingles. I was very happy with the time results. Each tire produced about 2ft2.
-
Image 4
-
Image 5
-
Image 6
The Roof[edit | edit source]
As mentioned earlier during the Clients/Site portion, I ended with "little did I know...". Well, I didn't think ahead with the weight factor. The run that was already built for the coop was way too flimsy to support these shingles. The shingles averaged 14 lb per 25 shingles and I had 460. Since covering the run was out, the owners and I needed to think of what we could do instead. They had a big enough garden and the chickens already had access to it so we decided to build a semi-portable roof and place it in the garden area. To the right is the sketch for the new roof and it required (2) 8' 2"x4" and (3) 4'x8' Plywood sheets.
-
Image 7
-
Image 8
Image 7 shows the assembly of the sides and front portion of the roof. The other parts of the structure are shown in Image 8. All wood was assembled with reused screws and nails that the owners had. Also in Image 8 you can see part of the removable roof measuring 6'x6'. The top of the roof was 4ft high and the lower portion was only 3ft high.
Shingle Installation[edit | edit source]
The typical shingles you see on roofs are installed using tar paper, which helps ensure that water will not leak in. Also standard shingles are usually doubled up on the first row to help keep water out. The shingles were a bit thick (1/4")so I was not able to double up, but I did find that the rubber is very tight against the nail and helps to seal the holes much more so than traditional shingles. In Images 9 and 10 you will see a plastic bag that I stapled down for a little extra protection and the process of installing the shingles. The owners did have some roofing nails but I ran out and had to buy a box to finish the project. I took about 14 hours of labor to nail all of the shingles in and it only took four hours to make them all.
-
Image 9
-
Image 10
Conclusion[edit | edit source]
In all, the design worked just as I thought it would. It was put through the Northern California rain test and there were not any visible leaks, although, water always finds a way. I was happy that I only spent $10 to make the shingles, the $10 was the purchase of several razor blades and utility knives. The structure itself was a bit more, but the main focus was the tire shingles themselves. This was a successful project, but that depends on your definition of appropriate technology. At the beginning of this class I thought the definition was that all other technology is inappropriate. I then formulated my definition to "our best effort in leaving the smallest environmental impact". I now know that what is good for one person will not be good for another, so my definition has changed again, "our best effort in leaving the smallest environmental footprint within the ways that we choose to live".

Afterthoughts[edit | edit source]
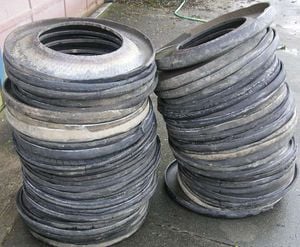
During the making of this project I had several ideas that I was not able to implement or test. The shingles did work fine, but if I was going to use them on my roof I would want them to be a bit more uniform and not so wavy. I need to find a way to cut straight lines; I had thought of a paper cutter, but this project needs something with more leverage and durability. Another idea I had was to build a rain gutter to catch the water, then I could have it tested, so I could know exactly what is running off. Unfortunately the funding for this project did not allow such an expensive test. It might have made things easier if I had made the shingles bigger. In case you are wondering what happened to all 72 sidewall rings (Image 11), I spoke to the guy who gave me the tires and it turns out that he also races go carts, he said he could use those to lay out track designs.
Main author[edit | edit source]
This project was carried out and written up by Brad Thompson.
Caveats and Followups[edit | edit source]
The longevity of this roofing tile is questionable. The original author will give an update in 2015. Also see SALIRAJA Yurt Project for another upcycled roofing project.


