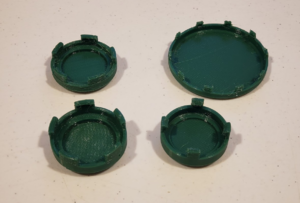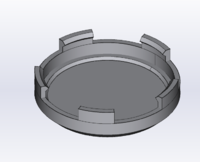
This is a parametric FreeCAD model that can be adapted to a variety of threaded or unthreaded pharmaceutical pill/medication bottles. This was requested as part of the Requests for 3-D printable open source appropriate technology#KIJENZI.2F HESE PRODUCT LIST. It would be useful to print low-quantity replacement caps, or caps for oddball bottles that don't have a stock of appropriate caps around. This would be useful in areas where it's not easy to get additional stock of caps out - rural areas, isolated research bases (McMurdo Station, Antarctica), or developing areas, all of which can have significant shipping overhead and lead time.


Bill of Materials[edit | edit source]
- Bottle that needs cap
- PLA Filament (amount varies)
- CAD model
Tools needed[edit | edit source]
- MOST Delta RepRap or similar RepRap 3-D printer
- Measuring tool (ruler/scale will work fine)
- Computer with FreeCAD installed
Skills and knowledge needed[edit | edit source]
- Ability to measure basic dimensions
- Ability to use FreeCAD to edit design spreadsheets and generate STL files
Technical Specifications and Assembly Instructions[edit | edit source]
- Measure the bottle that needs a cap. The important dimensions are the outer diameter of the opening and the height of the mating area.
- Download the FreeCAD file and open it.
- In the design tree, under "Application", double click "Design Spreadsheet" to open the parameters table.
- Change the parameters to match your cap's needs. Below are descriptions of the parameters, as well as recommendations for values.
- "innerDiameter" is the internal diameter of the cap. This should be approximately the outer diameter of the bottle opening, plus a mm or two for clearance.
- "rimHeight" should be approximately the height of the mating area of the rim, minus a bit to allow the tabs to work.
- "capDiameter" should be a bit less than "innerDiameter" to allow a step that prevents the cap from sliding too far down.
- "capExtraHeight" is optional, it adds an extra boss to the top of the cap that can be used for grip or to stack with other caps. If not being used, set it to 0.05mm.
- "thickness" sets the thickness of most cap sections - usually 1.5-2mm is appropriate.
- "tabCount" determines how many tabs there are. The more there are for a fixed tab coverage, the more they can each flex, but the more fragile they are. 4-6 5-8 is generally appropriate.
- "tabThickness" determines how thick the base of the locking tab is. It should generally be equal to "thickness".
- "tabToothThickness" determines the thickness of the locking tooth itself at the base. It should be set to about half of "tabThickness", generally.
- "tabLength" determines the length of the tab. Longer tabs flex more and are more fragile, but will mate more easily. 3-5mm is generally a good range for 2mm thickness.
- "tabTotalCoverage" determines the amount of circumference taken by tabbing. Higher tab coverage will make each tab stronger, but will make it harder to mate to the cap. The larger the cap is, the lower this should be. For 25-50mm diameter caps, 40-50 should be appropriate. For 50-100mm diameter caps, consider 20-40.
- In the design tree, select "CapBody", then select File -> Export... in the menu bar. Export the cap as an STL and proceed to slice and print.
- When printing, there should be no supports needed. Infill can be set low - consider 10-20%, with shells set to 2mm to better utilize plastic.
- Print time varies. With a 0.6mm nozzle and 50mm/s print velocity, I was able to print a ~38mm diameter cap in ~12 minutes. With a 0.4mm nozzle, this would take about 2.25 times as long, or ~27 minutes. With double the print velocity, it would take about half as long, ~6 minutes.
- Account for printing multiple parts to get a fit. Usually one or two prototypes is enough to confirm that dimensions are appropriate.
Common Problems and Solutions[edit | edit source]
- Make sure you leave enough clearance between the bottle and the innerDiameter of the cap. It's ok for there to be some play, as the locking tabs will secure the cap if properly dimensioned.
- Increasing tabCount can be good for the case of finely threaded bottles.
Cost savings[edit | edit source]
- Comparing to ULINE induction-seal caps
- 38mm diameter cap - commercial cost $0.11/unit (with 150 minimum order quantity - $16.5), filament cost ~$0.08 with 1.5mm thickness and 39mm ID, assuming $20/kg PLA. $0.04 or 36% savings per unit, with the benefit of no minimum quantity
- 89mm diameter cap - commercial cost $0.48/unit (with 50 minimum order quantity - $24), filament cost ~$0.33 with 1.5mm thickness and 91mm ID, assuming $20/kg PLA. $0.15 or 34% savings per unit, with the benefit of no minimum quantity
Benefited Internet Communities[edit | edit source]
References[edit | edit source]
- Web page: Bayer MaterialScience: Snap-Fit joints for plastics. Available: http://fab.cba.mit.edu/classes/S62.12/people/vernelle.noel/Plastic_Snap_fit_design.pdf