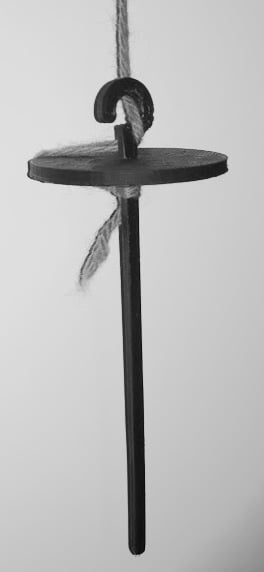
The Drop Spindle is an ancient tool used for spinning fibers such as wool, cotton, flax, and hemp into yarn, without the need for a large, expensive, and complex spinning wheel. Traditionally Drop Spindles are made out of wood with with a notch, groove, or metal hook on the end for securing the yarn. The drop spindle provides the tension necessary to spin yarn and provides a convenient way to introduce twist into the yarn as well as a place to wind yarn as it is being spun.[1] Spun yarn is used for a multitude of processes such as knitting, weaving, crocheting, thread-making and rope-making in order to produce final products.[2] Aside from personal use, products such as clothing and rope are a necessary and marketable product in any society and can be sold or traded in exchange for other necessities.
Because spinning yarn does not require any heavy lifting, or the use of one's legs, it is not only a relaxing activity that can be enjoyed at the end of a long work day, it can also be enjoyed by older members of a society and serve as marketable skill.
Bill of Materials[edit | edit source]
- PLA Filament, about 20grams
- Marine Epoxy Stick ~$3.39 per container. Only need 1/16 of container.
- Alternatively any super glue or epoxy will do. Natural gums and saps that harden may work as well
- Computer with OpenScad and software to run printer
- CAD Files
Tools needed[edit | edit source]
- MOST Delta RepRap or similar RepRap 3-D printer
- Pen knife or other blade for cleaning and trimming parts
- File, emery cloth, sand paper, or rough surface for smoothing rod
Skills and Knowledge Necessary to Make and Use the OSAT[edit | edit source]
- Basic Usage of 3D Printer
- Tutorial on Using a Drop Spindle
- Tutorial on Finishing Yarn and Wrapping Skein
Technical Specifications and Assembly Instructions[edit | edit source]
Time Estimates[edit | edit source]
- 20-70 minute print time depending on printing parameters
- 10 minute assembly time
Printing[edit | edit source]
- Minimum Fill of 20%, 25% recommended
- File prints flat, no support is necessary
Assembly[edit | edit source]
- Modify files as necessary and print files and let cool until surface feels room temperature (helps prevent warping)
- Remove Files from bed and use file, knife or sandpaper to remove protrusions from the square rod and to clean up the square hole in the disk DO NOT OVER DO IT just make it smooth
- Test the rod in the hole, if it is too large to fit, continue to file/trim down just the end one inch
- once the tip fits in snugly attempt to press the disk up on the rod towards the hook end by holding the hook end firmly in one hand and tapping the disk on the surface of a table near the edge so that the rod may continue to be pressed through. Keep rotating the rod and tapping until the disk is withing 40mm of the hook and is snugly wedged.
- If you printer is out of calibration, or if if the fit is not good for some other reason use the marine putty to secure the rod to the disk
- To use marine putty cut off a 2mm cross section of the putty stick and knead in hands according to directions. Form a mound around the rod on the top and bottom of the disk such that the rod looks like it is poking out of an ant hill atop the disk. Let harden according to the directions
- Even if a snug press fit is obtained, it might be desirable to add the marine putty in order to add weight to the spindle to improve function.
- Including drawings or pictures of the device at stage of assembly at minimum. (Upload)
- Consider video if appropriate
Common Problems and Solutions[edit | edit source]
- Rod is too large to fit through hole in disk
- Enlarge Hole in disk with pen knife
- Make Rod slimmer using Pen knife or file
- Be sure not to over do it, ideally you will have a press fit.
- Rod is too small to stay in place in disk
- Use Marine Epoxy putty to secure disk to rod
- Any epoxy, superglue, or substance that hardens and will bond to plastic will work
- Spindle is too light weight to be useful for desired yarn
- Add weight to the disk by adding mounds of marine epoxy, or larger amounts of marine epoxy
Cost savings[edit | edit source]
- Cost of PLA Spindle is about $0.40
- Cost rises to about $0.60 per spindle if marine epoxy putty is used instead of press fit or for weight.
- DIY out of wood costs about $3.00 (80% to 87% cost savings with 3D printed version)
- Commercial Products typically cost $15.00 (96%-97% Cost savings with 3D printed version).[3]
References[edit | edit source]
- ↑ web page: Spindle, Available: http://en.wikipedia.org/wiki/Spindle_%28textiles%29
- ↑ web page: Yarn, Available: http://en.wikipedia.org/wiki/Yarn
- ↑ web page: Knit Picks Drop Spindle, Available: http://www.knitpicks.com/accessories/Kromski_Drop_Spindles__DKromskiDrop.html?gclid=Cj0KEQiAqYCkBRC4xNiSu5-Y-PcBEiQA96OM9DDN4lGTLnPckhnPZvMNk0knUBArXQayh4-PEq4lbZgaAqUf8P8HAQ