Download these pages as a PDF so you can print them or read them offline.
Booklet
Download these pages as a PDF that you can print, fold and staple into a booklet.
Two pre-made, accordion folding roof halves are taped together
To form the roof-cone
Two accordion folding wall halves are taped together
Roof is taped to walls. Hinges made with tape allow the yurt to accordion fold, without mitering or special materials.
Download the PDF guide: for a summary of the construction of this hexayurt. It's a helpful reference, but incomplete without the instructions and video on this page.
To learn about hexayurt development for disaster relief and other applications, see the hexayurt project. If you want to make your own, first see the how-to page, written particularly for Burning Man participants. Here you will find a description of the various shapes and sizes of hexayurts so you can pick the best one for you.
This page describes a hinge technique that allows you to pre-fabricate any light-panel (rigid insulation) hexayurt as a semi-folding hexayurt. Semi-folding hexayurts are perhaps the best option for Burning Man and other environments. These instructions describe the technique for the popular 8' Hexayurt, but the hinge technique can be used for other hexayurt shape or size. Plans are already created for the 10 foot hexayurt, and the H13, and PDF guides can be found at the bottom of this page. If you make another hexayurt shape semi-folding, please share your strategy!
This method is summarized here for the classic 8' hexayurt (12 4'x8' panels), but it should work with variations for other "light panel" hexayurts,
Your roof cone is pre-assembled in two halves that accordion-fold open. The walls will accordion-fold in two halves as well. Other semi-folding hexayurts require use of fancy tools to miter the edges of the panels - this requires only tape.
90% of the work will already be done when you get to Burning Man. You will skip all the difficult steps of "constructing the roof cone" in the "classic, 3D construction strategy." This is preferable in the elements of the Black Rock Desert: wind, dust, sun and heat. Watch the video of classic hexayurt roof-cone construction to see how painfully tedious the "3D" assembly is.
4'x8' stack of panels to transport (same as classic construction).
This is hot: by the magic of geometry, the tape hinges form the exact angles that the hexagon walls and the roof will be in once assembled (trust: you'll get it when you see it). Therefore, the hinges don't cause you to lose any more insulation than the classically constructed hexayurt.
Hexayurt tape is expensive. The semi-folding hexayurt takes the same amount of tape as the "classic construction" route the 1st time you put up your yurt, but it takes much less tape every time you re-assemble your hexayurt (aka each "yurt raising.") These instructions also give you the option to use a mix of 3" and 6" tape, which will save you money.
You will need two people for most of the process. You will need 5 people for about 10 minutes when you lift the roof onto the walls, as compared with the classic construction, which needs 5 people for about an hour or more.
One design flaw is that the "tight" roof hinges create a gulley for rainwater, and this runs down to the tape ring, and ends up in the hexayurt. Most of the time that's no problem. However, if you expect serious rains, add some tape over the tight hinges on the roof. There's work underway to fix this problem without adding extra tape. We'll get back to you.
A problem of all hexayurts, especially at Burning Man, is that the bidirectional filament tape doesn't hold up for more than 2 weeks of sun damage, it gets crusty and peels off. The semi-folding yurts have permanent hinges designed to be re-used. In order to hold up permanently, they need to be shaded with something. Foil tape over the hinges works very well. Paint might also work but hasn't bee tested. See the www.appropedia.org/Hexayurt playa#The Tape tape discussion for more info.
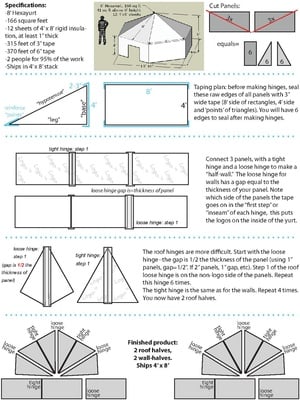
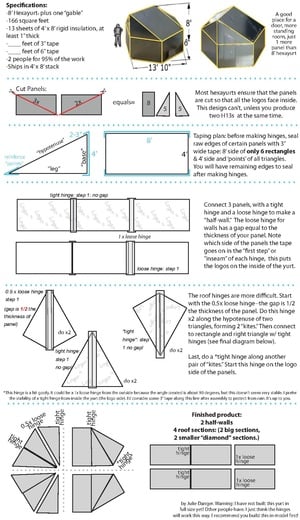
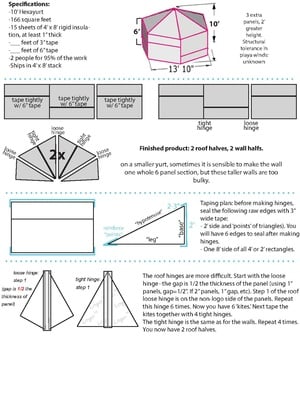
You will make 'tight' and 'loose' tape hinges that allow your roof and walls to be pre-assembled in accordion-folding halves.
For the walls there is a "tight hinge" and a "loose hinge". The loose hinge for the walls has a gap between panels that is equal to the thickness of your panels (see images).
For the roof there's a "tight hinge", exactly like the tight hinge for the walls. There is also a "loose hinge", but for the roof the gap between panels is half of the thickness of your panels.
Hinge design by Julie Danger and Chris Camp. We've built only one hexayurt, and we did it with hinges. Burning Man 2010. Instructions and videos by Julie Danger.
Make the hexayurt at home with two people: cut panels, tape-seal the edges, make tape-hinges, cut windows and door. It's been done with just one person, but it's not fun.
Test assemble the yurt at home
Package for transport
On playa assembly: connect the half-roofs
Drive at least 3 ground stakes
Connect the half-walls
Tape roof on top of the walls (need 5 people)
Fix it to the ground
Tape-seal the yurt to your ground tarp to seal out dust
For a comparison of materials, see the hexayurt DIY main page: here. For a detailed list, read the hexayurt playa checklist: [6]
Panels: 12 panels of rigid insulation, come 4' foot by 8' foot. Usually 1 inch thick, 1.5 inches is far better, 2 inch thick panels for great insulation.
Utility knife and blades (or power tools if you have them).
Masks, goggles, gloves.
Broom: useful in construction, also a good tool in any Burning Man camp.
Mail-order tape (don't delay in ordering tape!). Most instructions require 6" tape. This is excessive, expensive, and hard to work with. A mix of 3" and 6" tape is described here. You'll need 2 rolls of 3" tape and 1.5 rolls of 6" tape-- but that's the bare minimum, with little room for error. If you want to use tape anchors, you'll need another 2/3rds of a roll of 6" tape. If you buy 2 rolls of 3" and 3 of 6", you'll be very comfortably equipped. You can always cut 6" tape in half. You'll need 3/4 of a roll of tape the next time you assemble your yurt. Extra tape is a life saving gift for fellow yurters on-playa. For a complete breakdown on quantity of tape, see the tape calculator spreadsheet: File:8 foot hexayurt worksheet.xls
Read this prior to and during construction. These are mistakes you want to avoid. Reminders will appear in the instructions.
Cutting panels: forgetting to switch the direction you're cutting in: 3 panels are cut left to right, 3 are right to left. (this ensures that the shiny side is always out)
Tape hinges: forgetting which side of the hinge the logos are on (keep PDF nearby as a guide).
Roof Tape Hinges: forgetting that the loose hinge gap is 1/2 thickness of the panels. It is recommended you buy or make several 1/2 inch guides for tape hinges.
Roof Cone Construction: aligning the roof cone points instead of the bases. Align the bases so that they sit flat on the walls.
Final assembly: if you are at Burning Man, don't forget to drive at least 2-3 stakes into the ground and have some rope available. Use your walls or assembled roof cone as a guide for the footprint of the yurt. This way if a dust storm appears when your yurt is taped together, you can tie it down temporarily. While this possibility seems slim, I assure you it has happened. A hexayurt not tied down is a large, delicate kite.
Download the PDF guide to the construction of this hexayurt: (this is a handy reference, but it is incomplete without the instructions and video on this page.)
Make a Model if that helps. You can make a model with paper to get the general idea of the shape, but make one out of something with some thickness (like foam poster board, as shown in the videos.
At home, prepare the panels. Do this before arriving at Burning Man because the fiberglass will litter the playa. [In fact, always try to pre-make anything for Burning Man, because the environment is unforgiving and there's lots of other fun stuff happening.] It's worth being fussy and precise on this step, because later the roof panels need to be relatively equal to fit the shape of the walls later.This is best done with two people.
Six panels will be used for the roof cone. Most brands of panel have logos on one side. You probably want the logos facing inside of the yurt, so cut them this way:
Draw a diagonal line, left to right, corner to corner, on three of the panels using the ruler, or another panel, or a piece of string, as a guide.
Draw a diagonal line, right to left, on another three panels.
(Pitfall alert: "Cutting panels: (3 panels are cut left to right, 3 are right to left. Otherwise logos will not all face inward. Your hexayurt roof will have logos showing on half of the panels, like in this picture: the left panel is logoed, the right panel is not.)
Put on your gloves, mask and goggles. This protects you from little bits of fiberglass from the panels.
Using the snap-blade craft knife, extended about two inches, cut the panels. Expect to change the blade every panel or so, and change the blade as soon as you feel the knife tearing the material rather than cutting cleanly. (Many people use craft knives. If you have adequate power tools it's recommended (a reciprocating saw and a steady hand worked well.)
You use tape to seal all edges of the raw panels to protect you and the playa from the fiberglass, and to strengthen the fragile panels. Read more about that here: Hexayurt playa#The Dow Route Because the tape hinges you'll make next seal some of the edges, tape-seal only these edges now. If you seal all the edges now, you'll be wasting tape. You will have 6 edges left after you make hinges, but worry about those later. We recommend using 3" wide tape because it's cheaper, and easier to work with. Best with 2 people.
Tape the 8' edges on all the rectangular wall panels, but do not tape the 4' sections yet.
Tape the 'bases'/'short sides' (4' sides) of all of the triangular roof panels.
Tape just the pointy "tips" of the roof triangles for reinforcement.
The best way of doing this is to start the tape about 2-3" from the edge you're sealing, to ensure a strong corner and a complete seal. See image below. There is a trick to keeping the tape tidy at the corners shown, in the video [7], it prevents the tape bunching up and adding mass.
6 panels make the hexagon walls. 3 panels make a half-wall. You'll make 2 half-walls. It is not recommended to connect all 6 panels, because it's too bulky to work with. Half-walls are manageable and stabilize the roof halves during shipping.
Watch the video, it's very quick and explanatory: [9]
Lay two 4x8 wall panels next to each other, logo side up, tightly butting the 4' sections together. Pitfall Alert: Logo side of the panel should face up.
Tape them together at the 4' section while they are flat. This creates what's called the 'inside seam' or 'inseam' of the hinge. You can use 3" tape.
Stand them up and close the two panels like a book. Think of this like bookbinding on the spine of a book: you closed the book at this hinge.
Complete the hinge by taping "the spine of the book". Use 6" tape. This step seals the raw edge of the panel, like 'bookbinding' (shown below).
The "loose hinge" is the "magic" of this style of yurt: the flexible hinge allows you to accordion fold the panels for transport. This technique is even more valuable on the roof cone! You will attach the 3rd panel of the half-wall with a loose hinge.
For the loose hinge, you need a gap between wall panels that is equal to the thickness of your panel. If using 1" thick material this gap will be 1". If using 2" insulation, a 2" gap, etc. Use another panel as a "spacer" to get the right distance.
Tape the panels flat, non-logo side up. You can use 3" tape here, carefully. Notice the gap!
Next, use your other panel as a spacer again. Close the spacer into the hinge of the book like a bookmark. Then do the "bookbinding" style taping on this hinge as well - you will need 6" tape.
Recall that when the sticky tape touches itself the bond is very strong. Now you have a flexible hinge, to make the accordion-folding work for transport. You can try this right now if you have 3 DVD boxes or something similar and some tape.
Don't forget to cut a door. The door is the most difficult part of the 8' hexayurt. See some ideas here: Hexayurt playa#Doors. The Camp Danger Door how-to is coming soon.
Having common words during construction is worthwhile, so let's review geometry just momentarily. Twelve small-triangles aka right-triangles make the roof cone. Two small-triangles joined by their legs make a big triangle or isosceles triangle. Or, 2 small triangles joined at hypotenuse form a "kite." 3 'kites' make a half-roof. You will make 2 half-roofs.
"Hypotenuse joints": where the hypotenuses of two right triangles are joined (makes a "kite"). These joints are where the shape of the roof is angled, they are very important. They will have loose hinges -- but beware: not with a full 1-panel-sized gap as on the walls, but with a gap half that size. Making the gap 1/2 width happens to form the perfect angle for the roof--this stabilizes the roof cone and makes things easier (that's the magic of geometry.) You will notice that the roof is divided in halves so that all of these hypotenuse joints are pre-fabricated. The reason is: it's a lot easier to tape the vertical joints together-- they are flat, so you don't have to measure and ensure the angle is correct.
"Vertical joints": where the legs of two triangles meet. They will have tight hinges, because the two half-side triangles together act as one-side triangle that goes on one wall.
Pitfall Alert: the loose hinge for the roof changes: the gap is one half the thickness of the panel. (this means that if you use 1" thick insulation panels, your gap for the roof-cone-tricky-hinges will be about 1/2". If you use 2" thick, it'll be 1", etc etc. You may find the panels are a little thicker than 1"--don't worry about it, the tape is very forgiving.)
Unlike the wall sections, start construction with the loose hinges because otherwise you end up juggling several panels. Find a spacer that's the right thickness. For the miniature, a cookbook cover was about 1/2 the thickness of the mini-panels. For full size, a bit of spare lumber from the garage that was the right thickness.
1: Tape two hypotenuses together lying flat, with your 1/2-thickness gap between. 3" tape is ok. (pitfall alert: the non-logo side of the panels should be facing up if you want the logos on the inside of the yurt.)
2: Close the hinge, and use your spacer to help finish the other side of the hinge (the 'bookbinding' part that seals the raw edges of the insulation.) Use 6" tape for this part.
You will do the loose hinge 6 times or until you run out of hypotenuses. This gives you 6 "kites."
Pitfall alert: Sometimes one triangle is bigger than the other because of imprecise cutting of panels. Not a problem, but be sure you align the triangle bases so that they sit flat on the walls later. Do not align the triangles at the roof-points- that part doesn't matter. 1: Tape two "kites" together, without a gap (forms the 'vertical joint'). Logos should be facing up for this step. 3" tape is ok.
2: Same as with the walls: close the two panels at this hinge and tape-seal the back of the hinge like 'bookbinding' with 6" tape.
You will connect 3 "kites" with tight hinges. You now have two half roofs.
The roof could be divided in half on a different axis, preventing you from making so many of the more difficult "loose hinge," but as said above: the loose hinges dictate the angle of the roof, and when you join the two roof halves, it is much easier to connect them along the "vertical joint," because it does not require a gap.
The gap you created with the loose hinge creates the perfect angle for your roof-cone. Therefore, when you open the roof cone, it "snaps" to the correct shape for placing on top of the walls. Two roof cones, folded up, equal the 4' x 8' shipping footprint.
Some people cut their tarp into a hexagon 6" larger than the walls. This is nice because it looks tidy and especially in the case of rain: you can tape-seal the tarp edges up the outer walls of the hexayurt and prevent any leakage during a heavy rain (really the only way to prevent puddles getting in if it rains.) You don't need a hexagonal tarp, but be aware that most tarps are rectangular, and one side of the tarp will be too long and will need to get out of the way of your ground stakes. Two smaller tarps taped together on both sides with the bidirectional filament tape will work too (ps: big tarps are expensive!)
For classic yurts, it is essential to build them at home for practice. The semi-folding yurt is much less difficult during final assembly because of the pre-fabricated hinges. Despite this, it is recommended to build it at least once, and it's very satisfying after all the work. A tennis court is usually clean and flat, parking lots would work, etc. If you want to conserve tape, you can tape it together with just tape-patches-- 6" tape, about 6-10 inches long at all the corners and along the joints.
8-foot hexayurts have successfully arrived at Burning Man on top of cars as small as sedans-- however, that's probably not ideal. There are 2 approaches for transport: Tarp or Plywood. There's an account of panels being "wrecked" by the vibration and force of air (not sure if these panel edges were already tape-sealed)
Plywood: Preferable because tarps make a lot of flapping noise in the wind. Stack a half-wall, then the roof cones, then the other half-wall. The half-walls stabilize the roof cone. Sandwich the stack between two sheets of 4'x8' plywood. Tie them together tightly.
Tarp: Stack the half walls and roofs as above, wrap the bundle very tightly in your ground tarp like a flat burrito. The tighter it is, the more study and less noisy in the wind.
The entire package is an easy carry for two people. It weighs significantly under 100 lbs. It is quite large.
Do read a few hexayurt transport horror stories on the Burning Man discussion boards--because transport would be a terrible way to lose your yurt, injure another car/person, etc. It's recommended to have backup living quarters (even a cheap tent) in the even that your hexayurt sails away during transport or assembly. Remember: this is extreme self-reliance.
Now we have dust and heat to consider. The reflective panels are like an oven when the full sun is on them. Plan on working when dust and heat are minimized - early morning or nighttime is the best time because of minimized heat and wind. If you arrive in the day, you can try the late afternoon, before dusk. No matter how eager you are, don't stupidly lose your yurt by setting up in high wind.
People: just 2-3 people for most assembly, 5 or more for about 15 minutes while lifting the roof onto walls. 3 is nice for taping the walls to the tarp, because 6" tape is so unwieldy in long strips.
Never peel tape back off the boards carelessly, because you can rip the foil right off, never cut the board material on the playa because it generates moop/litter.
Apply tape to dust free panels! Wipe the edges of the surfaces clean beforehand. If you still have tape from prior assembly, try peeling that off first--but don't remove the tape that forms the hinges!
This is more difficult than the walls, but the roof is less likely than the walls to blow away once taped together. Besides, you're probably very excited, so use your energy now. Consider excellent rain protection in this step – as much as this possibility seems slim, rain happens. The challenge of roof taping is you can't reach all the way up the roof cone; a broom is very handy at this phase. You can also tape from inside the roof cone, but that's not as protective against rain.
Use a few "tape patches" (segments of 6" tape about 3 to 10 inches long) to get the roof cone into position, with the halves tightly butted together. Tape patches will make your life much easier and are surprisingly strong. (video)
This technique may need some improvement, but the way to tape the halves together and seal out rain is to use a 16' length of tape held between two people and lifted over the roof with the help of a broom handle. Use the broom handle to land the tape at the tip of the roof cone. Try to make it even, but don't be too concerned. Then use the bristles of the broom to smooth the tape down to the roof panels. You can add another shorter piece of tape in the opposite direction if you're concerned about rain protection. This piece doesn't have to be the full 16', but you do need to be able to reach without falling onto your roof cone.
Do make some sort of mark where you taped the roof together, or later you'll forget and cut one of your hinges accidentally. See the videos: model or actual demonstration.
Waterproofing
A flaw in the hinge design is that the 'tight' hinges of the roof can act like tiny furrows for rain water, although it's not usually severe in the average playa rainstorm. If you're expecting serious rain, cover this with tape (3" should work). Do this step before 'taping together the roof cone,' while your roof halves are flat on the ground). If you're using tape anchors, don't worry: those stretches of tape will cover this hinge.
If you are using tape anchors to stake your hexayurt, make them now (see below).
Pitfall Alert: if you are at Burning Man, don't forget to drive at least 3 stakes into the ground and have some rope available (one piece already tied into a "halo"). Use your assembled roof cone as a guide for the footprint of the yurt so you know where to put stakes. This way if a dust storm appears when your yurt is taped together, you can throw the halo over, and tie it down temporarily at those 3 points--it does not need to have a perfectly even shape, but good tension. While this "rogue dust storm" possibility seems slim, I assure you it has happened, and occupied 4 or 5 unhappy people who dutifully held the yurt down for 45 minutes instead of hiding indoors. A hexayurt not tied down is a large, delicate kite, and it's your home blowing away. This means you'll have stakes to trip over during assembly-- be careful! At worst, if a big wind appears, cut the new tape and fold the yurt down until it's over.
You can do this from inside the walls, or from outside (you'll tape with a gap that's equal to the thickness of the panels again.) You can tape both the out and insides if you'd like. Consider the possibility of rain as you do this. Do make some sort of mark where you taped the walls together, or later you'll forget and cut one of your hinges accidentally.
Move your roof cone out of the ground stakes, put down your ground tarp, and move the completed walls on top of the tarp.
(Optional:) make your life a little easier with some more tape-patches: from the outside of the roof cone, put a little 6" tape on each of the "vertical joints," partway up the roof cone. This will 'lock' the hinges and keep the roof cone shape sturdier as you lift and adjust it.
Lift: You'll need at least 5 people for this. Give each person 2 or 3 tape-patches--attach them to their clothing before lifting. Lift the roof cone from the hypotenuse corners, and settle it onto the walls. One person is designated to start the tape-patching, they should align their roof and wall corners and tape-patch it in place. After that, stick a patch in the middle of the wall too. Everyone else can tape their corners as the corners line up, and add a patch in the middle of the walls. Don't obsess about precision: the tape ring that finally secures the roof will not be affected if things don't line up perfectly--perfection is for woodwork. See the live video: [link here] or the model video: [13]
Tape Ring: This is what structurally completes the yurt: a (preferably unbroken) ring of 6" tape all the way around the roof-to-wall joint. Start in the middle of a wall, and center the tape over the seam between roof and wall. You run the tape all the way around the yurt. The tape makes a nice noise as you zoom it out along each side, and people get very excited. Again, there's a way to snip the tape that sticks up above the joint so that it is tidy and seals well when you smooth it over the roof panels (see video: [14], and full size: [15])
A general note about tying anything down at Burning Man: overbuild it. You'll never regret it. Stake the yurt to the ground before taping the it to the tarp, because a yurt blowing away is worse than a little extra dust getting in (see "delicate kite in high wind" section above.) Drive in your final ground stakes--6 total (rebar "staples" are great because they come out easier during cleanup.) Stakes should be pretty close to the bottom of the yurt. Make sure to pad the ends and mark the guy lines with something easy to see at night. There are two main techniques for tie-down, the halo or tape-anchors:
Tape Anchors vs Rope-Halo * Tape Anchors: are prettier than a rope-halo because they are unnoticeable on the surface of the yurt. They are very strong, however they require a lot more of the expensive 6" tape (about 120", or 2/3rds of a 60 yard roll. That's $20 worth of tape). You also have to recreate your tape anchors each time you assemble the yurt because you are using the strength of the tape going up and over the roof peak; you cut them off and make new ones each time. They do fail sometimes in high winds. Tape anchor construction is discussed here: Hexayurt playa checklist#Assemble the Roof Cone * Rope Halo:aka Rope Net, Rope Web, Hexayurt Macrame or "Hexayurt Bondage." It's cheaper and faster, less pretty. Definitely have one available during on-playa assembly even if you're planning to use tape-anchors, in case of sudden winds. The quickest and easiest method is to make a loop of rope about 24 feet in circumference (big enough that it rests on the roof cone somewhere that you can reach it). Before the ends are knotted to form the loop, take 3 or 4 (3 will work in most areas, more is better) lengths of rope about 10 feet long and form a Sliding Loop in one end and an Adjustable Hitch in the other. Thread the long rope through the loops, allowing them to slide freely along the length of the rope. Knot (Square Knot[16]) the ends to form your loop (sometimes called a Hexayurt Halo) and toss it over the center point of your roof. Pull on the guy lines to center the loop, and allow the guy lines to fall over the sides on each side except the wall that has your door[17]. If using 3 guy lines, they should start on the wall to the right of the Door panel, skip the next panel, etc. Pound in your rebar anchors and secure the guy lines, slowly tighten each one until there is even pressure on each line, and each line is tight. Too much pressure can damage the foam panels of the roof, a 12' square of heavy cloth or plastic between the guy lines and roof corners will extend the life of the unit considerably.
This part is the last structural reinforcement, but mostly about dust prevention, and also somewhat to do with rain. The best way to prevent rain and dust is to cut your tarp 6" bigger than the hexayurt and tape the tarp up the walls. Some people tape the walls to the tarp both inside and outside, others only in or out. Taping outside seems most important. Use 6" tape to connect the tarp to the walls. Having 3 people is useful to keep the tape tidy-- you especially want a smooth edge to seal against rain water seeping in.
You'll need a door, some windows, etc. It's better to cut the windows before you make the tape hinges, but the door becomes fragile so cut that after taping. See: Building Options
Here's the Camp Danger Door, and more info on hexayurt doors.
A hexayurt at Burning Man is really good with a swamp cooler. Here's instructions for building your own.
Convert a "classically" constructed hexayurt into a semi-folding
If you've already made a hexayurt, that means you've constructed a roof-cone piece by piece, and that means you probably didn't enjoy yourself. There's no reason not to make it a semi-folding hexayurt, and it will not take you very much more tape.
Follow the instructions here, familiarize yourself with the hinges, and print out the PDF: .
You should already have all the edges of the raw material sealed with tape, so skip that part.
You will make all the same tape hinges, but you probably only need to do "step one" or the "inseam" of all the hinges--step two of the hinges is always the "bookbinding" step, and is designed to seal the raw edges of the panels. The bookbinding part is the part you don't need. However, on the 'loose hinges' you might want to do the bookbinding step just for strength. If you opt not to do that, you will need to prevent the exposed tape on the loose hinges from sticking to everything it touches. That's important -- it will want to stick to itself and to the nearby panel edges, so stick something to it-- cheap masking tape will probably work great, scotch tape if you'd like, ribbon, strips of paper, anything.
Now you have a semi folding hexayurt and won't have to ever construct your roof cone again.
Semi Folding Pentayurt aka H10: Made with 10 panels. Smaller footprint and more standing room. Important changes to roof design compared to H12.
If you want to increase the amount of standing room in a hexayurt and create a taller entryway, there are two good options that can be made semi-folding with the Camp Danger hinge:
Hexayurt H13: This design adds just one more 4'x 8' panel (hence the name: "H13"), and raises one side of the hexayurt with an 8' gable, allowing increased headroom and a good face for a door. It's a bit trickier, and less stable than the standard 8' hexayurt because it is asymmetrical on one axis. Check out the PDF guide:
H15 aka 10' hexayurt If you're willing to add 3 more panels, you can increase the height of the entire 8' hexayurt: just add 2' to the walls. This is not as elegant a design as the H13, but it's more structurally sound, given that your tape-ring is not cut into with the addition of the door, and it's symmetrical on all axes. The roof hinges are the same as the classic 8' hexayurt, each of the 6 wall panels have the 2' addition either hinged on, or taped on one you hit playa.
It would appear H15's have survived at Burning Man. FYI, Julie Danger camps in an H15. For the best structural stability, you would stagger the 2' addition top and bottom when you build the walls, and it would still ship in the 4'x8' stack. However, that's a lot of extra on-playa work that no one is willing to do...if you can ship and store the yurt in a 6x8' stack, definitely stagger each wall section. If you're going to be lazy and make 4 pre-folded wall sections, be sure that your 2x8' wall additions are staggered (see PDF 'front and back view').
Follow this PDF for the 6'x8' variety, aka best structural integrity: Follow this PDF for the lazy, less stable, but playa tested H15, with 4 wall sections (most common version seen on-playa):