
CCAT yurt roof 2019

| Type | Roofing |
|---|---|
| Authors | egf65@humboldt.edu Desteny Gutierrez Brooke Kalarney Connor Lathrop |
| Location | Arcata, California |
| Status | Verified |
| Years | 2019 |
| Cost | USD 3 |
The CCAT Yurt was designed as a place where students and community members could come in and achieve a sense of relaxation.
It fits in quite well at CCAT for its educational space for appropriate technology. The roof of the yurt has undergone some renovation in order to reduce it's impact on the environment, and add some aesthetic significance to it. Time has taken its toll on the yurt, and there is visible wear and tear to the roof. The roof has begun to leak and this could lead to damage inside. We were tasked by CCAT to find a solution to correct the issues with the leaky roof, and so the yurt may continue to serve as an educational example of alternative building. Our hope is that we may renovate or replace the yurt roof, and maintain it's appeal for gathering with friends and colleagues.
Results from our project: We wished to minimize the amount of leaks which exist along the yurt roof, and we worked with CCAT to test different solutions to reduce water leaks. Our efforts and observations resulted in three projects which modified or addressed renovating the yurt roof. The projects include: Repairing the coke bottle light portals. Creating a demonstration board with potential roof materials. Sealing the skylight gaps to reduce the leaking.
Gallery
[edit | edit source]-
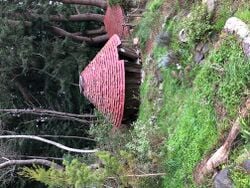 Fig 1: A view of the CCAT yurt.
 -
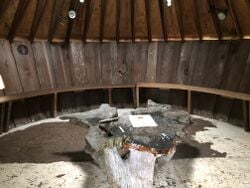 Fig 2: A view of the interior.
 -
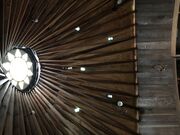 Fig 3: The skylight also known as a cap for a yurt.


Background
[edit | edit source]The yurt is a permanent structure at CCAT open to community and students, and it houses several features for comfort and education of appropriate technology. Our goal is to design and build the yurt roof in eco-harmony with the least amount of impact on the environment including the community and Mother Earth. Students and community are welcome to use and enhance the space. Just below we list our initial and final completed goals along with some photographs for reference.
- Initial Goals:
The purpose of our team is to design and apply our solutions for the renovation of the yurt roof which is located at CCAT, the Campus Center for Appropriate Technology, on Cal Poly Humboldt campus. If we are to consider other roof modifications instead of renovating or replacing the roof, we will move forward with the three projects listed above. For more information about CCAT:CCAT's webpage


- Final and Completed Goals:
Our second set of goals included roof modifications of the current alternative lighting designs within the yurt, repairing the skylight also known as a cap in the yurt, and demonstrating the potential for alternative roofing materials which will be displayed outside of the yurt on a board.

Problem Statement
[edit | edit source]We will come together to successfully design, build, and test an appropriate technology solution that will have a lasting impact within our local and broader communities. We also appreciate the opportunity to learn from the past CCAT yurt projects, and pass on this information to other students through our Appropedia page. During this experience we will learn how to budget for such a project, consider what kind of future maintenance the roof may need, and determine what is aesthetically appropriate for the location.
If it is not possible to renovate the roof we will have to consider a second set of goals which reflect reducing leaks from the roof. This will require us to revisit the current design of the yurt roof to examine the coke bottle light portals, the skylight to reduce any leaks from it's structure, and we will study what alternative materials can be used for the yurt roof.

From the Team Members
[edit | edit source]We are looking forward to this project, and recommend others in our community to stop by CCAT. We are also very grateful for the opportunity to work alongside CCAT on something that benefits us in our academic endeavors, and also benefits people in our community who are interested in learning more about appropriate tech. Coming together and including a broader community will amplify any and all efforts toward a cleaner and greener future. If you are not in our area we look forward to your insights and stories through this Appropedia Page connection. Thank you!
Team Members: Students enrolled in the Spring 2019 Engineering Appropriate Technology Class 305.
For more information about Appropriate Technology and past projects concerning the yurt, click here: Appropriate Technology SALIRAJA Yurt Project

Literature Review
[edit | edit source]This is a review of the available literature pertinent to the a specific project.
Past Project History and Nearby Terrain
[edit | edit source]The following includes an examination of the most recent renovation of the yurt roof at CCAT and the surrounding terrain. It's important to examine the following for reflection about appropriate technology, potential impacts stemming from the terrain, and the educational inputs.
Website Review 1 & 2:
- The SALIRAJA Yurt Project is the most recent major renovation project for the CCAT yurt roof, and the team provided a helpful page on Appropedia.org. The teams conclusion section is especially useful in explaining: how effective the implementation of lighting changes the atmosphere of the interior, the task of cutting wood boards took a great deal of time and required careful installation, and they mention the challenge of securing material to the beams due to the steepness of the hill where the yurt sits (paraphrased).[1]
Near by Terrain:
- The yurt is located on a hillside surrounded by a herb garden, an over story of trees, and a nearby retaining wall. There may be a requirement to assess the retaining wall as it is within three feet of the yurt. We are considering the aesthetics of the surrounding terrain, and must educate ourselves about the potential impact; as well if the yurt may be more welcoming if a small space was cleared all around the yurt.
The CCAT Yurt Retaining Wall project website provides several details concerning the construction as well clear photos to view the details of their work. It appears that the wall structure is extensive, and includes a major line of logs which provided extensive height and stability;thus the team decided not to work on the grade or slope of the terrain. We will be meeting with facilities management soon, and the meeting will cover an assessment of the surrounding terrain.[2]
Potential Aesthetics Through Design
[edit | edit source]Aesthetics
When considering the aesthetics and durability of roofing materials there is the option of such items as layers of felt, tarps, waterproofed canvas, or even upcycled sails. Traditionally yurts were designed for a region with high winds, cold temperatures, and nomadic lifestyles. The CCAT yurt roof will be a non-traditional design for our location in Arcata, CA. In the following source, I have focused on a canvas covering which can be removed which is a part of the aesthetic and functional use for future cleaning maintenance. The canvas can also be painted an ochre color if necessary per campus requirements, or we can expand on the aesthetics and paint it to resemble the nearby foliage.
Book One: The design for the roof would be strips of canvas, this could be adopted for other materials, sewn together into "...a pie shape minus one large slice (85)." The canvas would be fitted over the beams, measured, and then sewn into a cone shape. For more lighting and aesthetics, we could add a window which the book suggest using mosquito netting and a sheet of plastic. The window would be sewn flush to the rest of the canvas. Though this would require us to cut into the wood boards so the light could shine through. According to the book, the skylight would have to be in place or designed prior to the canvas roof being installed. In this book the design overview for the roof is laid out clearly, provides sewing techniques, and presents itself as an affordable aesthetically pleasing option.[3]
Book Two: In order to maintain the aesthetics and functionality of the roof it will need to be treated for waterproofing. The following books provides guidelines on waterproofing, but we would replace the recommended water sealant with lime or another environmentally friendly sealant.
The book suggest saturating the canvas in the sealant, and if the canvas is on its frame a long-handled roller may be used to coat the canvas. Depending on the smell of the sealant, the author suggest waiting to use the yurt for 36-48 hours. There are great details in the roofing design which provide an outline for the construction of the skylight hole and covering. Instead of replacing the glass bottles, we may include a window on the canvas or include a structure inside the yurt which would be placed below the skylight to reflect the entering light.[4]
Peer Reviewed Article:
In reviewing the aesthetics of yurt design there is the potential to educate about the original designs of a traditional yurt to learn how it can be adapted for non-traditional design; and to review the environmentally friendly design potential.
The following peer reviewed article Study on Mongolian Yurt Features and Its Environmentally Friendly Design provides a strong outline of traditional Mongolian housing which often features 'biologic materials;' and it speaks of it's appropriate structure for its environment which is a concept housed within our appropriate technology studies. A review of the article educates the designer, user of the yurt, and informs the project purpose of building and modeling environmentally friendly community spaces.[5]
=== Lighting ===[6] Large windows bring risks of glare problems, poor distribution of brightness, or excessive heat or heat loss. An answer to good lighting is looking at the broader context of design. Lighting design has a lot to do with perception of light: functional, aesthetic, emotional and somatic. The role of lighting goes beyond illumination and should consider its other functions. Windows should meet the demands of brightness for working, a sense of security, and orientation. Good useful lighting does not only make things visible, it also directs gaze, controls perception, and draws attention to details. The planning of natural light is primarily dependent on the availability of natural light. This availability is determined by natural conditions such as climate zone and the surroundings of the building and can be influenced by orientation, the form of the building, and the dimensions of the interior and exterior space. As a general rule of thumb for design, consider the context and additional factors before making decisions on lighting design.[7] It is important for students and designers to understand the amount of space and resources that is minimally necessary for rooms and buildings to function usefully. Reasons for changing these standards can depend on project criteria, client needs, budget, site, and other constraints. Designs will vary based on specific rooms so it is important to consider all factors and limitations when designing interiors for spaces. Some key points to consider are accessibility, design, visitability and usability. Lighting design can influence these aspects by optimizing their use and efficiency within a space.[8] The understanding of the surroundings and its effects on spaces is key when planning new urban complexes or refurbishing existing ones. Aiming at sustainable urban design is the most adequate way to achieve the desired goal and its consideration must be a priority in every situation. The quantity and distribution of natural light inside buildings is directly related to their design (distribution, orientation and dimension of openings). They are conditioned by the site characteristics, the construction density aspects, height of buildings, dimensions and proportions of exterior spaces, direct sunning and sun reflection on exterior surfaces, as well as by the presence of trees, billboards and other components of surrounding scenery.
=== Building Materials/Design ===[9]
The concept of the yurt was created by the Mongolian people, who had created it to be portable. It was essentially a round tent that was made out of wood and covered in wool or furs. The yurt was built this way because at the time of its creation the Mongols were nomadic people, and the design of this structure fit their lifestyle well because it was very portable and could be setup and taken down in a quick manner. Over time, cultures began to adapt the yurt to be more stationary, using heavier woods and making the roofs and coverings more permanent, by using materials such as metal for the roofs. Since the yurt was first introduced to the modern United States in the 1960s,[10] they have become increasing popular not only as temporary and portable living spaces, but also as more permanent places for people to live.[11] Because yurts are designed originally to be portable and not very invasive to the surrounding area,[12] we have set our sights on some possible materials we could use that would allow for simple maintenance of the yurt roof, as well as being portable and removable as well. We feel that fabrics that are weatherproofed would serve well as a roof for the CCAT yurt, such as fabrics that are used in yurts that are setup at campsites. These fabrics are very thick and are good at keeping heat in while keeping the weather outside. But, since the yurt at CCAT is more "stationary" than a Mongolian style yurt, we also have looked into materials that would be suited for long term that are also durable and easy to maintain and clean. For example, large pieces of metal sheet that can be formed and shaped might serve well as a roof, seeing as how the wholeness of it would decrease the existence of cracks and spaces between shingling in the roof, as well as being simpler to take down as one whole piece rather than pulling up multiple, smaller pieces of metal in order to clean or repair only one part. The large pieces of metal can also be painted to abide by Facilities Management's preference of having a red roof. However, a lot of campsites in California use the fabric yurts in this way, setting them up on wooden decks and throwing the fabric/tarp over a wooden skeleton, and taking them down to wash and repair all without jeopardizing the structure and soundness of the building itself.[13]
Education
[edit | edit source]"The analysis showed that on the characters of masteration on structure and material of conventional Mongolian yurt, we can take advantage of the Green Design theory to guide our designation. Thus, our living environment can be preserved properly and sustainable development can be realized."[14]
Project Evaluation Criteria
[edit | edit source]The following criteria will be used as guidelines for our project. *Criteria chosen based on the suggestions of the project coordinator from CCAT. The scale (1-10) represents the importance level of meeting the constraint of each listed criteria.
| Criteria | Constraints | Weight (1-10) |
|---|---|---|
| Durability | The yurt roof should be able to withstand weather conditions in Arcata, CA., and it should always be safe for people to be under or around the roof. It should not have any leaks. Second set of goals: coke bottle light portal project should be repaired or modified so as to eliminate any leaks through their access points in the roof. The sealant along the gap of the center of the skylight should reduce leaking from the cap. | 10 |
| Aesthetics | The lighting inside the yurt should be sufficient for comfortable use, and the design of the yurt should match its environment as much as possible i.e should be appropriate to the location. The water within the coke bottles should remain free of any fungal growth so the light may reflect through, and the skylight should be clear from any water collecting between the layers of plastic. | 7 |
| Maintenance | Must be free of maintenance for at least two years. The yurt roof should be assessed once a year. Assessment should include cleaning the roof once a year. Coke bottles should be examined, and if needed replace the water and bleach within the bottle once a year. Also check the condition of the corks which are inserted in the coke bottles. | 8 |
| Cost | Must not exceed budget. No more than $100 should be spent on non-up cycled materials. | 8 |
| Education | The yurt roof renovation should continue to be a good model for alternative building materials, our Appropedia page and the SALIRAJA Yurt Project page will serve as a source of information about the yurt roof project, and the demonstration board will provide examples of alternative building materials. | 7 |
Costs
[edit | edit source]We have provided a list of materials used for this project with sources and cost. Most of our materials are from CCAT, the cordura nylon was donated from Kokatat, or purchased at SCRAPP in Arcata. We were very thankful for the access to CCAT's materials, and the donation from Kokatat.
| Quantity | Material | Source | Cost ($) | Total ($) |
|---|---|---|---|---|
| 1 | 4'X3' plywood board | Provided by Team | $0.00 | $0.00 |
| 14 | Nails/Screws | CCAT | $0.00 | $0.00 |
| 5 | Tubes of paint | Provided by Team | $0.00 | $0.00 |
| 2 | Recycled bottle replacement | Provided by Team | $0.00 | $0.00 |
| 2 | Boating Canvas Strips | Scrap | $1.00 | $2.00 |
| 1 | Recycled Leather Strip | Scrap | $1.00 | $1.00 |
| 1 | Recycled Plastic | Provided by Team | $0.00 | $0.00 |
| 1 | Recycled tile | CCAT | $0.00 | $0.00 |
| 1 | Wetsuit Material | Kokotat | Donated | Donated |
| 1 | Linseed | CCAT | $0.00 | $0.00 |
| 3 | Waterproof Sealant | CCAT | $0.00 | $0.00 |
| 1 | Lime | CCAT | $0.00 | $0.00 |
| 2 | Tools - Hammer, Drill | CCAT | $0.00 | $0.00 |
| Total Cost | Approximately $3.00 | |||
Tentative Timeline
[edit | edit source]| Project | Started | Completion |
|---|---|---|
| Project Testing | April 26 | May 11 |
| Present Designs to CCAT & Facilities | February 25 | May 11 |
| Decide on final design | April 2 | May 12 |
| Remove Coke Bottle to Protoype Alternative Cover | April 26 | April 26 |
| Prototype: Test potential roof material with lime for mold. Also, test natural solvent for leak resistance. | March 16 | March 16 |
| Observation and Interview 2 | February 25 | February 25 |
| Appropedia Draft | April 21 | April 21 |
| Rent -or- use CCAT Tools | March 16 | May 12 |
| Install Repairs for Leaks | April 26 | May 12 |
| Final Appropedia Page | May 12 | May 12 |
| Final Video | May 12 | May 12 |
Prototyping
[edit | edit source]Our team focused on the second set of goals mentioned in our background, and the following information pertains to the three modifications and considerations connected to current and future roof modifications.
Project One: Alternative Roofing Materials and Prototype Steps
[edit | edit source]Currently the roof at CCAT includes three layers of material, and the most exterior material is up-cycled aluminum cans which have been cut, fitted, and painted with rustolium paint. At this time we have observed several leaks due to rain filtrating through the aluminum shingles, past the layer of organic roofing felt, and the plywood. We will focus on the most exterior layer of roofing. Criteria for the materials include alternative and up-cycled materials that shed water, eliminate rain infiltration, withstand exposure to the sun, and can be maintained efficiently we have chosen the following prototyping project.
- Lime Plaster Application (waterproofing): The process included submerging the materials in a lime plaster solution which simulates a single heavy rain.
- Weather Impacts: We placed all the materials outdoors on a piece of wood so it may dry over nine days. During that time there was sun drying it, overcast days, and a light rain.
- Results: We found the up-cycled boating canvas ranged from the most water resistant to shedding the most water.
- Materials: Canvas, boating material, denim, couch fabric, drop cloth, a aluminum shingle, and a piece of a stop sign.
- Boating canvas featured in the middle photograph just below.

Project Two: Coke Bottle Light Portals
[edit | edit source]The yurt roof has a number of coke bottle light portals which rain water is leaking from. We pulled out a couple of the bottles to study the overall design of the placement of bottle. In concern with the coke bottle light portals we will be asking if they provide efficient lighting, how can we reduce any leaks from their point of entrance, and how will they be maintained.
- Each bottle is inserted in a hole cut through all three layers of roofing material, and on the most exterior layer there is flashing and skirting to support the bottle which is porturding from the roof.

Project Two: Coke Bottle Light Portal Prototype Steps
[edit | edit source]- Tape: Each bottle has a layer of duct tape wrapped around it's widest section which serves as material to secure the bottle against the skirting, and to help reflect light entering the bottle. We found that several bottles had tape that was no longer sticking to the bottles, and needed to be replaced before we could prototype. We added two layers of gorilla tape.
- Corks: The bottles are corked with wine bottle corks, and needed to be cleaned before we could consider prototyping. We shaved down portions of the cork because there was mold build up along the sides of the cork.
- Water Mixture: Several of the bottles had fungal growth within the bottle, so we cleaned the bottles and added a fresh mix of water and a natural solution to prevent any growth.
- Placement: With each replacement of a coke bottle we tested the ability for the coke bottle to remain in place without a hand holding them. We also went around the outside of the roof, and used a long piece of wood to push against the bottle so we may test the placement and secured positioning. This also helped with positioning the bottles at the best angle.

Project Three: Skylight and Steps Taken to Prototype
[edit | edit source]The skylight proved to a be difficult structure and design to "prototype," and just below we list the steps taken to attempt a full prototype. Refer to testing results for a complete review of this project.
- Skirting: First step was to slice through the skirting in order to pop it off, and prototype a potential material replacement for the skylight. We found out that it was installed intricately and attached to all three layers of the roofing material. We determined that to do the prototype would require doing work from outside the roof which we did not have access to.
- Removing a Portion of Plastic: Our next step was to remove the inner layer of plastic that was attached to the skylight. This piece was screwed in, but due to water exposure the screws had rusted into place and were tough to remove. It took multiple tools, but with the use of a hammer, power drill, and screwdriver we were able to remove the center piece.
- Sealant: Instead of prototyping a piece of plastic we decided to prototype a sealant along the gap between the layers of plastic. After applying it we smoothed it down with a spatula. Within minutes it dried.


Operation
[edit | edit source]All above mentioned projects should include at least two people, monitor the weather for scheduling any work on the yurt, and review our project steps.
Maintenance and Troubleshooting
[edit | edit source]To maintain the quality of the yurt water leakage is the biggest factor to keep in mind.
- Coke Bottles: Check regularly for damage or deteriorating tape, and replace any solutions in the bottles if needed. Each bottle opening is supported with flashing and skirting which should be examined. The flashing will also help maintain the temperature inside at a comfortable medium.
- Skylight: Skylight should be monitored for buildup of moisture in order to prevent the build up of any fungal growth. If there is fungal growth it may diminish the amount of light from passing through skylight.
- Roof: The roof should be kept clear of debris, and the aluminum shingles require regular examination especially after a heavy storm.
- Weekly
- Checking the tape around the bottles, and make sure the water solution is clear of any algal growth.
- Ensuring that the sealant is attached well enough on the skylight is an important step in maintaining the current cap.
- Keeping the skylight plastic clean from buildup of dust or other opaque material should ensure a comfortable source of light.
- Monthly
- Replacing bottles due to damage from weather(i.e after storms, during extreme high/low temperatures).
Testing Results and Discussion of Projects
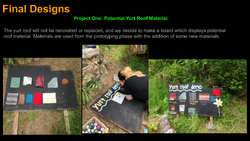
[edit | edit source]Project One: Alternative Roofing Materials Board
[edit | edit source]Our goal to renovate or replace the roof was sufficiently researched, and we went through all necessary channels to move forward but we were asked to consider another project instead of a full renovation. Thus, we followed through with our second goal which was the demo board. Our previous materials prototyping project helped a great deal with this goal.
- Placement of Board: We placed the board in an area that could be easily seen next to the yurt. It rained about a day after we put up the board, and we were able to examine how well it held up in the rain. Results: Each sample of material was held in place, and the paint was not running.
- Post Alternative Roof Material Prototyping: We selected the most durable of the materials we prototyped, and included them on the board with the addition of a 500 denier Cordura nylon and a 200 denier cordura nylon.
- Cordura Nylon: These two materials are designed to be used as fabric worn in outdoor settings ranging from extreme to mildly wet environments. They are very adept at shedding water, but not for full waterproofing. We think that due to the yurts size any use of this material will require you to further treat them to be waterproofed.
- Why consider cordura nylon: Based off of their original designed use these materials are good for much longer periods of time in this regions weather. The idea behind this is to show possible alternative solutions for a roof based off of what might be desired for appropriate technological designs. This would include the possibility of a roof design that could be removed frequently in comparison to a permanent structure.
- All alternative materials considered are for the use of the most exterior portion of this yurt roof.
-
 thumb
thumb -
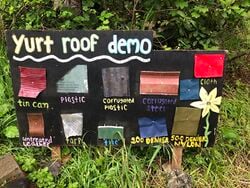 Completed materials board with the addition of the cordura nylon.


Project Two: Coke Bottle Light Portals
[edit | edit source]- Water Solution: The solution with water and a natural cleaner did not prevent algae growth because it could be seen at the bottom of the bottles. We removed the bottles, cleaned them again, and added a mix of bleach and water. This was the original solution listed in the past design.
- Gorilla Tape: There was no evidence of rain entering from the coke bottle openings due to the tape efficiently preventing entrance of water along the sides of the bottle. We saw there were a few gaps between the tape and some bottles, and altered the design to prevent any water from collecting in those gaps. The tape alteration included adding a third smaller layer of tape to the top of the bottle to eliminate any gaps between the bottle and layers of tape.
- Placement: All bottles were returned to the yurt, and we tested how secure they were in place with the same method mentioned above.

Project Three: Skylight
[edit | edit source]- Please note: Our third project required any work for the skylight to be completed from within the yurt because we did not have permission to be on the roof for any renovations.
- Skylight Plastic Material: Once we removed the center piece of plastic we saw there was a second layer of plastic just above it. This second layer is fastened to the aluminum shingle and the plywood in such a way that does not allow for us to renovate from within the yurt. Moisture has been accumulating between these layers and leaking from the skylight. Due to the moisture a film of mold could be seen between the pieces of plastic.
- Addressing Past Moisture Build Up: We pulled the inner piece off, and as we removed the plastic a decent amount of water came down onto the floor. We determined that in some part there was a leak from this part of the yurt roof because the rain was accumulating between the two pieces.
- Applying Sealant and Cleaning the Skylight: We cleaned the remaining layer of plastic, dried it, and added a sealant around the edges to prevent water from getting inside of it again.

Lesson Learned and Reflection of the Impacts of this Yurt
[edit | edit source]We learned a great deal about renovating a yurt, and all the possible ways to design a beautiful yet functioning yurt. There are many styles and options to fit every criteria you may have.
- Skylight: We have learned that the skylight is held in place connected to the plywood boards and shingles from the outside, and will require access to the roof in order to sufficiently renovate the skylight. Without permission to get on the roof we could not move forward with some of the tasks we had envisioned for this project. Examining the campus regulations for such student projects required a great deal of time to address, and considerable coordination between all parties involved. Due to these policies and requirements we do not qualify as approved contractors that may work on such roof structures. In turn, we had to dedicate some time to planning and revisiting what steps must be taken in order to consider any viable projects concerning roof modifications.
- Coke Bottle Light Portal: This design suits the current yurt, and we would only suggest placing the flashing below the aluminium shingles. Proper cleaning of the bottles is important. Our team would consider and recommend this alternative lighting design for other shelter structures based on it's usefulness, meeting our criteria, and ease of repair. Also we believe one could easily substitute parts of this design if needed.
- Alternative Yurt Roof Materials Board: This served as a valuable lesson and research into up-cycling and reusing of alternative materials for roofing. We learned a great deal about reaching out to our community to inquire about donations for materials.
- Reflection on Overall Design of the Yurt Roof: We would also note, the degree of difficulty for removing the inner layer of plastic for the skylight proved that the past design should not be replicated. We think that a future design should include criteria that addresses the ease of removing, modifying, or improving the design and structures of the yurt. The criteria should also address the components of the skylight which may be affected by the weather such as the nails rusting.
Next Steps
[edit | edit source]1) Refer to the demonstration board for the best roofing material.
2) Remove existing aluminum cans, and replace with alternative materials. This may require a new roof design.
3) Remove skylight, and replace with a single piece of solid hard plastic or durable single pane glass.
4) Keep the roof clean and free of excess water, debris, or mold.
Team
[edit | edit source]References
[edit | edit source]- ↑ Hopmans, T., McCain, R., Pastel, L., & Segin, S. "SALIRAJA Yurt Project." Appropedia, <https://www.appropedia.org/SALIRAJA Yurt Project> (Feb. 20, 2019).
- ↑ Diankov, I. & Kato, A. "CCAT Yurt Retaining Wall." Appropedia, <https://www.appropedia.org/CCAT yurt retaining wall> (Feb. 20, 2019).
- ↑ Star, Blue Evening. (1995). Tipis & Yurts: Authentic Designs for Circular Shelters. Lark Books, Asheville, North Carolina.
- ↑ Kuehn, Dan Frank. (2006). Mongolian Cloud Houses: How to Make a Yurt and Live Comfortably. Shelter Publications, Inc, Bolinas, California.
- ↑ ZHANG, Xin-Hong, and B. A. I. Yu-Tong. "Study on Mongolian yurt features and its environmentally friendly design." DEStech Transactions on Materials Science and Engineeringicmsea_mce (2017). <http://www.dpi-proceedings.com/index.php/dtmse/article/view/10855> (Feb. 20. 2019).
- ↑ Corrodi, M., Spechtenhauser, K., & Auer, G. (2008). Illuminating: Natural light in residential architecture (Edition Wohnen. English ; 3). Pages 129-177.
- ↑ Mitton, M., Nystuen, C., & Brewer, M. (2016). Residential Interior Design: A Guide To Planning Spaces (3rd ed.). Hoboken, N.J.: Wiley.
- ↑ Mesa, Corica, & Pattini. (2011). Evaluation of the potential of natural light to illuminate buildings in dense urban environment. A study in Mendoza, Argentina. Renewable Energy, 36(9), 2414-2423.
- ↑ "Yurt Notes & Calculator." SimplyDifferently.org: Helix Zome, simplydifferently.org/Yurt_Notes?page=6#Storm%20Preparation
- ↑ Gunther, Shea. "Yurts: Everything You Ever Wanted to Know but Were Afraid to Ask." MNN - Mother Nature Network. May 31, 2017. Accessed February 21, 2019. https://www.mnn.com/earth-matters/wilderness-resources/blogs/yurts-everything-you-ever-wanted-to-know-but-were-afraid-to.
- ↑ Apak, Kerimcan. "Modernization of The 'Yurt' Tensile Structures." International Conference on Adaptable Building Structures, July 03, 2006. Accessed February 19, 2019.https://www.irbnet.de/daten/iconda/CIB10932.pdf
- ↑ Róna-Tas, A. "BodunundElim Frühmittelalter." Acta Orientalia Academiae Scientiarum Hungaricae 56, no. 1 (2003): 57-79. doi:10.1556/aorient.56.2003.1.4.https://www.jstor.org/stable/pdf/23682763.pdf?refreqid=excelsior%3A22d13ede9e600b3a1a4480f5bb57798b
- ↑ Xin-Hong ZHANG, Yu-Tong BAI. "Study on Mongolian Yurt Features and Its Environmentally Friendly Design." DEStech Transactions on Social Science, Education and Human Science. 2017. Accessed February 21, 2019. http://www.dpi-proceedings.com/index.php/dtmse/article/view/10855.
- ↑ http://en.cnki.com.cn/Article_en/CJFDTOTAL-NMGM200901023.htm
| Authors | |
|---|---|
| License | CC-BY-SA-3.0 |
| Organizations | Campus Center for Appropriate Technology (CCAT), Cal Poly Humboldt |
| Cite as | Rise&Shine, Agua Canela, ConnorLathrop, Bkalarney, Desteny (2019–2024). "CCAT yurt roof 2019". Appropedia. Retrieved July 18, 2026. |