
CCAT rocket stove/zh

這台改良燃料爐(或稱火箭爐)是加州州立理工大學洪堡分校工程305課程的期末專案。該計畫的目標是為加州州立理工大學洪堡分校校園內的適用技術中心建造一台示範火箭爐。這台火箭爐將作為改良型燃料爐技術和發展的範例;參觀中心的學生和公眾將了解世界各地改良型燃料爐的設計、功能和需求。
火箭爐也能讓中心居民使用傳統生質燃料烹飪,進而減少他們對石油能源的依賴。值得注意的是,火箭爐是為世界各地依賴生物質燃料烹飪的人設計的。已開發國家沒有必要使用火箭爐。採用現代烹飪方式的已開發國家不會面臨傳統烹飪方式帶來的健康和環境問題。這款改良燃料爐由丹尼爾·莫耶和泰勒·瓊斯設計、製造和測試。
人們越來越依賴生物質作為烹飪燃料,這阻礙了現代烹飪方式的普及。發展中國家的人們渴望擁有像美國郊區常見的那種現代化的、自清潔的、對流式下吸式爐灶。許多人認為現代烹飪方式較為合適。現代烹飪方式燃料轉換率高,產生的空氣顆粒物也更少,然而,對石油的依賴限制了現代烹飪方式的適用性。
改良型爐灶旨在解決傳統三石灶對環境和社會造成的負面影響。改良型爐灶提高了燃料利用效率,並減少了室內烹飪環境中的污染排放。改良型爐灶採用金屬外殼和隔熱材料,將爐膛完全包裹起來。改良型爐灶改善了熱傳遞和燃料燃燒,從而成為高效清潔的燃木爐。
設計
設計原則
- 結構良好的火箭爐能保證空氣流通。因此,確保空氣流通路徑均勻至關重要。煙囪、燃燒室和裙邊縫隙的橫斷面積應該相同。
- 如果氧氣無法流通,火就會熄滅。建造燃燒室時,必須為燃料設置一個擱架。這樣,新鮮空氣就能從下方進入燃燒的燃料下方。
- 煙囪應該短一些,剛好位於烹飪鍋上方。這樣可以讓熱氣更快流經整個系統。
- 熱量會從燃燒室輻射出來。為了提高效率,請在燃燒室周圍進行隔熱。
素材
火箭爐主體的製作材料取自回收的金屬桶。一個舊檸檬油罐被裁剪成合適的尺寸,用作爐裙。隔熱燃燒室由購自當地陶器用品商店的陶瓷隔熱磚構成。燃燒室透過18號不銹鋼板固定,並用3/8英吋的五金件連接。火箭爐的五金零件包括機螺絲、螺帽、墊圈和自攻螺絲;所有五金零件均購自當地五金商店。
物料清單
| 物品 | 成本 |
|---|---|
| 隔熱陶瓷磚 | 29.60美元 |
| 8誇脫湯鍋 | 19.99美元 |
| 陶瓷磚水泥 | 3.95美元 |
| 2平方英尺金屬板 | 19.99美元 |
| 雜項螺帽、螺栓和緊固件 | 20.00美元 |
| 8誇脫湯鍋 | 8.49美元 |
| 16加侖桶 | 自由的 |
| 全部的 | 84.02美元 |
施工步驟

方形燃燒室由隔熱磚砌成。磚塊用鋼鋸切割成型。密封材質採用耐熱膩子。

金屬支架支撐著一個金屬薄殼,將燃燒室固定到位。金屬薄殼是用錫剪剪裁而成,邊緣用螺絲固定。

用鑽頭和錫剪在槍管上切出一個與金屬外殼尺寸相對應的方形孔。燃燒室外殼裝入孔中,兩側突出。

槍管外殼牢固地固定在一根橫跨槍管的金屬樑上。這根金屬樑兩側用L形支架固定。

為了隔絕燃燒室,會在桶內倒入蛭石。這種隔熱材料填滿了燃燒室和桶身之間的空隙,並一直填到燃燒室頂部。

我們在燃燒室頂部開口處安裝了一個金屬架。這個金屬架呈圓形,與槍管內部完美契合。金屬架上有一個方形切口,與燃燒室頂部開口的位置相對應。這樣一來,氣體可以穿過切口,但又能將其與槍管下半部隔開。金屬架用L型支架和螺絲牢固地固定在槍管外側。

我們在桶的上半部製作了一個裙邊。這個裙邊環繞著烹飪鍋,底部和側面留出一些縫隙。裙邊是用一個罐頭盒做的。我們用錫剪在罐頭盒底部剪出一個方形開口,用來引導熱氣。罐頭盒的頂部則用往復鋸完全切開。裙邊用螺絲和墊圈固定在架子上。

將鍋子插入桶頂的開口中。我們用錫剪出一個圓孔,然後用方形鉗和木槌小心地將金屬向下彎曲成直角。這樣鍋子就密封得更好了,開口也不會有鋸齒或尖銳的邊緣。


我們在桶的上側開了一個孔,然後用螺絲將一個圓形金屬煙囪固定在孔上。
使用我們的火箭爐時,在燃燒室內燃燒燃料,並將鍋子放在爐裙內。
測試
測試對於火箭爐專案至關重要。測試應貫穿爐灶專案的整個生命週期。改良型爐灶的評估有助於確定該型號是否具有市場競爭力、生產成本是否已降至最低,以及是否需要改進。 「對爐灶進行仔細測試,有助於更準確地了解如何製造更好的爐灶。如果沒有實驗和測試,爐灶的開發就只能基於推測。」僅靠能源效率方面的技術進步並不能確保成功。爐灶計畫必須輔以適當的計畫設計、實施和完善的機構支援。如果沒有適當的測試,爐灶工程會對改良型爐灶的效率抱有不切實際的期望。在受控的實驗室環境下進行測試時,爐灶專案可能會高估改進型爐灶的效率。改良型爐灶在實際家庭環境的表現往往不如實驗室檢驗結果。 「在實驗室中實現的燃料節省量通常與實際使用條件下的節省量幾乎沒有關係」[ 1 ]。許多在受控實驗室環境下進行的爐灶專案實現了燃料消耗量降低75%。但在對早期爐灶計畫進行審查後,人們對改良型爐灶的燃料效率預期已大幅降低。 「目前,爐具領域的大多數人都認為,燃料消耗量減少50%已屬重大成就,而節省25%甚至更少的燃料量就應該感到滿意了。」[ 1 ]實驗室環境對於改進型爐具的設計和初步測試至關重要;而實地測試則能確保最終產品的設計和製造符合規範。設計一款符合當地文化的爐具對於確保爐具計畫的成功至關重要。
測試類型
在測試爐灶時,我們想了解燒開水需要多長時間以及消耗多少木材。我們還檢查了爐灰,以確定木材是否完全燃燒。最終,我們進行了三種類型的測試。
- 我們分別進行了冷水燒開和熱水燒開的測試。熱水燒開是指在木柴已經燃燒的情況下開始測試。水的初始溫度為63度。
- 我們保持水沸騰30分鐘。直到最初將水燒開的木柴全部燃盡,我們才開始計時。這樣可以獲得更精確的結果。
結果
- 將四公升水加熱至 108 華氏度(約 42 攝氏度)耗時 13 分鐘,消耗了 0.36 磅(約 0.1 公斤)木材。這是從冷啟動(初始未燃燒任何燃料)開始的。初始溫度為華氏62 度(約攝氏 17 度),最終溫度為華氏 170度(約攝氏 77度) 。
- 從高溫開始,用 10 分鐘和 0.56 磅木材將相同體積的水加熱到 149華氏度。起始溫度為華氏 63度,最終溫度為華氏 212度。
- 從高溫開始,花了 11 分鐘和 0.72 磅木材將 6 公升水加熱到 146華氏度。起始溫度為華氏 64度,最終溫度為華氏 210度。
- 要讓六公升水保持沸騰半小時,需要0.18磅木材。初始溫度為華氏212度,最終溫度為華氏210度。
結論
我們的測試結果表明,該專案取得了成功。首先,我們注意到空氣流通非常好。我們從未遇到進氣不足或煙霧從燃燒室倒流的問題。這使得生火非常容易。此外,我們很高興地看到幾乎沒有灰燼殘留。木柴燃燒充分,溫度很高。雖然爐頂在火勢旺盛時會變熱,但蛭石對爐底的隔熱效果非常好。爐子的下半部從未燙手,爐底甚至從未發熱。一旦爐火燃起,就必須定期照顧。除了在燃燒過程中添加木柴外,還必須不斷地將燃燒的木柴推入燃燒室深處。我們的爐子非常有效率。用我們的爐子煮義大利麵大約需要一磅木柴,而且只比普通爐子多花幾分鐘。透過使用大量的木柴並產生較大的火焰,可以快速燒開水。用較少的木柴也能燒開同樣多的水,但需要更長。剛開始加熱水需要很多木柴,但維持水沸騰只需要很少的木柴。一磅木柴大約能讓六公升水沸騰兩個半小時。爐子燃燒時,鍋子和爐裙會積聚很多煙灰。需要定期清理這些煙灰。
在製作火箭爐的過程中,我們學到了一些重要的東西。首先,完全可以用回收材料製作這種爐子。最難找到的是五金配件。其次,不用電動工具也能製作火箭爐。我們可以用鐵鎚和釘子代替電鑽,也可以用鋼鋸代替往復鋸。我們只用過一次往復鋸,用來切割爐裙。正如我們所預料的那樣,爐頂會很燙。如果把爐子放在另一個桶子裡並做好隔熱,使用起來會更方便。就我個人而言,我寧願忍受高溫,也不願在爐子上花更多功夫。如果有孩子使用爐子,滾燙的金屬表面可能會很危險。我們這個爐子唯一缺少的就是一個擱板,用來放置燃燒的長木柴。
世界各地的人們在未來很長一段時間內都將繼續使用生物質燃料。使用改良型爐灶有助於控制對環境和人類社會造成的外部成本。 「越來越多的生物質燃料將被購買並在購買的爐灶中燃燒,這似乎不可避免。」[ 1 ]節省燃料可能並非推廣改良型爐灶的主要驅動因素。改良型爐灶之所以有效,是因為它們讓烹飪更快速、更安全、更乾淨。改良型爐灶可以保護兒童免受明火燙傷的危險,減少呼吸系統疾病,並且燃燒更充分,不產生煙塵。
2011年9月更新
9月11日,我們去CCAT參觀了火箭爐,查看它的運行狀況並更新了頁面。爐子狀況良好,但仍有一些地方可以改進。自建成以來,火箭爐經歷了一些細微的改變。最近,它重新粉刷了一遍。此外,煙囪也加長了許多。正如您從之前的照片中看到的,原來的煙囪比較短。新的煙囪高得多,頂部還加裝了煙囪帽。我們還留下了一份塑封的說明牌,可以掛在煙囪周圍,向人們介紹火箭爐的用途以及相關的知識。
更新測試
我們和丹碰面並測試了爐子。看起來這爐子已經好幾年沒用過了。
- 第一步是清洗鍋具。
- 然後,我們收集了一些長度為1英尺到1.5英尺的引火柴。這些引火柴總重0.44磅。
- 之後,我們把鍋子裝滿水,然後把它放在裙子裡。
- 接下來,我們開始在燃燒室裡燃燒木塊。我們還在引火物中加入了枯草。
- 水在7分25秒內迅速沸騰。
- 水溫經測量為華氏150度。
我們發現了一些問題。用於隔熱燃燒室的蛭石已經老化,需要更換。此外,燃燒室和爐膛金屬外殼之間存在一些細小的縫隙,這可能會降低鍋周圍的熱量集中度,導致沸水溫度偏低。這些縫隙可以用耐熱密封劑輕鬆填補。另外,加長煙囪是否改善了瓦斯流動尚不清楚。如前所述,煙囪應該較短,剛好位於鍋子上方,因此加長煙囪實際上可能阻礙了燃氣流動。燃燒室內的磚塊也可能需要更換。如果這台爐子經常使用,最好解決這些問題,確保爐子處於最佳運作狀態。
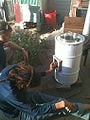 圖1:艾瑞克和丹正在為爐子添柴。
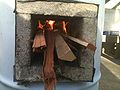 圖1a:野獸內部景象
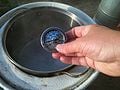 圖 1b:溫度讀數
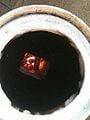 圖 1c:俯視圖,圖中未顯示烹飪鍋。
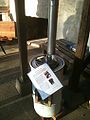 圖 1d:懸掛在爐灶上的層壓訊息


2014年10月更新
由 Jacob Carroll-Johnson 和Carlos A. Sanchez更新
看起來火箭爐已經很久沒用了。不用的原因主要是操作不便。它很難點火,而且點著之後也很難保持燃燒。鍋底很容易燒焦。使用時還會冒出很多煙。天氣也對它造成了很大的損害。我很遺憾我們沒能測試一下它的實際效果。我們計劃回去做一些測試,看看它和剛建成時相比有什麼變化。測試完成後我們會發布結果。
我們繼續進行分析。首先註意到的是煙囪和層壓說明書都不見了。鏽蝕嚴重,爐子受損尤為嚴重。爐頂和爐底受損最為嚴重。爐頂上有一些鏽蝕穿透的孔洞,因此很快就需要更換。爐底也受到了影響,鏽蝕似乎已經侵蝕了金屬,現在底部非常薄。目前還沒有出現孔洞,但可能不久就會出現。爐體結構似乎已經不太完整。接下來檢查燃燒室。用於密封陶瓷磚的耐熱密封膠幾乎完全失效。底部的陶瓷磚狀況也很糟。我們晃動底部陶瓷磚時發現只有一大塊可以移動。我們也注意到燃燒室後部出現了裂縫。
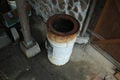 圖 1:概覽
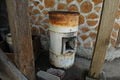 圖 1d:鏽蝕
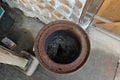 圖 1a:頂部鏽蝕孔
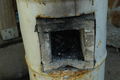 圖 1b:燃燒室
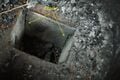 圖 1c:後牆裂縫


另請參閱
參考文獻
- ↑跳轉至:1.0 1.1 1.2 Barnes, Douglas F. “是什麼促使人們使用改良型生物質爐灶做飯。” Worldbank.org。世界銀行。網頁。 2011年10月3日。 < http://www-wds.worldbank.org/external/default/WDSContentServer/WDSP/IB/1999/08/15/000009265_3970311122727/Rendered/INDEX/multi_page.txt >。
| 作者 | 丹莫耶、泰勒瓊斯、羅根沃德、艾瑞克拉斯姆森 |
|---|---|
| 執照 | CC-BY-SA-3.0 |
| 組織 | 校園適用技術中心 (CCAT),Engr305 適用技術,加州州立理工大學洪堡分校 |
| 引用方式 | 丹莫耶、泰勒瓊斯、羅根沃德、艾瑞克拉斯穆森(2007-2025)。“CCAT火箭爐”。附錄。檢索日期:2026 年 1 月 12 日。 |