
CCAT MEOW 2023

| Type | Photovoltaic system |
|---|---|
| Authors | Lonny Grafman Emilio |
| Location | Arcata, California, United States |
| Status | |
| Years | |
| Made | No |
| Replicated | No |
| Uses | agriculture, energy generation |
| Map | |
|---|---|
| Location | Humboldt, United States |
| Coordinates | 40° 35' 59.07" N, 123° 53' 59.18" W |
This article describes the refit to C.C.A.T.'s Mobile Energy On Wheels aka M.E.O.W. done by "electro-kitties" for Lonny Grafman's 2023 ENGR 305 class.
Background
[edit | edit source]The M.E.O.W. trailer is a staple of C.C.A.T. and has gone under three ENGR 305 refits since it was first released in 2003. The first refit was a total redesign in 2012 after being stolen, stripped of electrical components, and abandoned in Hoopa in 2010. The second refit was in 2015 where the team built a new battery casing and replaced the batteries. The third and most recent refit was in 2019 where they replaced the batteries again and painted the interior of the M.E.O.W. In their Appropedia article, the 2019 team states that
“Some of the history of the M.E.O.W. is a mystery. There's a loss between the M.E.O.W. V2 to the version of the M.E.O.W. we have now. In M.E.O.W. V2 there were Trojan batteries instead of Interstate batteries that we have presently and there is no documentation of the switch and this has led us to believe that someone had done work on the M.E.O.W. without letting many people know.”
While the 2019 team does mention the 2012 refit, there is no mention of the 2015 refit in their article, leading us to believe that they were unaware of the changes made by the 2015 team.
Past teams working on the M.E.O.W. trailer have made several suggestions for future teams while maintaining and upgrading the system. The 2012 team explains many of their design choices were done to prefer structural integrity over optimization of the solar panels placement. The 2015 team did some good research on the battery technology of the time, however went with batteries obtained on a discount over some of the alternatives. It is conjectured that one/several of the batteries failed in 2019 by the team who worked on the M.E.O.W. that same year after they replaced them. The addition of a fire extinguisher is also recommended by the 2019 team.

Problem statement
[edit | edit source]The objective of this project is to effectively fix and swap the wagon from half solar, and half pedal power to full solar power. We want to make the Mobile Energy Operation Wagon (M.E.O.W.) a functional energy generator as well as a welcoming demonstration space for students to utilize energy more efficiently. We would also love to see CCAT use it to implement their own projects. Lastly, we want to revamp the M.E.O.W. to make it an integral part of the CCAT community.
Criteria
[edit | edit source]This is the criteria which we followed throughout the project, it helped us define what a successful project would look like and help us in our decision making process.
| Criteria | Constraint | Weight (1-10) |
|---|---|---|
| Cost | Remaining within budget. | 10 |
| Impact | Must positvely impact the community in some way. | 10 |
| Time | Diagnose problems with M.E.O.W. and fixing them in a timely manner. | 10 |
| Useability | Must be simpler and easier to operate than currently is. | 10 |
| Longetiviy/Durability | Must remain operational until the next refit. | 10 |
| Safety | Must be safe while working and not add any unnecessary dangers in design. | 9 |
| Ethical sourcing of materials | Use ethically sourced material with minimal environmental impact. | 8 |
| Recyclability (cradle to grave) | Must have partially recyclable chosen parts (especially batteries). | 7 |
| Aesthetics | Give the outside of the M.E.O.W. an artistic flare and adding lighting on the inside (If we have the time). | 6 |
| System Efficiency | Must have less power loss than current amount. | 6 |
| Mobility | Must maintain the system to be transportable (keeping it as light as possible). | 5 |
Prototyping
[edit | edit source]The CCAT MEOW was previously designed and built to generate a large amount of usable power for CCAT staff and volunteers to utilize. The original design also featured four pedal power bikes for staff and volunteer to generate a small amount of voltage to add to the total power input of the MEOW. Lastly the power was made accessible via an outlet on the side of the breaker box.
While this design had a strong demonstration component with the addition of the pedal power bikes, the usability, and complexity of the MEOW made it difficult for CCAT staff to manage and troubleshoot. With this in mind the Electro Kitties Team focused our efforts on three main factors to improve on the past versions of this project. Usability was our first main goal to improve on the design of the MEOW. To implement this theme into the built we opted to figure out how to make the Solar generating system as simple as possible, while still being accessible, and easy to fix. Next we focused on the durability of the MEOW. Over the course of the pandemic the MEOW fell into dis-repair and was non-functional, and eventually deemed broken when the Co-directors of the time couldn't fix it. With this in mind we decided to brainstorm ways to allow the MEOW to run continuously to mitigate the batteries draining past a dangerously low amount. This way the MEOW is always usable, and only needs to be turned off for monthly maintenance.

Lastly Aesthetics and general simplicity were topics the Co-directors and ourselves were interested in. After discussion we decided to add a window to the side of the MEOW to open up the space, and provide natural light to the interior to not only make the trailer feel more open, but to also save on energy usage while allowing light to access the interior more easily without needing to install multiple lights. We also took out the pedal power bike portion to further simplify the system. The loss of the bikes poe almost no loss in voltage as the bikes were more for show, rather than posing functionality to power generation.
Our team discussed what the MEOW would look like with these changes in mind and drew up a few rough sketches to depict this. Below is a rough sketch of the exterior, and some interior sections of the MEOW, as well as a digital version to help depict our first, second, and third prototypes better.
-
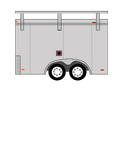 First Prototype of the MEOW
 -
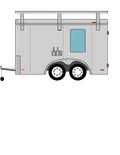 Second Prototype of the MEOW
 -
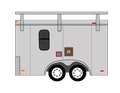 Final Prototype of MEOW


After completing our main prototyping phase we moved onto the discussion and prototype phase of the MEOW Solar generating system. We wanted to simplify the system as much as possible by removing any circuitry that makes the system cluttered or over complicated. After discussing and removing the pedal power portion of the system all we had left to do was to tackle the main photovoltaic system. To do this we talked to CCAT Co-directors to determine exactly what they wanted to see from a usability perspective of the MEOW. They talked about having an exterior outlet, interior lighting, and a possible extension cord. With this in mind our team went to work sketching up a rough photovoltaic system circuit map that would meet the goal of our project. The photos shown below display our very rough sketch of the system, and a digital re-creation of the system for clarity.
-
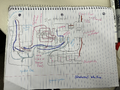 Hand drawn MEOW Photovoltaic generator system
 -
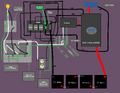 Digital MEOW Photovoltaic generator system


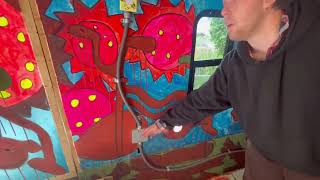
Lastly, the Electro kitten team worked on prototyping the construction and installation of the window. For the window we decided the easiest and most affordable option was to install a replacement RV window into the side of the MEOW. We opted for this method for two reasons, the first is cost and sourcing. While buying an RV window is possible in Humboldt county getting one that is the correct size and dimensions without paying a large amount of money is near impossible. With this in mind we instead bought the window on amazon, to simplify the cost. Furthermore the second reason was construction, there are countless videos online to reference for to install an RV window its and trailer or van, (we found these videos by following the "Van-life" tag). From this we planned to install the window through the side of the MEOW, and caulk it into place after.
Construction
[edit | edit source]In this section, we will go over our process of retrofitting the MEOW that we took.
Video instructions
[edit | edit source]
Steps
[edit | edit source]
We started our process by simplifying the entire system by removing the bikes from the system entirely. We did this so the system was simpler and more understandable, also so there would be less maintenance needed in the future. We then installed the new batteries into the M.E.O.W.,
We also rewired the breaker box because one breaker was upside down, and we just cleaned up the rest of the wiring

We had to remove the internal wood panels along the side of the trailer in order to install the outside outlet and window
We cut a hole into the metal side of the trailer for the window, we also cut a smaller hole for the outlets.

We had to remove the internal wood panels along the side of the trailer in order to install the outside outlet and window
We drilled a hole into the metal side of the trailer for the window, we also drilled a smaller hole for the outlets.
We installed a wooden frame on the inside that was ¾ of an inch wide, which fit perfectly behind the metal frame of the trailer and allowed us to drill through the frame instead of the metal panels.
We also cut a slightly smaller window in the wood panel on the inside, that aligned with the frame for the window.
On that same panel we cut out a hole for the outlet box for the external outlets

We also used the piece of metal that came out of the window hole, and drilled it in with the outlet box to reinforce it, due to an expected high amount of usage
We then drilled holes that lined up the faceplate through that extra piece of metal and connected the outlet box, the outlets, a gasket, the piece of metal then the faceplate. We then drilled and connected the entire thing to the side of the trailer, we also added a wood trim around to cover the holes The one thing about having both the window and the outlet on the same panel, is that that it can be difficult to work on and access the outlet, we consider cutting that board but decided against it, but that may be necessary in the future
we then connected the external outlet box to the breaker box by running wiring through conduit down and along the wall
We also ran more conduit up from the outlet box along the wood panel, into a light switch, then into a light. We decided not to cut a whole in the wood for the light switch for aesthetic purposes, as well as simplicity
The light switch is a dial in order to prevent it being left on over long amounts of time and potentially draining the batteries

we the cleaned the outside and the floor on the inside, as well as adding small decorations throughout the MEOW
Timeline
[edit | edit source]This Is a tentative timeline of the progress of the Electro Kittens progress on the M.E.O.W.
M.E.O.W. 2023 Tentative Timeline[edit | edit source] | |
|---|---|
March 2023[edit | edit source] | |
| Mondays | Wednesdays |
| 3/6
Due: Timesheet 2, Prototype for desire and function Weekly CCAT Meeting - Alex and Ethan" 3/13 Spring Break" 3/20 Due: Project photos 1, Budget Weekly CCAT Meeting - Alex and Ethan" 3/27 Due: Project photos 2 Weekly CCAT Meeting - Alex and Ethan |
3/1
Due: Tenative Timeline, Alternative Solutions" 3/8 Finalize purpose for M.E.O.W. make decision w/ CCAT" 3/15 Spring Break" 3/22 Finalize plan of action 3/29 Order any necessary parts needed for M.E.O.W." |
April 2023[edit | edit source] | |
| Mondays | Wednesdays |
| 4/3
Due: Project photos 3 Weekly CCAT Meeting - Alex and Ethan 4/10 Due: Timesheet 3 Appropedia Draft Weekly CCAT Meeting - Alex and Ethan 4/17 Weekly CCAT Meeting - Alex and Ethan 4/24 Due: Final Appropedia Page |
4/5
Have M.E.O.W. ready to be retrofitted Cleaned and Movable |
May 2023[edit | edit source] | |
| Mondays | Wednesdays |
| 5/1
Due: Final Video, Reflection, Final timesheet, Evaluations 5/8 Final Presentation 12:40 – 2:30pm |
|
Bill of materials
[edit | edit source]| Item | Amount | Cost per unit | Total |
|---|---|---|---|
| Solar specific deep cycle 12v batteries — 12v 100ah Deep Cycle Batteries | 4 | USD 180.00 | USD 720.00 |
| RV style window — Ideally we find one at the scrap yard and can get a significantly lower cost[1] | 1 | USD 120.00 | USD 120.00 |
| Label Maker — want to make components of MEOW and their uses clear | 1 | USD 20.00 | USD 20.00 |
| 100 foot extension cord — will be used to connect to CCAT or other places if needed - Find here[2] | 1 | USD 80.00 | USD 80.00 |
| extension cord reel — Will be used to keep the extension cord out of the way and make sure it is not damaged - find here[3] | 1 | USD 10.00 | USD 10.00 |
| misc. mounting hardware — includes all mounting hardware and door hinges | 1 | USD 50.00 | USD 50.00 |
| misc. tools — cost for any tools that may be needed and not already accessible | 1 | USD 50.00 | USD 50.00 |
| Cleaning supplies — used for any extra cleaning supplies needed to restore the MEOW to it former beauty | 1 | USD 50.00 | USD 50.00 |
| Second 12 gauge 100ft extension cord — We purchased a second extension cord to be able to reach the CCAT garden, we also got a smaller gauge to prevent voltage drop | 1 | USD 120.00 | USD 120.00 |
| Outlets — GFCI Weatherproof Outlets | 2 | USD 30.00 | USD 60.00 |
| Conduit — 25ft roll of conduit for outlet box and lighting 1/2" conduit | 1 | USD 20.00 | USD 20.00 |
| Wires — about 20ft of 3 wire, as well as 5-10ft each of individual live neutral and grounding wire, all 12 gauge except for 2ft of 6 gauge for a breaker | 1 | USD 50.00 | USD 50.00 |
| outlet box — waterproof outlet box for external outlets | 1 | USD 12.00 | USD 12.00 |
| faceplate — weatherproof faceplate for external outlets | 1 | USD 6.00 | USD 6.00 |
| Grand total | USD 1368EUR 1,176.48 <br />GBP 998.64 <br />CAD 1,696.32 <br />MXN 28,522.80 <br />INR 102,394.80 <br /> | ||
MEOW Operating Procedures
[edit | edit source]How To Turn Off The Solar Generator System
- Flip the inside outlet breaker switch off.
- Flip the outside outlet and inside light breaker switch off.
- Flip the inverter breaker switch off.
- Flip the solar panel switches off.
- Flip the battery switch off.
How To Turn On The Solar Generator System
- Flip the battery switch on.
- Flip the solar panel switch on.
- Flip the inverter breaker switch on.
- Flip the outside outlet and inside light breaker switch on.
- Flip the inside outlet breaker switch on.
General Guidelines
- Do not exceed usage of 120 Volts or 15 amps on the inside outlet.
- Do not exceed usage of 120 volts or 20 amps on the outside outlet.
- Stop all outlet usage if batteries fall below 50% charge until batteries are recharged if sunlight is present.
- Turn off the M.E.O.W. solar generator system if batteries fall below 50% charge and the sunlight is not present. Wait until the morning sun (approximately 9:00 A.M.) and turn the system back on to recharge the batteries.
If problems occur try turning the system off and on again and resetting the G.F.C.I. by pressing the reset buttons on all outlets.
- If any further problems occur with the M.E.O.W. solar generator system please contact Ethan Levering (esl29@humboldt.edu) or Lonny Grafman (lrg3@humboldt.edu)
Maintenance
[edit | edit source]The CCAT MEOW is a large project that needs care and attention to continue performing nominally. The Electro Kittens team prepared a daily, weekly, monthly, every six months, yearly, and every five year check list. This check list if followed properly insures the future of the MEOW operation. We also included the link to the previous MEOW project as there is a lot of helpful information regarding care, instructions on maintenance, and general tip and tricks.
Past owners manual:
Schedule
[edit | edit source]For when to maintain the CCAT MEOW.
Daily:
- Check the charge controller to see the battery percentage
- Shut off MEOW every night, and turn it on every morning, ONLY if rain is forecasted for over 5 days or if batteries fall between 50%. If sunny, leave the MEOW on.
Weekly:
- Check outlets for corrosion, debris, or loose/exposed wires
- Check that batteries are producing current
Monthly:
- Inspect tire lugs
- Check GFIC
- Check Battery Voltage
- Move the trailer several feet forward or backward to balance tread wear
Every 6 months:
- Cleaning of MEOW solar panels and exterior during the rainy season
- Check junction box seal, box degradation, and inspection of water inside
- Check Tire Pressure
- Check and clean bearings
- Lubricate the trailer hitch lever
- Check battery lights and turn signals
- Check trailers bolts and PV racks for corrosion
- Test breaks, break switches, and break battery
- Clean/dust inside of MEOW
Yearly:
- Check brake battery health Check brake pads
- Check the battery vent for damages and debris
- Check the fire extinguisher re-charge date
- Rotate Tires Repack tire bearings
Every 5 years:
- Renew trailer license
- Replace batteries
Conclusion
[edit | edit source]Testing results
[edit | edit source]We accidentally set off the ground fault indicator on the outlets when turning on the system, however we realized quickly enough before attempting to rewire the system. we left the MEOW on the day after we got it operating to see how the battery held up, it dropped 8% overnight and then gained 3% the next day, during a cloudy day. which did create a bit of concern for leaving the MEOW on permanently, especially during long periods of low sun.
Discussion
[edit | edit source]We feel that we reached most of our criteria we stayed under our Cost, however getting a HEIF grant which more than doubled our budget definitely made that easier, before we received that grant our plans were a bit underwhelming. we believe that with this new set up the MEOW can have the potential to be accessible by the community and many students to charge their devices. it will also be utilized by CCAT for thing like power tools and potentially the new compost sifter.
We completed all of the components necessary to make the MEOW operational in time, however we did cut it a little close, as for our battery system we decided to keep the deep charge lead acid battery system, due to the charge controller and converter not being able to run properly on a lithium ion battery, as well as the higher cost of the lithium batteries.
As for Useability, with the simplicity of the system, as well as its significantly higher useability, we believe that the MEOW will last far longer, because the batteries will not be depleted and left unplugged for long amounts of times, and it will be much easier to operate. With the removal of the bike, giving users more room to navigate inside the MEOW, as well as a simplified system with much clearer labels instructions and diagrams, the MEOW is much safer.
as for our the ethically sourcing of materials, it was hard to find ethically sourced batteries and material, however we did our best to source our material locally, with everything bought in Humboldt except the batteries and the window, because not of the place we went to or contacted had what we needed. The wood used for the framing and trimming was reused material, some of which was found in CCATs reclamation station.
Aesthetically the MEOW looks a lot better, the inside definitely looks less cluttered without the bikes, the window makes it feel a lot less like you are sitting in a metal box when you are inside. We also cleaned the outside walls, the panels and the floor on the inside, we also added bits of creativity live painting the faceplates and adding a wood trim around the external one.
Lessons learned
[edit | edit source]We thought that doing the photovoltaic labs would be enough prototyping for us, however rewiring a box and installing an outlet was far more difficult and time consuming. We ordered ground fault circuit interrupter gfci outlets with USB and USBc included online because there were only a few on the market that we could not find locally, however we had already gotten our entire outlet box set up before hand for sizing, but when the outlets arrived they were far larger than normal GFCI outlets, and did not fit in our box, we attempted to make several other thing work, but in the end they all cost us a lot of vital time. we most likely should have ordered the outlets far sooner, but also should have decided to just cut out loses and go with normal GFCI outlets sooner.
Cutting the window was a lot harder than the videos online looked like, we did realize after that the tool we were using from CCAT had a worn blade, so making sure you have adequate tools beforehand is important.
The one thing about having both the window and the outlet on the same panel, is that that it can be difficult to work on and access the outlet, we consider cutting that board but decided against it, but that may be necessary in the future.
Next steps
[edit | edit source]Ideally switching the system over to a better more sustainable type of battery such as lithium ion. however those batteries are more expensive and a lot of the system would need to be replace, because of the difference in how lead acid batteries recharge compared to lithium ion.
We removed the bikes because they added a lot of confusion and clutter to the meow, but had talked about keeping one in there that was not connected to the MEOW Solar System, and instead it's own independent system meant for educational purposes. We did not have the time to complete this, it would be interesting for another team to take this on.
Troubleshooting
[edit | edit source]| Problem | Suggestion |
|---|---|
| Control charger and Inverter not turning on | check battery breaker switch then system switch (green) |
| Outlets and light not working | press reset buttons on GFCI outlets |
| Outlets have low voltage | check throughout system with multimeter, make sure the person doing so is well educated in how to use a multimeter |
If not comfortable or experienced with a multimeter or electronics, contact Ethan Levering (esl29@humboldt.edu), Lonny Grafman (lrg3@humboldt.edu), the campus electrician in order to be safe.
Controversies
[edit | edit source]Battery Theft Incident
[edit | edit source]On July 24th 2023, Ethan Levering reported to the Arcata Police Department that two of the deep cycle batteries were stolen from the MEOW. As of right now, the search is still out for the batteries and the thieves who stole them. There are no suspects at this time.
Team
[edit | edit source]Introduce team and semester in the following format:
References
[edit | edit source]- ↑ https://www.amazon.com/Window-Teardrop-Horizontal-Thickness-Replacement/dp/B07X5XDYDL/ref=asc_df_B07X5XDYDL/?tag=hyprod-20&linkCode=df0&hvadid=416867048575&hvpos=&hvnetw=g&hvrand=12356292574726309919&hvpone=&hvptwo=&hvqmt=&hvdev=c&hvdvcmdl=&hvlocint=&hvlocphy=9032376&hvtargid=pla-873574235959&psc=1&tag=&ref=&adgrpid=91286206542&hvpone=&hvptwo=&hvadid=416867048575&hvpos=&hvnetw=g&hvrand=12356292574726309919&hvqmt=&hvdev=c&hvdvcmdl=&hvlocint=&hvlocphy=9032376&hvtargid=pla-873574235959
- ↑ https://www.harborfreight.com/100-ft-x-123-gauge-multiple-outlet-extension-cord-with-indicator-light-yellowblack-62908.html?utm_source=google&utm_medium=cpc&utm_campaign=12169054043&campaignid=12169054043&utm_content=125548907668&adsetid=125548907668&product=62908&store=205&gclid=Cj0KCQjw8e-gBhD0ARIsAJiDsaU6Iv3seN-NXoEjXfryrUYZcXytyIHrDdlh9VeYUR0hvBGU2nXliu0aAkRcEALw_wcB
- ↑ https://www.acehardware.com/departments/lighting-and-electrical/extension-cords-and-power-strips/cord-reels/3009271?x429=true&utm_source=google&utm_medium=organic-shopping&utm_campaign=organic-shopping
| Authors | |
|---|---|
| License | CC-BY-SA-4.0 |
| Organizations | Cal Poly Humboldt |
| Cite as | Mar240, Lonny, Alex Bee, Esl (2023–2024). "CCAT MEOW 2023". Appropedia. Retrieved July 24, 2026. |