The cider press is an older technology that has been used for ages to make juices from fruit. The cider press enabled people to move from manually crushing fruit via a mortar and pestle or even two rocks to a self-contained unit that produces more juice in less time. This allowed for the production of cider and other pressed juices at a commercial capacity - beyond subsistence farming. This extra revenue generated from commercial sales of cider can sustainably elevate people from financial poverty and produce a healthier local economy.
The goal of the 3D-printable cider press is to provide an affordable means of efficiently pressing cider. With scaled-up designs, the press can be used to produce enough product to sell excess not used for subsistence. This design fulfills the need of enabling financial mobility. Simple cider presses have been made by the | Low Technology Institute. However, even these designs require pre-cut wood,fasteners, and precisely-threaded rods. These parts can usually be found in hardware stores, but these establishments are not prevalent in 3rd world countries.
The cider press as presented in this page is modeled to fit on a standard mason jar for demonstration purposes. The openSCAD files are parametric and allow for easy customization of the components.
The size of the whole assembly can be scaled to be used on any cup or even buckets.
The spigot can be modified or removed for alternate cider press configurations when the outlet for crushed liquids is at the base of the
The press base can be modified to incorporate different patterns or crushing heads.
Threading can be added to the collar (as seen in the example below) to form a tight grip on any cup or jar. These can be removed or replaced as well.
Picture of completed print using your printer
Fig 1: Disassembled roller screw
Fig 2: Assembled simplified press screw with grapes
Provide a full BOM -- Materials needed for fabrication of device and alternative materials if they are not available, prices/sources of non-printable parts
Upload and link to all source files from open source CAD
Measure dimensions of the cup that you want to put the cider press on. the outer diameter of the cup will be the inner diameter of the cover to be printed. Add threading if applicable.
2
Measure the depth of the cup used by the press. Determine this length and add 40 mm to this value to create an appropriately-sized center screw. Resize the handle on the top to the user's desire
3
Measure the inner diameter of the cup/jar at its base. This value will be the maximum diameter of the crusher plate. Edit the bottom of the crusher plate to suit the user's needs.
4
Print all components with modifications (if any are made). Perform simple fit tests to ensure functionality prior to assembly.
5
Fill cup with softer matter to be pressed up to 3 cm below the top lip.
6
thread center screw through the threaded hole in the lid with the spigot hole.
7
Attach crusher plate to the threaded end of the center screw
8
Attach entire assembly to the cup that was measured by the user. Screw on if threaded design was used.
9
To start crushing fruit, begin by turning the center screw so that it moves downwards into the cup.
9
After fruit is sufficiently pressed, pour liquid thru spigot into another container.
Strength of materials: Prevent press from breaking easily
increase wall count on 3D printed builds
increase top and bottom layer counts
increase print density
prevent under extrusion at all costs (leads to weak spots)
increase part thickness when possible
add triangular bracing
Tolerances: parts not meshing well
review printer settings and increase size of parts by 0.5 to 1 mm if unable to thread component into center screw (Eventually, will be one "Comp" variable)
increase size of threading to a size that is easier for low resolution printers to produce
sand down defiant parts
Motion: crusher plate not moving thru full range of motion
re-check cup/jar inner diameter measurements, check for taper in item.


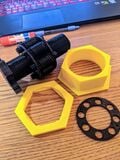 Fig 1: Disassembled roller screw
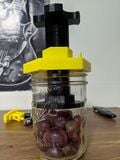 Fig 2: Assembled simplified press screw with grapes