Sophivorus (talk | contribs) m (Text replacement - "| instance-of = " to "| type = ") |
|||
| (56 intermediate revisions by 9 users not shown) | |||
| Line 1: | Line 1: | ||
{{777 | {{777 notice}} | ||
== | [[File:Light Mount 2.jpg|thumb]] | ||
Biking is not only an enjoyable hobby or exercise, but a practical and sustainable way of getting where you need to go. Biking at night can be especially dangerous which is why many places require a light to be mounted to the front and back of any bicycle. | |||
{{Project data | |||
[[ | | authors = User:Dwsweene | ||
| years = 2018 | |||
| made = Yes | |||
| replicated = No | |||
| cost = USD 3.64 | |||
| type = Bicycle part | |||
}} | |||
Biking is not only an enjoyable hobby or exercise, but a practical and sustainable way of getting where you need to go. Biking at night can be especially dangerous which is why many places require a light to be mounted to the front and back of any bicycle. These lights can be needlessly expensive, so I designed a customizable mount that can be used with any standard flashlight. This, paired with the many other parts designed by my colleagues, will allow anybody to print their own bicycle, making for a cheap and sustainable method of transportation. | |||
[[File:Light Mount 3.jpg|thumb]] | |||
== Bill of Materials == | |||
# [https://www.usimprints.com/product/renegade-aluminum-flashlight-8255546/?utm_source=google&utm_medium=product%2Bsearch&utm_campaign=base&gclid=EAIaIQobChMIr6aTpe2G3wIVS1YNCh0aTAlSEAkYASABEgJzkvD_BwE Flashlight] | # [https://www.usimprints.com/product/renegade-aluminum-flashlight-8255546/?utm_source=google&utm_medium=product%2Bsearch&utm_campaign=base&gclid=EAIaIQobChMIr6aTpe2G3wIVS1YNCh0aTAlSEAkYASABEgJzkvD_BwE Flashlight] | ||
# [https://www.walmart.com/ip/FoxSmart-GREEN-1-75mm-PLA-3D-Printer-Filament-1kg-Spool-Green/316396481?wmlspartner=wlpa&selectedSellerId=1330&adid=22222222227140112630&wl0=&wl1=g&wl2=c&wl3=250547695150&wl4=pla-410797775896&wl5=9017742&wl6=&wl7=&wl8=&wl9=pla&wl10=100362769&wl11=online&wl12=316396481&wl13=&veh=sem&gclid=EAIaIQobChMIvoGz0ayH3wIVDBhpCh2ycAU6EAQYASABEgKMMfD_BwE .013 Kg of filament] | # [https://www.walmart.com/ip/FoxSmart-GREEN-1-75mm-PLA-3D-Printer-Filament-1kg-Spool-Green/316396481?wmlspartner=wlpa&selectedSellerId=1330&adid=22222222227140112630&wl0=&wl1=g&wl2=c&wl3=250547695150&wl4=pla-410797775896&wl5=9017742&wl6=&wl7=&wl8=&wl9=pla&wl10=100362769&wl11=online&wl12=316396481&wl13=&veh=sem&gclid=EAIaIQobChMIvoGz0ayH3wIVDBhpCh2ycAU6EAQYASABEgKMMfD_BwE.013 Kg of filament] | ||
## Part Files: [[File: | ## Part Files: [[File:Light Mount.scad]], [[File:Light Mount 2.scad]] | ||
## STL Files: [https://www.youmagine.com/designs/custom-bike-light-mount YouMagine] | ## STL Files: [https://www.youmagine.com/designs/custom-bike-light-mount YouMagine] | ||
# [https://www.amazon.com/XOOL-Assortment-Precise-Beautiful-Printed/dp/B072FKMYMF/ref=sr_1_1?s=industrial&ie=UTF8&qid=1543984717&sr=8-1&keywords=m3+hex+bolt M3 Nut and bolt] | # [https://www.amazon.com/XOOL-Assortment-Precise-Beautiful-Printed/dp/B072FKMYMF/ref=sr_1_1?s=industrial&ie=UTF8&qid=1543984717&sr=8-1&keywords=m3+hex+bolt M3 Nut and bolt] | ||
# M3 Hex Wrench | # M3 Hex Wrench | ||
== Tools needed | == Tools needed == | ||
# [[Athena Build Overview| MOST Delta RepRap]] or similar RepRap 3-D printer | |||
# [[Athena Build Overview|MOST Delta RepRap]] or similar RepRap 3-D printer | |||
# M3 Hex Wrench | # M3 Hex Wrench | ||
== Skills and | == Skills and knowledge needed == | ||
* Basic knowledge of 3D printing | * Basic knowledge of 3D printing | ||
== Technical Specifications and Assembly Instructions== | == Technical Specifications and Assembly Instructions == | ||
* Print Specifications: | * Print Specifications: | ||
# Material: PLA | # Material: PLA | ||
| Line 39: | Line 46: | ||
# Bed Adhesion: Skirt | # Bed Adhesion: Skirt | ||
# '''Print time estimate: 1 Hour 35 Minutes''' | # '''Print time estimate: 1 Hour 35 Minutes''' | ||
* Assembly Instructions: | * Assembly Instructions: | ||
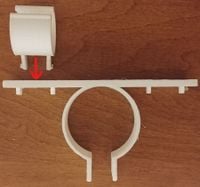
# Place snap-fit rings in base mount slots. | # Place snap-fit rings in base mount slots. [[File:Light Mount Step 1.jpg|200px|center]] | ||
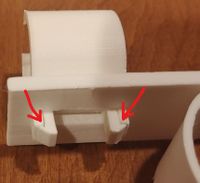
# Press down firmly until the tabs snap into place. | # Press down firmly until the tabs snap into place. For larger lights requiring more support, print a second ring and repeat this process for the back mounting slot. [[File:Light Mount Step 2.jpg|200px|center]] | ||
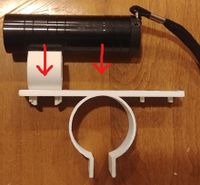
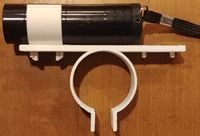
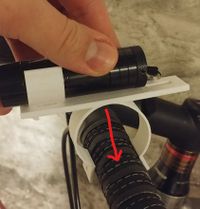
# Place the light into the snap-fit rings by firmly pushing it into the opening.[[ | # Place the light into the snap-fit rings by firmly pushing it into the opening.[[File:Light Mount Step 3.0.jpg|200px|center]][[File:Light Mount Step 3.jpg|200px|center]] | ||
# Take the handlebar mounting hole and place it around the handlebars. The mount should flex enough to fit around the bar.[[ | # Take the handlebar mounting hole and place it around the handlebars. The mount should flex enough to fit around the bar.[[File:Light Mount Step 4.jpg|200px|center]] | ||
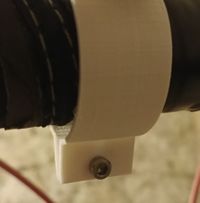
# Place a 20mm long M3 bolt through the holes at the opening of the mount and secure with an M3 nut. Keep it loose enough to rotate the mount about the bar[[ | # Place a 20mm long M3 bolt through the holes at the opening of the mount and secure with an M3 nut. Keep it loose enough to rotate the mount about the bar[[File:Light Mount Step 5.jpg|200px|center]] | ||
# Adjust the light to the desired level and tighten the bolt to an M3 hex wrench. | # Adjust the light to the desired level and tighten the bolt to an M3 hex wrench. | ||
# '''Assembly time estimate: 5 minutes''' | # '''Assembly time estimate: 5 minutes''' | ||
=== Common Problems and Solutions === | |||
* Size the flashlight hole and handlebar hole to be slightly smaller than the actual light and handlebar. This will allow for a proper, tight fit. | |||
* Size the flashlight hole and handlebar hole to be slightly smaller than the actual light and handlebar. | |||
* Ream the M3 through holes to clear them of all debris. | * Ream the M3 through holes to clear them of all debris. | ||
== Cost savings== | == Cost savings == | ||
* If your solution is not a low cost one then it is not really appropriate. | * If your solution is not a low cost one then it is not really appropriate. | ||
# Estimated Cost: | # Estimated Cost: | ||
| Line 65: | Line 72: | ||
== Benefited Internet Communities == | == Benefited Internet Communities == | ||
* [http://cycling.mtu.edu/ Copper Country Cycling Club] | * [http://cycling.mtu.edu/ Copper Country Cycling Club] | ||
* [https://www.bicycleadventureclub.org/html/ Bicycle Adventure Club] | * [https://www.bicycleadventureclub.org/html/ Bicycle Adventure Club] | ||
* [https://www.bikeleague.org/ League of American Bicyclists] | * [https://www.bikeleague.org/ League of American Bicyclists] | ||
* [ | * [[Requests for 3-D printable open source appropriate technology|Appropedia OSAT Community]] | ||
* [https://www.usacycling.org/ USA Cycling] | * [https://www.usacycling.org/ USA Cycling] | ||
{{Page data | |||
| keywords = 3D printing, bicycle, bike light, mount, osat, Plastic | |||
| sdg = SDG09 Industry innovation and infrastructure | |||
| published = 2018 | |||
| organizations = Michigan_Tech's_Open_Sustainability_Technology_Lab, MTU, MY4777 | |||
| license = CC-BY-SA-3.0 | |||
| language = en | |||
}} | |||
[[Category:OSAT 3D-Printable Designs]] | |||
[[Category:How tos]] | |||
[[ | [[Category:Electricity]] | ||
[[ | [[Category:Electric lighting]] | ||
[[ | [[Category:Cycling]] | ||
[[ | [[Category:Transport]] | ||
[[ | [[Category:3D printing]] | ||
[[ | [[Category:Plastic]] | ||
Latest revision as of 17:50, 18 June 2024

Biking is not only an enjoyable hobby or exercise, but a practical and sustainable way of getting where you need to go. Biking at night can be especially dangerous which is why many places require a light to be mounted to the front and back of any bicycle. These lights can be needlessly expensive, so I designed a customizable mount that can be used with any standard flashlight. This, paired with the many other parts designed by my colleagues, will allow anybody to print their own bicycle, making for a cheap and sustainable method of transportation.

Bill of Materials[edit | edit source]
- Flashlight
- Kg of filament
- Part Files: File:Light Mount.scad, File:Light Mount 2.scad
- STL Files: YouMagine
- M3 Nut and bolt
- M3 Hex Wrench
Tools needed[edit | edit source]
- MOST Delta RepRap or similar RepRap 3-D printer
- M3 Hex Wrench
Skills and knowledge needed[edit | edit source]
- Basic knowledge of 3D printing
Technical Specifications and Assembly Instructions[edit | edit source]
- Print Specifications:
- Material: PLA
- Layer Height: 0.1 mm
- Wall/Top/Bottom Thickness: 0.8 mm
- Infill: 15%
- Extrusion Temperature: 200˚C
- Print Speed: 60 mm/s
- Support: Everywhere at 50˚
- Bed Adhesion: Skirt
- Print time estimate: 1 Hour 35 Minutes
- Assembly Instructions:
- Place snap-fit rings in base mount slots.
- Press down firmly until the tabs snap into place. For larger lights requiring more support, print a second ring and repeat this process for the back mounting slot.
- Place the light into the snap-fit rings by firmly pushing it into the opening.
- Take the handlebar mounting hole and place it around the handlebars. The mount should flex enough to fit around the bar.
- Place a 20mm long M3 bolt through the holes at the opening of the mount and secure with an M3 nut. Keep it loose enough to rotate the mount about the bar
- Adjust the light to the desired level and tighten the bolt to an M3 hex wrench.
- Assembly time estimate: 5 minutes


Common Problems and Solutions[edit | edit source]
- Size the flashlight hole and handlebar hole to be slightly smaller than the actual light and handlebar. This will allow for a proper, tight fit.
- Ream the M3 through holes to clear them of all debris.
Cost savings[edit | edit source]
- If your solution is not a low cost one then it is not really appropriate.
- Estimated Cost:
- Flashlight: $3.44
- Printed parts: $0.14
- Hardware: $0.06
- Total Cost: $3.64
- Commercial equivalent: Front Light: $64.95
- Savings: $61.35 or 94%