Mjjaramillo (talk | contribs) No edit summary |
(→Update October 2013: fixed names) |
||
| (25 intermediate revisions by 8 users not shown) | |||
| Line 1: | Line 1: | ||
{{ | {{Offline content bundle}} | ||
{{Lang|[[AEF | {{Lang|[[AEF Greywater|English]] - [[AEF_Sistema_de_reutilizaicon_de_aguas_grises|Español]]}} | ||
{{aefprojects}} | |||
[[Image:AEFcurrentmarsh.jpg|frame|The new and improved Marsh|left]] | |||
For our final project we rebuilt a [[greywater system]] at the [[CSA]], Arcata Educational Farm. [[Greywater]] consists of all used water produced at a particular site, except for water coming from the toilet, which is known as blackwater. When building a greywater system you first separate the greywater from the blackwater and send the greywater through a separate treatment system. Ideally, after the greywater passes through the purification process it will then be able to be reused. Greywater systems are an [[appropriate]] use of technology for many reasons. Some of them being: they reduce the use of fresh [[water]], there is less stress on existing more conventional [[Septic_tanks|septic tanks]], it is a highly effective [[Water_purification|purification]] process, and there is less chemical and [[energy]] use required. In our case the majority of water used on the farm is to water [[Food crops|vegetables]], herbs, flowers and fruits, and the source of greywater comes from the outdoor kitchen, used by the farmers and volunteers to cook and wash vegetables or dishes. | |||
== The original system == | |||
[[Image:AEFprevmarsh.jpg|thumb|Fig 1: Previous marsh flow diagram|left]] | |||
[[Image:AEFprevfilt1.jpg|thumb|Fig 2: Previous marsh settling tank|right]] | |||
The original system was a [[constructed wetland]] with an initial settling tank that had no existing grease trap or [[filtration]] system. The initial settling tank was a 55 gallon drum, which sat entirely underground. The water came straight from the kitchen sink and into the drum. When the water reached the top of the drum it would flow out a funnel, and into the marsh. The marsh was a five by ten foot rectangular pond and was approximately 4-6 inches in depth. The waterproof membrane was made of pond liner and was filled with pea gravel and bulrush. In this particular system the water was not reused, it was simply directed out of the right corner at the end of the marsh. It was not clear to us when we were deconstructing the marsh why there was a settling tank to begin with, because it seemed that a pipe going directly into the marsh would have had the same effect. We identified some major flaws in the original design: the initial settling tank was ineffective, because there was no grease trap; there was no filtration system to eliminate larger food particles from entering the wetland; and the drum simply acted as a holding tank, which is a serious mistake because when greywater is held stagnant it turns into blackwater. Moreover, the wetland was too shallow, causing the water to overflow when large amounts of water were introduced to the system, and there were no existing baffles, to help move and filter the water over the roots of the plants. | |||
[[Image: | |||
[[Image: | |||
== The new Greywater marsh: design, method, and materials == | |||
Our design is also a constructed wetland, but it is much larger and has a functional settling tank and an outlet that waters a nearby apple tree. The design we chose was based on the small amount of greywater generated on a weekly basis on site. In the book "Create an Oasis with Greywater", Art Ludwig provides a source estimation guide. He approximates that with conservation a kitchen sink will use five gallons of water per day, per person. This means that with two farmers using the kitchen sink everyday they would produce 70 gallons of water per week. We also took into consideration volunteers and interns on the farm, and estimated that with one volunteer per day, it would add another 35 gallons a week to the total. In addition we calculated the use of the kitchen by the Community Agriculture class on Friday, and estimated a total of fifteen students. This adds another 75 gallons of water used per week. Finally we calculated the water needed to wash vegetables during the climax of the season and calculated a total of 20-30 gallons per week. The grand total of water used at the Arcata Educational Farm equates to approximately 200 gallons of greywater produced per week. For the amount of water used per week at the farm, a constructed wetland design best fit our project. | |||
[[Image:AEFprevfilt2.jpg|thumb|left|Fig 3: Cleaning out the old tank]] | |||
[[Image:AEFdigmarsh.jpg|thumb|right|Fig 4: Digging out the old marsh]] | |||
After determining the amount of water used on a weekly basis at the farm, and choosing our design, we began to deconstruct the original system and salvaged as much of the bulrush as we could. The next step was to get rid of the blackwater sitting in the original tank (see Fig 3). This was a disgusting process, the smell was horrid, I would not wish this upon anyone. Once the blackwater was disposed of, we started to dig the hole for our marsh (see Fig 4). The hole is five by twelve feet and has a gradual gradient, from 24-30 inches in depth. The hole was dug at a slope so that gravity will move the water through the marsh system (see diagram in Fig 5). The hole was dug 24-30 inches deep so that the bulrush and cattail roots would be able to grow at their full potential. | |||
Once the hole was dug we used two pieces of pond liner to cover the hole and placed rocks along the outside to hold the pond liner in place (see Fig 6). Then we installed one and a half baffle systems, which were made of plywood (see Fig 7). The first baffle system was placed three feet from the inlet pipe, and the half baffle was near the end before the outlet pipe. The first baffle is flush to the bottom of the marsh and the second baffle sits on bricks. The last baffle is flush with the bottom of the marsh as well (see diagram in Fig 5). Getting the baffles to stay in place was a task. We carved grooves in the wall of the hole and slid the baffles down into the slot. To make this process easier we cut the corners off the bottom ends of the baffles, this helped prevent ripping of the pond liner. Lastly we packed mud around the outside of the baffles, under the pond liner. This method worked well, making the baffles very solid and secure. | |||
[[Image:AEFcurrentsystem.jpg|thumb|300px|right|Fig 5: Diagram of new marsh]] | |||
For the initial settling tank we used the same drum, but we cut a foot off the top, to make the holding tank a bit smaller; reason being that holding greywater results in blackwater. The new settling tank sat a bit higher then the original, leaving almost half of the tank above ground. For filtration we installed a mesh screen around the top of the tank, which is held in place by a thin, but stiff aluminum strap that we manufactured. The screen is there to divert food particles and should be empty into the compost when need be(see Fig 8). Inside the tank we constructed a grease trap to keep the grease from entering the marsh. We placed a four gallon bucket upside down, and 3-4 inches over the top of 1 ½ inch vertical pipe. The vertical pipe in the initial settling tank determines the water line. This pipe runs through a hole (sealed) in the bottom of the tank and into the marsh (see diagram in Fig 5). When the water enters the tank it sinks to the bottom and flows under the bucket and down through the pipe, leaving the grease on the surface. Then the water flows out of the pipe, through a final screen, and into the marsh. | |||
<gallery> | <gallery> | ||
Image:AEFmarshliner.jpg|Fig 6: | Image:AEFmarshliner.jpg|Fig 6: Putting in the pond liner | ||
Image:AEFbaffles.jpg|Fig 7: | Image:AEFbaffles.jpg|Fig 7: Putting in the baffles | ||
Image:AEFcurrentfilter.jpg|Fig 8: | Image:AEFcurrentfilter.jpg|Fig 8: New filter | ||
</gallery> | </gallery> | ||
In conclusion, the water enters the system from the kitchen sink and flows through the filtration screen. Then the grease trap separates the water from the grease and the water finally flows out of the initial settling tank and into the marsh. Once the water exits the initial drum it flows by gravity over the first baffle, under the second, and over the third. This allows for the water to move across more surface area of the roots, making the water cleaner. Finally, the water flows to the right corner of the marsh, where there is a pipe that directs the water to a nearby apple tree. | |||
[[image:AEFfill.jpg|thumb|300px|left|Fig 9: Filling the baffled marsh with plants and gravel]] | |||
== Barriers/Limitations == | |||
After any project has been completed, the designers and constructors have a chance to step back and learn from the project. In our case, this is the first greywater system that we have constructed; and because of that fact we have learned from the actual system, people who have looked at the system and each other as well. As a result there are a few ideas that we have come up with if we were to construct this system again. | |||
An ideal result of our treated greywater would be to irrigate the field crops throughout the Arcata Educational Farm. However in an interest of money as well as the location of the sink used, we were able to water only one apple tree. One possible method of using the water to irrigate throughout the farm would be to collect the end water result into another tank; we would then be able to connect a hand pump to this tank that would then pump the water through PVC pipe to wherever the water was needed. | |||
[[ | When designing this [[greywater marsh]], we constructed the system for a certain average flow per week. We decided to error on the side of caution and make the actual marsh system a little longer and wider then we may have actually needed. Instead of using scrap plywood that we found at a home re-model site as our baffles; it would have been nice to find large pieces of plastic that we could cut to size. Plastic would withstand the elements for a longer duration; however we hope that the painted plywood will last for a considerable amount of time. | ||
== Trouble Shooting == | |||
== | |||
This system design is extremely user friendly. Occasionally the screen lid will need to be scraped off, and the excess scraps can be placed on a compost pile. If for some reason the water is not draining out of the settling tank and into the marsh, it would be a good idea to check and unclog the screen on the inlet pipe that feeds into the marsh. If this does not solve the problem, there is also a screen on the outlet pipe that transfers the water to the apple tree. | |||
==Project Update: 1 Year Later == | |||
One year later, Spring 2006, and this system seems to be thriving. | |||
*The old filter shown in Fig 8 has been replaced by a metal filter as shown in Fig 10. This new filter will hold up to the elements and use for much longer than the previous fabric mesh filter. | |||
*The innovative grease trap shown in Fig 11 is working well, with one small problem: the upside-down 5-gallon bucket is tilting and allowing some grease to pass into the marsh. This tilting is caused by a pressure difference similar to attempting to push an upside-down glass into a basin of water. To correct for this tilting, a stronger mount may be constructed or a small hole may be drilled into the 5 gallon bucket to allow for air to pass. | |||
*Although it is too early to tell, currently the recycled wood baffles are not showing the signs of decay worried about in the Barriers/Limitations section. | |||
*The farmers removed some of the cattail and bulrush this season (see Fig 12), as the system was starting to get overrun and risking [[eutrophication]]. | |||
Overall the system seems to be in great health, with no smell of anaerobic decay detected and strong marsh plant and recipient apple tree growth seen in Fig 13. | |||
<gallery> | <gallery> | ||
Image:AEFgreywaterFilterSpr06.JPG|Fig 10: | Image:AEFgreywaterFilterSpr06.JPG|Fig 10: New metal screen for filter. | ||
Image:AEFgreywaterTrapSpr06.JPG|Fig 11: | Image:AEFgreywaterTrapSpr06.JPG|Fig 11: Grease trap with a small tilting problems. | ||
Image:AEFgreywaterPlantsSpr06.JPG|Fig 12: | Image:AEFgreywaterPlantsSpr06.JPG|Fig 12: New green shoots and brown, senesced, cutback. | ||
</gallery> | </gallery> | ||
[[Image:AEFgreywaterTreeSpr06.JPG|frame|right|Fig 13: | [[Image:AEFgreywaterTreeSpr06.JPG|frame|right|Fig 13: The system and its tree.]] | ||
[[Category:Arcata Educational Farm]] | [[Category:Arcata Educational Farm]] | ||
[[Category:Constructed wetlands]] | [[Category:Constructed wetlands]] | ||
[[Category:Engr305]] | [[Category:Engr305 Appropriate Technology]] | ||
[[Category: | [[Category:Projects]] | ||
[[Category:Greywater | [[Category:Greywater]] | ||
[[Category:Humboldt County, California]] | [[Category:Humboldt County, California]] | ||
[[Category: | [[Category:2005]] | ||
==Update October 2013== | |||
Myself [User:Dfh95|Drew]] and project partner [[User:Akr57|Annika]] visited the Bayside Park Farm during the second week of October. During this visit we attempted to evaluate the current condition of this project; we were unable to find this project. Current Co-Farmers, Jayme and Leandra, were able to provide us with a little information as to why with project no longer exists. To our understanding the painted plywood baffles did not hold up to the elements as planned (explained above). The weathering of the paint led to wood rot. In combination with several smaller problems, the system eventually resulted in failure. | |||
It was difficult for the farm to keep up with the routine maintenance necessary for this system to function properly. As a result, the capacity of the system was reached and proper drainage was effected. Also, bullrush soon became overwhelmingly integrated into the system. A stench was venting from the system meaning anaerobic decay had begun to take place. | |||
In overview, the system required too much work to refurbish and the farm had plans to expand the storage shed/kitchen area by adding a wash station. The final call was made. The greywater system was removed and the wash station was constructed. Below you will find two photographs ( Fig. 14 & Fig. 15) of the current state of the new wash station were the greywater system used to sit. | |||
[[File:Greywater system.jpg|thumb|Fig 14: Wash station]] | |||
[[File:Greywater system2.jpg|thumb|Fig 15: Ground of wash station – site of old greywater system]] | |||
Revision as of 03:45, 25 November 2016
Template:Offline content bundle Template:Lang

For our final project we rebuilt a greywater system at the CSA, Arcata Educational Farm. Greywater consists of all used water produced at a particular site, except for water coming from the toilet, which is known as blackwater. When building a greywater system you first separate the greywater from the blackwater and send the greywater through a separate treatment system. Ideally, after the greywater passes through the purification process it will then be able to be reused. Greywater systems are an appropriate use of technology for many reasons. Some of them being: they reduce the use of fresh water, there is less stress on existing more conventional septic tanks, it is a highly effective purification process, and there is less chemical and energy use required. In our case the majority of water used on the farm is to water vegetables, herbs, flowers and fruits, and the source of greywater comes from the outdoor kitchen, used by the farmers and volunteers to cook and wash vegetables or dishes.
The original system


The original system was a constructed wetland with an initial settling tank that had no existing grease trap or filtration system. The initial settling tank was a 55 gallon drum, which sat entirely underground. The water came straight from the kitchen sink and into the drum. When the water reached the top of the drum it would flow out a funnel, and into the marsh. The marsh was a five by ten foot rectangular pond and was approximately 4-6 inches in depth. The waterproof membrane was made of pond liner and was filled with pea gravel and bulrush. In this particular system the water was not reused, it was simply directed out of the right corner at the end of the marsh. It was not clear to us when we were deconstructing the marsh why there was a settling tank to begin with, because it seemed that a pipe going directly into the marsh would have had the same effect. We identified some major flaws in the original design: the initial settling tank was ineffective, because there was no grease trap; there was no filtration system to eliminate larger food particles from entering the wetland; and the drum simply acted as a holding tank, which is a serious mistake because when greywater is held stagnant it turns into blackwater. Moreover, the wetland was too shallow, causing the water to overflow when large amounts of water were introduced to the system, and there were no existing baffles, to help move and filter the water over the roots of the plants.
The new Greywater marsh: design, method, and materials
Our design is also a constructed wetland, but it is much larger and has a functional settling tank and an outlet that waters a nearby apple tree. The design we chose was based on the small amount of greywater generated on a weekly basis on site. In the book "Create an Oasis with Greywater", Art Ludwig provides a source estimation guide. He approximates that with conservation a kitchen sink will use five gallons of water per day, per person. This means that with two farmers using the kitchen sink everyday they would produce 70 gallons of water per week. We also took into consideration volunteers and interns on the farm, and estimated that with one volunteer per day, it would add another 35 gallons a week to the total. In addition we calculated the use of the kitchen by the Community Agriculture class on Friday, and estimated a total of fifteen students. This adds another 75 gallons of water used per week. Finally we calculated the water needed to wash vegetables during the climax of the season and calculated a total of 20-30 gallons per week. The grand total of water used at the Arcata Educational Farm equates to approximately 200 gallons of greywater produced per week. For the amount of water used per week at the farm, a constructed wetland design best fit our project.


After determining the amount of water used on a weekly basis at the farm, and choosing our design, we began to deconstruct the original system and salvaged as much of the bulrush as we could. The next step was to get rid of the blackwater sitting in the original tank (see Fig 3). This was a disgusting process, the smell was horrid, I would not wish this upon anyone. Once the blackwater was disposed of, we started to dig the hole for our marsh (see Fig 4). The hole is five by twelve feet and has a gradual gradient, from 24-30 inches in depth. The hole was dug at a slope so that gravity will move the water through the marsh system (see diagram in Fig 5). The hole was dug 24-30 inches deep so that the bulrush and cattail roots would be able to grow at their full potential.
Once the hole was dug we used two pieces of pond liner to cover the hole and placed rocks along the outside to hold the pond liner in place (see Fig 6). Then we installed one and a half baffle systems, which were made of plywood (see Fig 7). The first baffle system was placed three feet from the inlet pipe, and the half baffle was near the end before the outlet pipe. The first baffle is flush to the bottom of the marsh and the second baffle sits on bricks. The last baffle is flush with the bottom of the marsh as well (see diagram in Fig 5). Getting the baffles to stay in place was a task. We carved grooves in the wall of the hole and slid the baffles down into the slot. To make this process easier we cut the corners off the bottom ends of the baffles, this helped prevent ripping of the pond liner. Lastly we packed mud around the outside of the baffles, under the pond liner. This method worked well, making the baffles very solid and secure.

For the initial settling tank we used the same drum, but we cut a foot off the top, to make the holding tank a bit smaller; reason being that holding greywater results in blackwater. The new settling tank sat a bit higher then the original, leaving almost half of the tank above ground. For filtration we installed a mesh screen around the top of the tank, which is held in place by a thin, but stiff aluminum strap that we manufactured. The screen is there to divert food particles and should be empty into the compost when need be(see Fig 8). Inside the tank we constructed a grease trap to keep the grease from entering the marsh. We placed a four gallon bucket upside down, and 3-4 inches over the top of 1 ½ inch vertical pipe. The vertical pipe in the initial settling tank determines the water line. This pipe runs through a hole (sealed) in the bottom of the tank and into the marsh (see diagram in Fig 5). When the water enters the tank it sinks to the bottom and flows under the bucket and down through the pipe, leaving the grease on the surface. Then the water flows out of the pipe, through a final screen, and into the marsh.
-

Fig 6: Putting in the pond liner
-
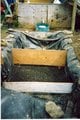
Fig 7: Putting in the baffles
-
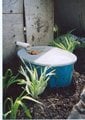
Fig 8: New filter


In conclusion, the water enters the system from the kitchen sink and flows through the filtration screen. Then the grease trap separates the water from the grease and the water finally flows out of the initial settling tank and into the marsh. Once the water exits the initial drum it flows by gravity over the first baffle, under the second, and over the third. This allows for the water to move across more surface area of the roots, making the water cleaner. Finally, the water flows to the right corner of the marsh, where there is a pipe that directs the water to a nearby apple tree.

Barriers/Limitations
After any project has been completed, the designers and constructors have a chance to step back and learn from the project. In our case, this is the first greywater system that we have constructed; and because of that fact we have learned from the actual system, people who have looked at the system and each other as well. As a result there are a few ideas that we have come up with if we were to construct this system again. An ideal result of our treated greywater would be to irrigate the field crops throughout the Arcata Educational Farm. However in an interest of money as well as the location of the sink used, we were able to water only one apple tree. One possible method of using the water to irrigate throughout the farm would be to collect the end water result into another tank; we would then be able to connect a hand pump to this tank that would then pump the water through PVC pipe to wherever the water was needed.
When designing this greywater marsh, we constructed the system for a certain average flow per week. We decided to error on the side of caution and make the actual marsh system a little longer and wider then we may have actually needed. Instead of using scrap plywood that we found at a home re-model site as our baffles; it would have been nice to find large pieces of plastic that we could cut to size. Plastic would withstand the elements for a longer duration; however we hope that the painted plywood will last for a considerable amount of time.
Trouble Shooting
This system design is extremely user friendly. Occasionally the screen lid will need to be scraped off, and the excess scraps can be placed on a compost pile. If for some reason the water is not draining out of the settling tank and into the marsh, it would be a good idea to check and unclog the screen on the inlet pipe that feeds into the marsh. If this does not solve the problem, there is also a screen on the outlet pipe that transfers the water to the apple tree.
Project Update: 1 Year Later
One year later, Spring 2006, and this system seems to be thriving.
- The old filter shown in Fig 8 has been replaced by a metal filter as shown in Fig 10. This new filter will hold up to the elements and use for much longer than the previous fabric mesh filter.
- The innovative grease trap shown in Fig 11 is working well, with one small problem: the upside-down 5-gallon bucket is tilting and allowing some grease to pass into the marsh. This tilting is caused by a pressure difference similar to attempting to push an upside-down glass into a basin of water. To correct for this tilting, a stronger mount may be constructed or a small hole may be drilled into the 5 gallon bucket to allow for air to pass.
- Although it is too early to tell, currently the recycled wood baffles are not showing the signs of decay worried about in the Barriers/Limitations section.
- The farmers removed some of the cattail and bulrush this season (see Fig 12), as the system was starting to get overrun and risking eutrophication.
Overall the system seems to be in great health, with no smell of anaerobic decay detected and strong marsh plant and recipient apple tree growth seen in Fig 13.
-
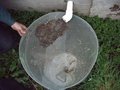
Fig 10: New metal screen for filter.
-
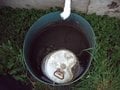
Fig 11: Grease trap with a small tilting problems.
-
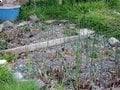
Fig 12: New green shoots and brown, senesced, cutback.


Update October 2013
Myself [User:Dfh95|Drew]] and project partner Annika visited the Bayside Park Farm during the second week of October. During this visit we attempted to evaluate the current condition of this project; we were unable to find this project. Current Co-Farmers, Jayme and Leandra, were able to provide us with a little information as to why with project no longer exists. To our understanding the painted plywood baffles did not hold up to the elements as planned (explained above). The weathering of the paint led to wood rot. In combination with several smaller problems, the system eventually resulted in failure. It was difficult for the farm to keep up with the routine maintenance necessary for this system to function properly. As a result, the capacity of the system was reached and proper drainage was effected. Also, bullrush soon became overwhelmingly integrated into the system. A stench was venting from the system meaning anaerobic decay had begun to take place. In overview, the system required too much work to refurbish and the farm had plans to expand the storage shed/kitchen area by adding a wash station. The final call was made. The greywater system was removed and the wash station was constructed. Below you will find two photographs ( Fig. 14 & Fig. 15) of the current state of the new wash station were the greywater system used to sit.

