This is a work in progress, no one should make this unless they are experimenting. Collaborators source code https://osf.io/jgb8z/ The best place to connect active builders for hang printers is the Discord server: https://discord.gg/83G3XnPFXh
Introduction[edit | edit source]
3D printers with capability to print large prints do usually consists of complex mechanisms, large parts and often takes in advanced engineering and controls and are also bulky in size. The hangprinter uses simple mechanism, with smaller parts and have the advantage of being not bulky in size. The main advantage of hangprinter design and approach is its scalability to print components of various sizes, The design of the hangprinter makes it easy to scale the size of print bed based on arranging and fixing few components and parts of it. It consists of two main segments which include a ceiling plate and a carriage, The ceiling plate holds a couple of motors, gearing, spools and linerollers arranged in a way to hold up the carriage and provide movement to it in vertically and horizontally. The carriage holds the extruder and is scalable based on the size of extruder to reduce the usage of materials as needed and the control of carriage is done with the help of movement of strings in a particular manner according to the firmware settings and software. The recyclebot is a device that functions to extrude filament from pellets/shredded recyclable plastics by a mechanism that makes the pellets to travel through different heat zones where they are heated and cooled and finally extruded through a nozzle to obtain the filament. Though this device is meant to extrude filament it can also be used as extruder where the extruded material through nozzle can be used directly to print parts. This project includes work on combination of hangprinter technique and recyclebot as extruder to build a hybrid machine that is capable of printing large and wide components along with maintaining the sustainability of using a waste plastic extrusion technique. The components of hangprinter are printed based on opensource materials published by Tobben using a Lulzbot Taz6 3D Printer out of which few components are modified and few parts are newly designed to adjust the assembly according to the new hybrid printer. Electronics usage include Arduino Mega+Ramps 1.4 combination along with nema17 and nema23 stepper motors along with corresponding motor drivers. Marlin firmware based on configurations published on opensource platforms is used in this hybrid printer along with modifications to accommodate extrusion with recyclebot instead of fused filament extrusion. Material selection, spooling and arranging the strings plays a crucial role in the hangprinter design, The selected material for string must be able to hold up and bear the weight of recyclebot+carriage and must be able to have the capability of withstanding the movements caused in them when the printer is in operation with strings being held in tension all the time. A total of five stepper motors will be used in the operation of this hybrid printer where one motor is used for extrusion through recyclebot and the rest four motors to control the movement of carriage + recyclebot assembly vertically and horizontally based on marlin firmware with configurations feeded and calibration done.
Bill of Materials[edit | edit source]
| Part | Quantity | Details |
|---|---|---|
| Nema23 steppers with planetary gearbox(18:1 ratio) | 1 |
[[1]] |
| Nema23 stepper with 1.9Nm torque rating | 4 |
[[2]] |
| 0.5mm nylon string | 84 meters |
[[3]] |
| Arduino Mega | 1 |
[[4]] |
| Ramps 1.4 | 1 |
[[5]] |
| A4988 stepper driver | 3 |
[[6]] |
| TB6600 stepper motor controller | 2 |
[[7]] |
| Recyclebot | 1 | MOST Lab [[8]] |
| V-shaped grooved bearings | 12 |
[[9]] |
| self tapping wood screws - M3x10 | multiple |
[[10]] |
| self tapping wood screws - M4x45 | multiple | [[11]] |
| 3-32V to 5-60V 40Amps Solid State Relay | 1 |
[[12]] |
| Red and black electrical wire | 5 meters | local hardware |
| Openbeam/Makerbeam | 1.5 meters | local hardware |
| 1inchx1/8inch Alumiinum flat bar | 3 meters | local hardware |
| 2 inch C-Clamps | 5-6 | local hardware |
| M2, M3, M4 and M5 nuts bolts and washers | multiple | local hardware |
| 12V 60W high temperature heater cartridge | 4 |
[[13]] |
| 3D printed printer parts | 1KG PETG filament | stl files found here
[[14]] |
| 12V power supply | 1 |
[[15]] |
Mechanical Build Instructions[edit | edit source]
This hybrid 3D printer's mechanical assembly consists of two main segments ceiling plate and carriage and uses nylon string to connect both of them and get into operation instead of using a frame for support. This hybrid printer uses hangprinter V3 with a few modifications to the original hangprinter V3. The original build instructions can be found here [[16]]. Upgrades from original version are as follows:
- Using nema23 stepper and its respective stepper holder for D motor and spool in ceiling plate instead of regular nema17 and its holder. The .stl files to print nema23 stepper holder and the gear are given in the link in bill of materials.
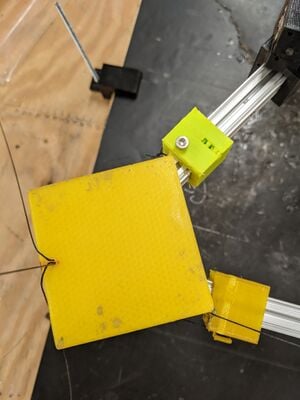
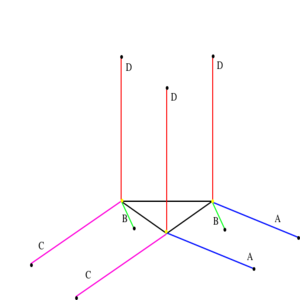
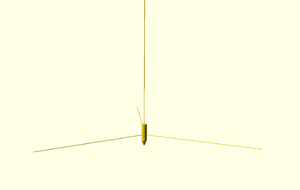
- Openbeam is used as carriage in this hybrid printer instead of a wooden frame to hold up the recyclebot as it is heavier than a regular extruder. stl files for 3D printed parts that are used to make the assembly of frame are given in the link in bill of materials. Three beams each of length 40cm and one one beam of length 30cm are assembled using the 3D printed components as shown in the Images 1,2 and 3.


Electrical connections[edit | edit source]
After completion of the Mechanical assembly of all components as described electrical connections for the hangprinter are to be made with modifications to the original hangprinter V3. Wiring diagrams for the original version can be found here [[17]]. Upgrades from original version are as follows:
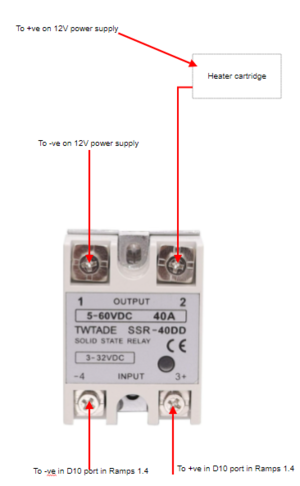
- This hybrid printer setup uses five nema23 stepper motors with TB6600 motor drivers for each motor, Arduino Mega2560, Ramps 1.4 and 12V power supply. The connections are made according the wiring diagrams given in images below. The step value and current rating given to the motors is done manually using the switches given on the TB6600 drivers. Steppers used for A, B and C lines are set at a step of 3200 and 2.8 Amps rated current, D line is set at a step of 3200 and 3.0 Amps rated current and Extruder motor is set at a step of 4800 and 3.5 Amps rated current. The heating to the recyclebot in this system consists of two heat zones where each heat zone is heated by an Aluminum block into which two heater cartridges along with a thermistor are inserted. A total of four heater cartridges are used in heating the recyclebot, each cartridge is a rated at 12V and 60W and all four cartridges are connected in parallel and then plugged into the heating supply as a single connection.

Operating the Hybrid Printer[edit | edit source]
Pronterface software is used to operate this hybrid 3D printer which is opensource and can be downloaded from here[[18]]. Marlin firmware with loaded hangprinter settings is used for this hybrid printer. A few changes in firmware are done from original V3 for this hybrid printer and can be found here[[19]]. Once the firmware is loaded into the Arduino board pronterface application which was downloaded earlier is to be used to operate the hangprinter. Recommended steps of operations are given below:
- Connect the hangprinter to your PC with a USB cable.
- Open Pronterface application on your PC.
- Turn on the power supply by connecting the 12V power supply into a socket.
- Establish the connection between your PC and the printer with the connect button provided in the prnterface application with COM4 port selected at 250000 baud rate.
- You can now command the printer using the commands tab where you can enter G codes to operate the hangprinter.
- Test the printer if it is working or not using G6 Axx gcode in the commands tab, test B, C and D motors too. A, B and C motors are used to move the carriage horizontally and D motor to move it vertically.
- Using the G6 gcode get the printer to a position where it is considered to be the center of the print bed.
- Disconnect and connect the printer using the connect/disconnect option on Pronterface software to calibrate the hangprinter and set the position as home position after performing the previous step.
- Under the setting tab in pronterface select slicing setting and an application Slice3r should open where you can slice your stl file into a gcode. This is also where you can modify the setting to comply with this hybrid printer.
- After slicing you can load the gcode into the pronterface application and start printing.
- Recommended slicing settings changes from default settings in Pronterface's slicing extension Slice3r for printing with PLA: Temperature 175o C, Filament Diameter=3mm, Extrusion Multiplier=1.1, Bedsize: X=175 Y=175, Print Center: X=0 Y=0.
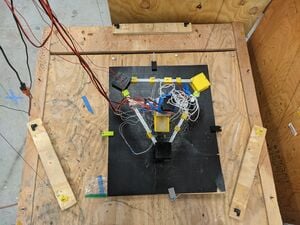
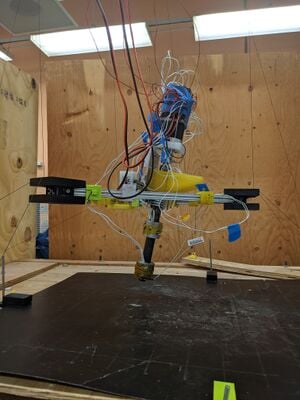
File:Video of the Hybrid printer trying to print a 10cm line.mp4
References and Sources[edit | edit source]
- Hangprinter on Wikipedia [20]
- Reprap blog [21]
- Hangprinter specs, advantages and issues [22]
- Hangprinter v3 Assembly Manual [23]
- Recyclebot details and versions [24]
- RepRap Gcodes. [25]
- Chris Riley Youtube videos for bulding Hangprinter V3 [26] [27] [28]
- Thomas Sanladerer and Tobben Youtube videos for building Hangprinter V3 [29] [30]
- http://kliment.kapsi.fi/printrun/


