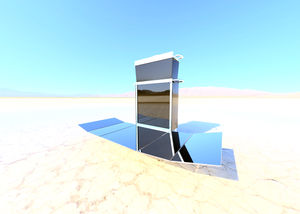
Solar Pura is an appropriate technology project aiming to provide safe drinking water by harnessing the power of the sun.
Around 2 billion people lack access to clean drinking water across the globe and many of those live in arid and remote areas perfect for the implementation of a highly efficient, low cost, small scale solar still. The aim is for it to produce between 5-10 liters of fresh water per day in a sunny climate, enough for a small family's needs. The design has been optimised to be lightweight, low cost, robust and user friendly. And a scale functional prototype has been built and tested.
Solar Pura is part of my honours thesis in the school of design at RMIT in Melbourne, Australia. It is the culmination of a year of research into creating technology that can empower those caught in the poverty cycle and how by open sourcing designs and solutions we can give people the means to be self sufficient and build resilience for communities in need.
Vertical multiple effect diffusion type solar stills vs basin solar stills[edit | edit source]
You can learn about the mechanics and history of solar stills here solar stills and here improving basin solar stills and here understanding solar stills. These pages have a lot of great information on how single effect basin solar stills function. This design would have to be the norm for low tech solar distillation.
After many experiments and a lot of research I decided that a single effect basin type solar still could not meet these criteria and looked towards more experimental and complex designs. That is how I came across the work of R.V Dunkle and his 1961 paper on the topic of multiple effect diffusion solar stills.[1] As well as contemporary research groups such as Hiroshi Tanaka et al from Japan.[2] As well as researchers from Taiwan national university also exploring this space.[3]
The principle behind the vertical multiple effect diffusion solar still is best described visually:
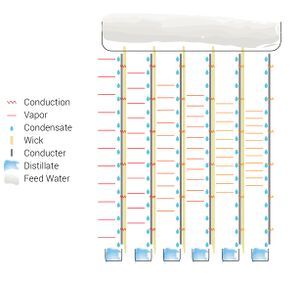
The multi effect diffusion principle works by stacking plates very close together to create different cells or 'effects' this is so that the latent heat of vaporization can be recycled multiple times before being dissipated into the atmosphere. From the diagram, Heat enters the device from the left while water is fed from above onto absorbent wicks. The wicks are laminated to one side of the conducting plate while the other side acts as the condenser. When the water on the wick is heated via conduction through the plate it vaporizes and then 'looks' for the next coldest surface to condense upon (the next plate) where it then drips down into a collection gutter that routes the distillate into a storage vessel. This process is repeated for as many effects as the device contains.
Researchers mentioned above have found that around 12 effects is optimal before returns are diminished. With 5mm spacing between plates being optimal to create the effect. This has lead to productivity for these devices to be anywhere from 20 to 40 liters per day per square meter. This is a 4 - 8 x increase in productivity compared to a single effect basin type still.
Project goals[edit | edit source]
For my project I developed 5 key design goals to focus my research around:
- low cost
- high efficiency
- mobility
- robustness
- usability.
I followed a simple iterative methodology with 3 key stages
- Research - read academic research on the topic and ideate on their findings
- Experiment - develop experimental prototypes to test new concepts
- Evaluate - learn from experiments for next iteration of development
Design[edit | edit source]
There is very little experimental research that has been done on the construction and optimization of these devices. Most of Tanaka's designs he never built fully functional prototypes, just tested 1 effect and theorized the rest of the work. While the team at Taiwan university did build their prototypes, they were all hooked up to evacuated tube collectors that could supply a steady stream of 100 degree heat to the device. This coupling adds so much cost and complexity that in my eyes moves the technology beyond Appropriate Technology applications.
The inspiration for my design came from the Tanaka's paper from 2005[4] where in he describes a multi effect diffuser that is coupled to a flat plate collector. I was very attracted to this idea because of its integration of the solar collector and the condenser. So from that point to move forward I used 3d CAD tools to flesh out the various systems and went about building my first prototype.
I synthesized the literature into a design consisting of 10 key subsystems:
- Feed water flow control - Storage of feed water and controlling the rate at which it is fed to the wicks
- Frame/mounting - The way in which all the components are mounted and housed & the spacing between the plates
- Absorber - The solar selective surface absorber that absorbs the sun
- Optical cover - Mounted in front of the absorber that prevents convective losses
- Reflector - Mirrored surface that reflects the sun onto the absorber
- Wicking Bed - The way in which the wicks are mounted and fed water
- Insulating Panels - Side and back panels that prevent heat loss
- Wicks - The material for wicking the feed water down the device
- Condenser plates - The plates that act as condensers and conductors to create the multi-effect diffusion reaction
- Distillate Collection - The way the distillate flows and is collected
And then I developed a scale prototype to test the interactions between these systems
Prototype # 1[edit | edit source]
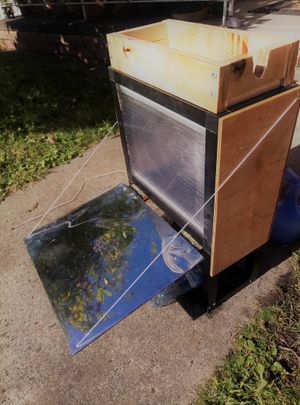
This was an early prototype to help physically model the different ideas I was trying out. To save on costs I kept it quite small with an approximate absorber area of 300x200mm and 6 effects with 20mm gaps
Feed water flow control[edit | edit source]
For this component I made a box with volume around 5 liters. I then drilled a hole and inserted a plastic irrigation valve. This didn't work very well. The control wasnt great enough for the low flow rate I needed
Frame/mounting[edit | edit source]
I used qubelock aluminum extrusion(Australian brand). It is a simple system that uses aluminum square tube joined with plastic joiners. this provided room for the plates to be stacked, support to stand the device up and all necessary mounting points.
Absorber[edit | edit source]
Part of my earlier research looked into simple cost effective solar selective surface design. Selective surfaces are special materials that absorb the solar light spectrum very efficiently and emit it out at very low rates. They are very important in high efficiency solar technology however many of the products are proprietary or very expensive. So I looked into the academic research and found that coating a piece of aluminum with a resin infused with finely crushed charcoal to be a very good selective surface. I tried many resins with polyurethane being the highest performing but also somewhat prone to cracking if it gets too hot. Polyethylene is good to but dries very glossy, decreasing quality. I measured temperatures over 80 degrees Celsius on the back of the absorber plate on this prototype(without wicks)
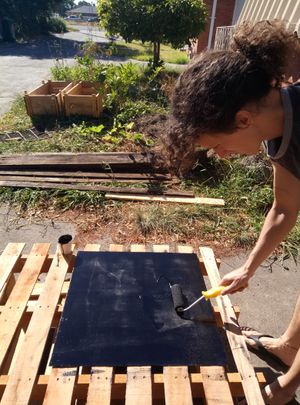
Optical cover[edit | edit source]
For this prototype I used 2 walled polycarbonate for the optical cover. It provided superior convective heat loss mitigation for the absorber but may have also diminished light transmissivity.
Reflector[edit | edit source]
I used Mylar film mounted to plywood with contact adhesive to bond the two. It had no protection from the elements and was damaged easily as well as not providing an optically clear image. I mounted my reflector on a hinge at the base of the absorber and then controlled the tilt with strings that I tied around the device. I used a spring loaded clasp from an old rain jacket to control the length.
Wicking Bed[edit | edit source]
This was one of the hardest problems and I spent a lot of time trying to solve it. The idea being that I could mount the wicks with spaces in between them but so that water wouldn't drip down around them. I tried multiple techniques without much success. No matter how I tried to make it water tight. The water would eventually start dripping through.
- Wicking Fails
-
This first test I laser cut a piece of acrylic and inserted wicks into 1mm slits spaced 10mm apart. This design leaked when water was poured over it
-
Stacking silicon rubber extrusion with wicks and aluminum plate wedged between
-
All plates stacked between rubber extrusions. Then with wooden piece screwed on the end to compress.
-
This attempt used bent aluminum glued to wooden dowel with large rubber band wrapped around the dowel. The aim being to provide rigidity and elasticity. The rubber bands were meant to create a gasket so that water would only flow down the wicks. Once all stacked in the channel a piece of wood was fastened to compress them all.
Insulating Panels[edit | edit source]
Panels were made from 5mm plywood with 20mm EVA foam squares glued on. They press fit into the frame and were made so they could be easily taken on and off while testing
Wicks[edit | edit source]
Wicks were made from common dish cloths. These were chosen for their inexpensiveness and ubiquity. As well as their wicking properties and antibacterial designs that may help. The problem with this design is that they are only secured at the top and so they dont stay laminated to the aluminum plates, causing contamination. Also there was no way to secure the first wick to the back of the absorber as it was mounted flush to the frame with no gaps.
Condenser plates[edit | edit source]
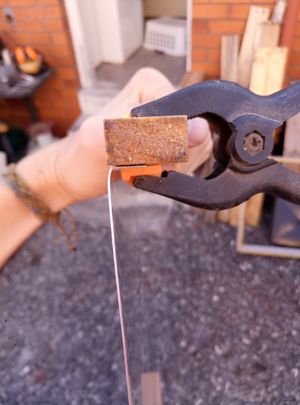
I used 0.5mm aluminum plates cut 200x300mm. These were integrated into the wicking system for accurate spacing. I tried many mounting techniques but the dowel one worked quite well. Except where the device was out of square and at the bottoms where they were just hanging freely. Without a rigid guide the plates weren't evenly spaced.
Distillate Collection[edit | edit source]
With the channel at the base of the aluminum plates there were two holes drilled. Under those holes was glued a channel and a hole in that channel to a pipe. That pipe could then be fixed to a bottle or other collection device.
Testing[edit | edit source]
This device didn't function properly due to issues with leaks and the distillate collection system. But I did test it in sunny conditions in Melbourne Australia with promising amounts of heat (average between 65-70 degrees C) and steam coming out of the device when the panel was removed.
- Side view
-
Side view of the prototype
-
Removing the easily removable insulated side panel
-
See uneven distribution of wicks and stacking of plates causing problems.
Prototype # 2[edit | edit source]
After reviewing my previous prototype I attempted to solve the underlying design issues by starting fresh on an improved version. This new iteration solves all of the problems of the first still while being more ambitious in its design. It has more effects, closer together, to improve efficiency. It has a larger reflector area that requires less daily maintenance. It is an all plastic / metal design. It is lightweight because of the all aluminum frame but built solid to last the elements.
It is still of the same dimensions as the previous still to keep costs down while prototyping and because with 12 effects it has the same surface area as a 1 square meter still but in a far smaller package.
By integrating the lessons from the previous prototype and the in depth analysis of the relevant literature I have designed a still system that I think is far more robust and closer to something that could be implemented in the field.
Manufacturing was completed over a period of weeks. Various innovations were integrated into the design utilizing components from disparate industries.
CAD design[edit | edit source]
This design was very focused on precise control of spacing and tight tolerances for manufacturing. Therefore a lot of time was spent in CAD. The design materials for the frame are entierly made from aluminum and polycarbonate. Polycarbonate was the plastic of choice because of its heat resistance up to 120 degrees Celsius. The idea behind the design was around assembly and simplicity [File:SolarPuraCad.jpg|thumb|Cad design in fusion 360 showingg spacing between plates.]]
Feed water flow control[edit | edit source]
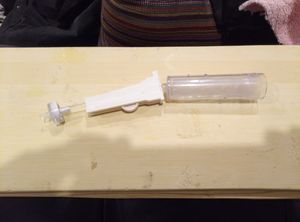
Flow control was managed first by an IV drip system hacked together from low cost medical technology. A filter to filter out large particulates, a mechanical drip controller and check valve to keep the flow consistant. This was connected to the fiberglass formed 5 liter reservoir with a small elbow joint piece glued in for the outlet.
Frame/Mounting[edit | edit source]
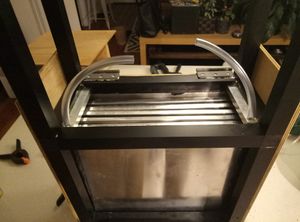
Frame was made from welded aluminum angle brackets. This created the wicking bed and reservoir housing. The idea being that the device can be assembled from 4 mounting holes with threaded rods. Spacers were lasercut from Polycarbonate for precise control.
-
Welded aluminum frame with 4 mounting holes for threaded rod
-
Assembly of all components
Absorber[edit | edit source]
Absorber is the same as previous. 3mm aluminum sheet with resin infused with charcoal coating
Optical Cover[edit | edit source]
This prototype used 3mm polycarbonate for the cover. It is considerably reflective so need to source better quality with anti reflective coating. It also scratched very easily. I first had it mounted inside the frame but this caused it to touch the absorber plate behind it. This created thermal bridging further diminishing the performance. So I mounted it on the outside.
Reflector[edit | edit source]
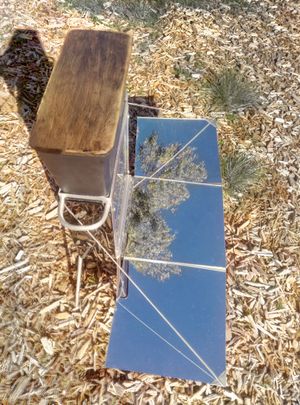
The new reflector design utilizes a longer mirror array. This array is designed to provide more sunlight to the absorber throughout the day without the need to rotate the device. it folds up and is supported by string similar to the first prototype as well as a wire kickstand. There is still some more modelling to be done
Wicking Bed[edit | edit source]
This issue turned out to be a kind of non issue. The wicking bed doesn't need to be watertight, it just needs to have a controlled flow of water to the wicks through an interface of other wicks between them and the water flow. This was achieved by wrapping a sponge like wick in a piece of polycarbonate as the first point of wetting. this made the water spread out so that it would slowly wet the wicks mounted underneath. The wicks were mounted in a laser cut grill. they are threaded through and then fixed to the plates with the top and bottom dividers
Insulating Panels[edit | edit source]
These panels were made from 6mm acrylic with EVA foam glued to them. The back panel afforded more space for insulation but the side panels were very thin. This may contribute to greater heat losses
Wicks[edit | edit source]
The wicks were made from a thick non woven fibre dish cloth. These are perfoming quite well and staying laminated to the plates even with such small spaces between.
Distillate Collection[edit | edit source]
My first idea for this was to glue small tubes to the gutter outlets. these then coalesced into a larger tube that had an outlet. This didn't really work. there was not enough force in the water for it to just drip through this system. So I experimented by adding wicks to this process. A string wick through the gutter system into a channel with an outlet hole.
Testing[edit | edit source]
Testing so far has been indoors as it is June in Melbourne. I have used a 1000w high pressure sodium bulb to test the prototype. This has given interesting results but not particularly realistic. The first tests proved that the mechanism was working.
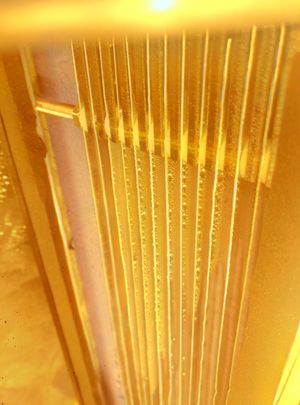
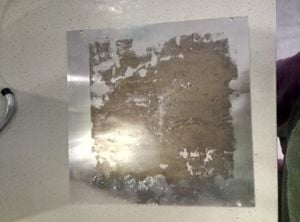
The initial distillate collection system didn't work so I had to disassemble the device. What I found after disassembly was that there was a black layer on the aluminum plates closest to the heat source. This was identified as galvanic corrosion from the different metals in the design. So i decided to swap out the aluminum plates with polycarbonate.
The next round of testing with improved distillate collection was succesful and small amounts of distillate have been collected. The issue is that the indoor testing rig heats up the feedwater quite dramatically over time and isnt giving realistic outputs. So I will have to wait for warmer weather before getting real test results
References[edit | edit source]
- ↑ http://trove.nla.gov.au/work/34968478?selectedversion=NBD9189687 Original mutliple effect diffuser paper
- ↑ http://web.archive.org/web/20181027001744/http://www.cc.kurume-nct.ac.jp:80/~tanakad/intro-eng.htm Hiroshi Tanaka home page
- ↑ http://www.sciencedirect.com/science/article/pii/S0011916415000983
- ↑ http://www.lenntech.com/abstracts/1421/a-simple-and-highly-productive-solar-still-a-vertical-multiple-effect-diffusion-type.html
Contact details[edit | edit source]
Get in touch at mflood124875%gmail.com (replace % with @) if you want to know more about the project or chat about solar stills. All plans are freely avaialble by request


