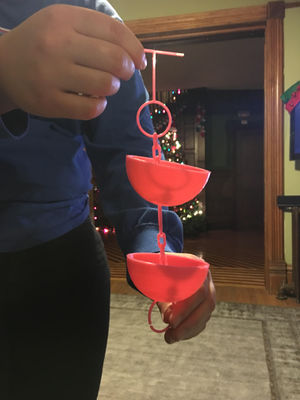
I have created a rain chain for gutters of houses. I have seen these used on houses before when a gutter continuously overflows and water puddles up in bad places. The rain chain directs the water down the chain from the spout and can be collected into a bucket or place where a puddle is okay to form. This is used as an alternative to a downspout. They were originally created in Japan but many home owners prefer these over downspouts because of the look. Picture of completed print using your printer
Bill of Materials[edit | edit source]
Provide a full BOM --
- 1 T-bar
- 3 Chain links per cup
- 1 Cup
- 2 Split rings
- 1 Metal bob
- 1 String
There are four files needed for this:
https://www.youmagine.com/designs/rain-chain
Tools needed[edit | edit source]
MOST Delta RepRap or similar RepRap 3-D printer
Skills and knowledge needed[edit | edit source]
- No Skill needed for this OSAT
Technical Specifications and Assembly Instructions[edit | edit source]
BOM
1 T-bar 3 Chain links per cup 1 Cup 2 Split rings 1 Metal bob 1 String
Instructions-
- Drill two holes in the end of the gutter for the t-bar to hang.
- Take one of the chain links and clip it onto the circle part of the t-bar.
- Clip one chain link onto the one attached to the t-bar.
- Clip one last chain link onto the previous chain link.
- Clip the last chain link onto the top loop on the cup.
- To add more cups, add three chain links in a row onto the bottom loop then add a cup and repeat.
- Once rain chain is to appropriate length, a weight may need to be added onto the bottom with string and a metal bob.
Print time estimate
- T-bar: 15 min
- Chain link:3 min
- Cup:2 hr 21 min
- Ring: 7 min
- Assembly time: About 3 hours to print the chain with 1 cup down.
- Pictures of the Assembly can be found here: (https://www.youmagine.com/designs/rain-chain)
Common Problems- The rings can sometimes come apart if they side around. It may be beneficial to glue the rings shut. Also the cups do not always want to sit upright. If you glue the inside rings to the cup, they will stay attached and make the cup stay upright to catch the water.
Cost savings[edit | edit source]
- Print cost: $8
- Commercial semi equivilent rain chain [1]
- $39 savings and %83 savings
Benefited Internet Communities[edit | edit source]
- Architecture Art Designs [2]
- The Garden Glove [3]
- Garden Lovers Club [4]
- Pretty Handy Girl.com [5]
- DIY and Crafts [6]
References[edit | edit source]
None
.