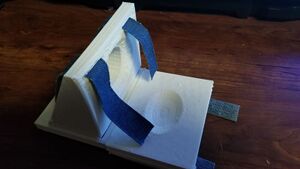
This is meant to be used by EMT or other first responders for immobilizing a head and neck after major trauma, keeping the head steady during transport. All that is needed for this device is a 3D printer, and straps
Bill of Materials[edit | edit source]
Needed parts:
- 2x 3D Printed Head Blocks - $5.18 each in PLA
- OpenScad File: File:Neck Immobilizer Head Block.scad
- STL File: File:Neck Immobilizer Head Block v01.stl
- 2x 3D Printed Outer Plates - $1.95 each in PLA
- OpenScad File: File:Neck Immobilizer Outer Plate.scad
- STL File:
- 1x 3D Printed Head Plate - $2.18 in PLA
- OpenScad File: File:Neck Immobilizer Head Plate.scad
- STL File:
- 2x Straps - $8.49; can be any strap up to 2 inches wide, using hook and loop fasteners or some other type of connection to tighten down at the forehead and chin (https://www.amazon.com/VELCRO-Brand-All-Purpose-Fastening-Organizing/dp/B00006IC2S?th=1)
Tools needed[edit | edit source]
MOST Delta RepRap or similar RepRap 3-D printer
Skills and knowledge needed[edit | edit source]
Must have a 3D Printer and knowledge to use OpenSCAD models are fully parametric; however basic knowledge of OpenSCAD, and a computer capable of rendering, are necessary for updating dimensions
Technical Specifications and Assembly Instructions[edit | edit source]
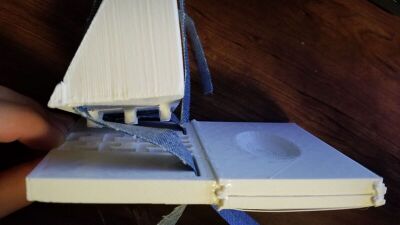
Creating the device is primarily done by the printing of each part. Once each part is complete, the fasteners are done through printed components on each part. First, slide the outer plates on either side of the head plate, using the dovetail rails. Support material is likely needed for the dovetails, so first clean out the support material, then the parts should slide right together.
Once the plates are assembled, the head blocks need to be attached. First, slide a strap through each slot at the top of the block (the slots right above the rounded head pocket). Once the straps are in place, they should drape down the outside of the block, toward the slots at the base (parallel to the pegs sticking off the bottom). Slide the straps through those lower slots as well, so that the ends of the straps are now at the bottom of the block.
Once the straps are at the base of the blocks, they can be slid through the slots in the outer plates, each block sliding both of it's straps through an outer plate, so that each head block is now on either side of the head plate. Then insert the pegs on the head block into the slots on the outer plate, each plate receiving one head block. This will allow the head block to rest upright, and the pegs chosen will allow for setting the width of the spacing between head blocks. This will require the straps to be wedged under the head block as it bases from the second head block slot to the slot on the outer plate; this is good, that position will help to provide force on keeping the blocks in place once the straps are secured.
The head blocks may feel loose in the outer plates, as though they can light right out. This is okay, once the straps are tightly connected, it will provide force to keeping the head blocks down, and pull the tops in toward each other to tightly secure the patient's head.
Assembly should only take 5-15 minutes, but may take longer depending on support material that needs to be cleaned out. The major time consuming aspect once parts are ready is the threading of the straps through all the slots.

Common Problems and Solutions[edit | edit source]
The easiest mistake in printing is to create any of the plates without support material. Dove tail rails require support material to create the upper dovetail portions, so make sure to include some sort of support material.
In assembly, be careful on removal of support material. Damaging the dovetails is possible when cleaning out the support material, and while some damage may be acceptable, significant damage may cause the connection to fail, or never hold in the first place. Strong glue is a potential fix for minor damage to the rails.
Cost savings[edit | edit source]
Total Cost (broken down above with files): $33.42
Commercial Equivalent: $77.28 (https://www.firepenny.com/Junkin_Head_and_Neck_Immobilizer_p/junkin-jsa-363-bf.htm?utm_source=bing&utm_medium=cse&utm_term=JUNKIN-JSA-363-BF)
Total Savings: $43.86 or 56.75% of commercial equivalent
Benefited Internet Communities[edit | edit source]
- Name and add links to at least 5 using single brackets around [url name]
References[edit | edit source]
- Examples of used EMT Immobilizer Designs For example:[1]