
NOAA pinniped tags by Thrifty Solutions

| Type | Animal Tag |
|---|---|
| Authors | Gabriel Bondurant Erik Blanco Dylan Dunnigan Diego Gaspar |
| Location | Arcata, California |
| Status | Prototyped |
| Years | 2025 |
| Made | Yes |
| Replicated | No |
| Uses | education, science |
| Map | |
|---|---|
| Location | Arcata, California, United States |
| Coordinates |
Pinniped (seal/sea lions) tagging is a process undertaken by researchers primarily associated with the NOAA (National Oceanic and Atmospheric Administration) or marine mammal research programs. Designed in Fall of 2025 in conjunction with NOAA and the Marine Mammal and Education and Research Program (MMERP) of Cal Poly Humboldt our tag is a complete redesign of sheep tags in order to better suit them for pinnipeds. Sheep tags saw issues such as fading text, material breakdown, and irritation caused by rough edges. Our design aims to solve these problems with softer materials, a longer-lasting structure, and clearer legibility.
Background
[edit | edit source]Researchers NOAA and MMERP have been utilizing sheep tags in order to track and study pinnipeds in their natural environment. Sheep tags worked for quite a number of years for researchers but as the livestock industry created tags better suited for livestock it made the use of these tags for pinnipeds substantially worse.
Sheep tags used on pinnipeds saw failure in 2 main ways. Either the tag became impossible to read or it damaged the animal that it was attached to. Environmental conditions often lead to the tag becoming sun bleached or stained to the point that it became impossible to read the numbering on them. When tags need to last for at least 15 years and the tags deployed may fail in a matter of months change is needed.
Thrifty Solutions from the Cal Poly Humboldt, Fall 2025, Intro to Design Class (ENGR 205) worked closely with NOAA and MMERP through their representative Dawn Goley in order to create a tag suitable for pinnipeds.
Problem statement
[edit | edit source]The objective of this design is to provide NOAA with a flipper tag that offers improved comfort, long-term durability, and better legibility throughout extended field use. Existing tags often fade, wear down, or become difficult to read after months in the ocean. This design seeks to remain readable while staying secure and reducing irritation, supporting more reliable identification in long-term research.
Criteria
[edit | edit source]Below is a list of our criteria, ranked from most to least important.
| Criteria | Description | Weight (1-10) |
|---|---|---|
| Longevity | Tag cannot last less than 15 years. | 10 |
| Animal Comfort & Safety | Must not cause irritation, drag, or interfere with natural behavior. | 9 |
| Visibility & Readability | Must use colorfast materials and stay legible in required NOAA colors. | 9 |
| Retention Through Growth | Must stay secure and comfortable as the animal grows. | 8 |
| Flexibility | Must bend under very light force for comfort and safety. | 7 |
| Cost & Fabrication Feasibility | Tag is $0.50-$1.50 and manufacturable locally. | 7 |
| Attachment Security | Must remain firmly attached during typical pinniped activity. | 6 |
| Ease of Application | Must allow fast, simple, and reliable application in the field. | 5 |
| Weight & Size | Must stay under 6 grams and within required dimensional limits. | 3 |
Prototyping
[edit | edit source]Throughout the design of the tags multiple prototypes were created. Each prototype faced issues that required significant alterations to the base concept of the tag.
Thrifty Solutions originally started with a sketch outline of potential tag designs eventually settling on the design seen in Figure 1-A. This design was meant to be created in two main steps. The first step would be to utilize injection molding to create the form factor while the second would be to laser engrave the text onto the injection molded tag in order to create a permeant and dark text that could be easily changed from tag to tag. Injection molding was ruled out as a possibility due to the injection molder at Humboldt being non-operational. Additionally laser engraving was a non-viable solution as when attempting to laser engrave the tag the laser simply melted through the tag instead of engraving it as seen in Figure 1-B.
In order to navigate the setbacks from being unable to utilize the injection molder 3D printing was seen as a viable, cost-effective answer. Utilized in the 3D printer was TPU-95A (a type of 3D printing filament) which is long lasting, durable, cost-effective, and readily accessible. The first potentially viable 3D print as seen in Figure 1-C had three immediate issues which needed solving. The print was overly flexible, there were concerns over the tightness of the print, and how to attach a spike to the post of the tag.
For the overly flexible print this was solved by increasing the thickness of the tag in order to reduce the flex. The tightness of the print was increased by switching to a different role of TPU-95A that was drier and by increasing the print density of the tags.
The spike was a much more difficult process and the easiest seen solution was to heat sink a track spike into a 3D printed post. This process proved to be impossible without utilizing a brass heat sink first. The multi-step process lead to major time inefficiencies and resulted in our group working with another known as Seal Tag 6 where they would create the posts (Figure 1-D) and Thrifty Solutions would focus on creating the tag.
-
 Figure 1-A
 -
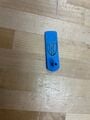 Figure 1-B
 -
 Figure 1-C
 -
 Figure 1-D


Final product
[edit | edit source]The tag design is a 3 piece solution. Our flags have two differing designs. Flag 1 of the tag seen in Figure 2-A consists of a coffin shaped tag that is 0.0723in tall with reinforcement around the whole that is 0.1297in tall in order to make sure that the tag does not fail during post insertion and has consistent grip on the post. Flag 2 seen in Figure 2-B has the same coffin shaped design with a raised collar section, 0.4126in tall, that ensures the spike from the post does not injure the animal after attachment. Both flags utilize a multicolor print completed by first printing a colored layer, a black layer, then the same color for the last layer. The last printed layer has letters/numbers embossed into it in order to allow tracking of the animals.
These pieces are combined with the post from Seal Tag 6's spike as seen in Figure 2-C. When attached to a pinnipeds flippers this system ensures that the tags do not fall off and are easily readable from a distance.
-
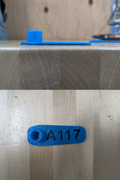 Figure 2-A
 -
 Figure 2-B


How to Print
[edit | edit source]Material List
[edit | edit source]- Black 95A TPU
- Additional 95A TPU (Colored)
- 3D Print File
Tool List
[edit | edit source]- 3D Printer
Construction Instruction
[edit | edit source]The tag is printed in a multi-step process.

Access a 3D printer as well as a roll of colored TPU-95A and black TPU-95A the file (in the materials list) should be accessed in a 3D modeling software and the desired text should be transcribed into the tag. After this the file should be transferred to a 3D printer. There are a variety of modeling software's and 3D printer's so the user should look up instructions for there software and printer.

Once the file has been uploaded, preheat the printer then insert the colored filament. Once the filament has been grabbed insure that the printer is extruding the correct color. Once the correct color has been extruded clean the nozzle then allow the printer to run.

When the first color layer finishes printing, unload the additional filament and load the black filament. Run the filament through a few times to ensure only black is extruding, then resume the print.

Once the black portion is done printing, unload the black filament and reload your additional color filament. Extrude the filament until the color is clean, then continue the print. After print completes remove from the tray.
Video instructions
[edit | edit source]A good way to display a process is by making a video explaining your process. See Template:Video for information on how to add and annotate videos. (The video portion of our project shall be uploaded by Sunday night (12/14/2025)
Bill of materials
[edit | edit source]The materials listed below represent all components used to prototype and produce the final pinniped flipper tag.
| Item | Amount | Cost per unit | Total |
|---|---|---|---|
| TPU-95A | 1 | USD 25.53 | USD 25.53 |
| Brass Threaded Inserts Kit | 1 | USD 15.00 | USD 15.00 |
| 1/4" Track Spikes | 1 | USD 13.00 | USD 13.00 |
| Grand total | USD 53.53EUR 46.04 <br />GBP 39.08 <br />CAD 66.38 <br />MXN 1,116.10 <br />INR 4,006.72 <br /> | ||
Material Cost Per Tag
| Item | Amount | Cost per unit | Total |
|---|---|---|---|
| TPU per tag | 1 | USD 0.13 | USD 0.13 |
| Additional post component | 1 | USD 0.52 | USD 0.52 |
| Printer depreciation/wear | 1 | USD 0.05 | USD 0.05 |
| Electricity | 1 | USD 0.01 | USD 0.01 |
| Maintenance & consumables — Recycled | 1 | USD 0.02 | USD 0.02 |
| Technician time (batch printing) | 1 | USD 0.10 | USD 0.10 |
| Grand total | USD 0.83EUR 0.71 <br />GBP 0.61 <br />CAD 1.03 <br />MXN 17.31 <br />INR 62.13 <br /> | ||
Operation
[edit | edit source]The pinniped flipper tag is designed for single-use field application by trained personnel. Once attached, the tag requires no interaction and serves as a passive identification marker.

Insert post into the metal spike of the universal tagger.

Insert the flatter flag into the metal clip with the text facing the post. Squeeze the handles of the applicator whilst pulling down on the tag in order to pull it onto the post.

With the flag attached to the post insert the other flag into the metal attachment area insuring that the collar is facing away from the spike. The tag system is now ready to use on a pinniped. Tagging should be done under instruction from an experienced tagging researcher.
Maintenance
[edit | edit source]Pinniped flipper tags are a single-application device and are not intended to be serviced once deployed in the field. After the tag is attached by NOAA personnel, it remains in place for the rest of the animal’s life, requiring no cleaning, adjustments, or replacement under normal conditions.
Conclusion
[edit | edit source]Testing results
[edit | edit source]The tags underwent two main forms of testing by the Testing and Design Team.
UV radiation testing was performed first. The tag weathered 1 hour under the extreme radiation before being pulled. The tag experienced no degradation in color.
The second test performed was that of a rock tumbler. The tag was in the tumbler for a 2 day period. The tag showed no degradation in the material and retained its flexibility.
Discussion
[edit | edit source]The testing performed on the tags showcased that they are able to withstand extreme conditions and come out without a scratch on them. The tags should be able to last for a minimum of 15 years out in the wild based on the testing performed on them. TPU-95A has proven to be an extremely durable material and its usage in other marine environment applications may be warranted.
Lessons learned
[edit | edit source]Creating the tags was a difficult process that gave us several valuable lessons. Communication was probably the best learned lesson for the project. Instant communication apps didn't necessarily mean that the person on the other end would respond instantly. Group members got busy and this resulted in delays in communication that could be worked around if the group was working ahead of project deadlines but was near impossible to work around if pressed against the deadline.
Another lesson learned by our group was that prototypes fail constantly. We went through numerous prototypes and it wasn't always 1 step forward. Often times it felt like 1 step forward and 3 steps back. Prototyping thankfully allows you to ditch the numerous steps backwards in each design and focus on combining those steps forward.
What we would do differently is make sure that there is early and consistent communication between group members. This would insure that tasks are distributed fairly and that those who had expertise in one section would be able to help spread that knowledge to others in the group.
Next steps
[edit | edit source]For the project we hope to upscale it by providing the file to NOAA and showing them multiple 3d printer manufactures that would be able to create our tag in bulk. These production mills would have higher quality machines and therefore the tags supplied to NOAA would be of even better quality than what they can receive from us.
Troubleshooting
[edit | edit source]| Problem | Suggestion |
|---|---|
| Tag not inserting into universal tagger | Insure that metal flap of the universal tagger has been lifted before inserting. |
| Tag does not line up | Insure that the metal post has been fully inserted into the taggers metal spike. |
| Tag identifier not facing correct direction | Make sure that the tag with the cuff is opposite the spike. |
| 3D printer printing incorrectly | Insure that file dimensions have not been altered. Otherwise refer to 3D printer manual. |
| Post does not fit on tagger | Bring up to manufacturer. If manufacturer does not have an answer refer to Seal Tag 6's page. |
Team
[edit | edit source]Thrifty Solutions of the Fall 2025, Engineering 205 of Cal Poly Humboldt consists of:
References
[edit | edit source]
| Authors | Gabriel Bondurant, Erik Blanco, Dylan Dunnigan, Diego Gaspar |
|---|---|
| License | CC-BY-SA-4.0 |
| Organizations | Cal Poly Humboldt, NOAA |
| Cite as | Gabriel Bondurant, Erik Blanco, Dylan Dunnigan, Diego Gaspar (2025–2026). "NOAA pinniped tags by Thrifty Solutions". Appropedia. Retrieved July 13, 2026. |