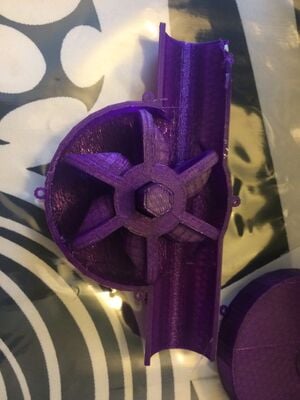
This micro water turbine can be paired with a DC generator for power generation applications. The micro design allows for the turbine to be extremely portable and light weight, allowing for power to be available to remote areas. The micro turbine will only produce a small amount of power allowing the user to charge a battery, cell phone, or other small device.
Bill of Materials[edit | edit source]
- A Delta Athena II printer or similar 3D printer
- 146 g of 3D printing filament
- 8x 3 mm screw or bolts with nuts
- 1x 3-12 V DC generator
- 1 x 50 mm circular rubber seal
- 40 mm of rubber sealing
- screw driver or other tool to fix bolts
- scissor may be needed to cut rubber sealing.
- Stl and open scad files can be found here: https://www.thingiverse.com/thing:3263806
- The turbine wheel can be found here: https://www.thingiverse.com/thing:59445
- A 3-12 V DC generator similar to the one found here on Amazon: https://www.amazon.com/EUDAX-Generator-Electric-Turbine-Cranked/dp/B078MSFFH5/ref=sr_1_1?ie=UTF8&qid=1544070605&sr=8-1&keywords=small+dc+generator
Tools needed[edit | edit source]
- MOST Delta RepRap or similar RepRap 3-D printer
- small screw driver and wrench
Skills and knowledge needed[edit | edit source]
- basic knowledge of wiring and electrical components may needed to hook the generator to a battery or other energy consumption source.
Technical Specifications and Assembly Instructions[edit | edit source]
- 40% trihexagon infill was used when printing the casing
- 90% trihexagon infill was used when printing the shaft and the bearings
- Print all components
- Insert the bearing and shaft into the circle groove in the left casing.
- Place the turbine on the shaft
- line the edge of the left case with the rubber seals
- place the right case on top of the rubber seal
- place the second bearing on the shaft
- secure the two case sections together
- The estimated print time is approximately 9 hours (4 hours for each side of the casing + 40 minutes for the bearings and shaft)
- To assembly the entire micro water turbine it will take about 30 minutes
- Including drawings or pictures of the device at stage of assembly at minimum. (Upload)
Common Problems and Solutions[edit | edit source]
- Include common mistakes/problems to avoid in building your OSAT and how to overcome them
Cost savings[edit | edit source]
- Estimate of filament need: $2.92
- DC generator $2.50
- Rubber seals and gaskets: $2.00
- 3mm bolts: $1.00
- Total Cost: $8.42
- The commercial equivalent's range for $10 to $40.
- Approximately $3-$12 dollars can be saved, this is a 28% and 40% savings.
Benefited Internet Communities[edit | edit source]
coming soon
References[edit | edit source]
- webpage: Green Optimist, Hydroelectric Generator: How to Build a Small One Available: https://www.greenoptimistic.com/hydroelectric-generator/#.XAlHYGhKjIU