
Laser welding protocol: MOST


This page describes how to use this: Open source laser system for polymeric welding located in the MOST lab. Our primary interest in it is making Expanded microchannel heat exchangers for all kinds of energy efficiency applications including solar water disinfection. For the most up to date publication on this topic see Open Source Laser Polymer Welding System: Design and Characterization of Linear Low-Density Polyethylene Multilayer Welds
Laser
[edit | edit source]Basics
[edit | edit source]The Laser is composed by three main devices: LaserMount 264, TECSource 5305 and LaserSource 4320. The LaserMount 264 is a unit that integrates a Peltier cooler for precise temperature control and the laser itself. TECSource 5305 is a temperature controller that needs to be attached with the LaserMount. LaserSource 4320 is a Laser Diode Driver, it controls the laser behavior.
Safety
[edit | edit source]General Basic Precautions
[edit | edit source]When operating the laser make sure that the doors to the rig are closed and that you are wearing the laser safety glasses.
The LSO shall be notified of the purchase of any laser, regardless of the class. Such notification should include the classification, media, output power or pulse energy, wavelength, repetition rate (if applicable), special attachments (frequency doublers...etc.), beam size at the laser aperture, beam divergence and users.
No attempt shall be made to place any shiny or glossy object into the laser beam other than that for which the equipment is specifically designed.
Eye protection devices which are designed for protection against radiation from a specific laser system shall be used when engineering controls are inadequate to eliminate the possibility of potentially hazardous eye exposure (i.e., whenever levels of accessible emission exceed the appropriate MPE levels.) This generally applies only to Class IIIB and Class IV lasers. All laser protective eyewear shall be clearly labeled with optical density values and wavelengths for which protection is afforded.
Skin protection can best be achieved through engineering controls. If the potential exists for damaging skin exposure, particularly for ultraviolet lasers (200-400 nm), then skin covers and or "sun screen" creams are recommended.
HANDS - Most gloves will provide some protection against laser radiation. Tightly woven fabrics and opaque gloves provide the best protection.
ARMS - A laboratory jacket or coat can provide protection for the arms. For Class IV lasers, consideration should be given to flame resistant materials.
Software
[edit | edit source]The Template, and all other files are uploaded in SourceForge, https://sourceforge.net/projects/lasersystemforp/
- Processing -- http://processing.org/ (If using source code).
- Inkscape -- http://inkscape.org/download/?lang=en
- GCodeTools for Incscape --- http://www.cnc-club.ru/forum/viewtopic.php?t=35#top1
- Windows: Unpack and copy all the files to the following directory Program Files\Inkscape\share\extensions\ and restart Inkscape
- Linux: Unpack and copy all the files to the following directory /usr/share/inkscape/extensions/ and restart inkscape.
- DHCP Tool -- http://www.dhcpserver.de/cms/ (Note: This is for a Windows set-up. Equivalent software is available or Mac/Linux based systems)
- PutTTy (SSH Client) -- http://www.putty.org/ (Note: This is for a Windows set-up. Equivalent software is available for Mac/Linus based systems)
- .SVG Inkscape Template -- https://www.appropedia.org/File:MOST_laserweld_TEMPLATE.svg
Loading Samples
[edit | edit source]- Loading samples
-
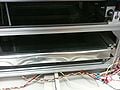
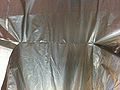
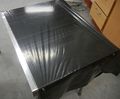 Plastic stretched onto plater
 -
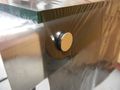 Magnets hold the plastic in place
 -
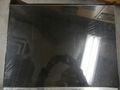 Glass sheet on top to apply pressure and reduce wrinkles
 -
 Rail slider detail
 -
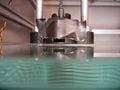 Laser clearance above glass
 -
 Back in and ready to go


- Open the safety doors.
- Carefully remove the aluminum and glass plater.
- Remove the top layer glass.
- Place the plastic layers on the bottom sheet of glass (two the first time and adding one per weld routine if more than 2).
- Stretch the plastic layers flat and hold in place with magnets at the four corners. Make sure as many wrinkles are removed as possible.
- Put top sheet of glass on top of plastic.
- Slide the plater back into the laser rig.
- Close the box and put on the safety glasses.
Powering up and communicating with the device
[edit | edit source]- Powering Up the open-source laser welder
-
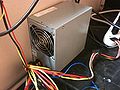 Power supply
 -
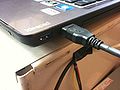 USB connection
 -
 TECSource 5305
 -
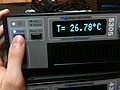
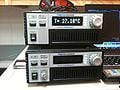 Temperature stabilizing
 -
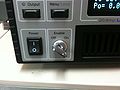
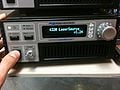 4320 LaserSource
 -
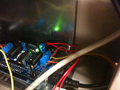 Arduino green light
 -
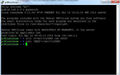 PuTTY Set-Up Interface


- Turn on computer and log in
- Plug in Arduino and RAMPS control board
- RAMPS uses a standard 120V outlet, through a converter, to the (+)(-) on the board.
- Arduino uses a micro-usb to 120V outlet connector.
- Plug in and confirm power to both:
- LaserSource 4320
- 5A/12V TECSource 5305
- Turn on 5305 TECSource and insure the "blue' light is on hear the Output indicator. If the light is not on push the Output button.
- Wait until the temperature reading on the 5305 is stable below 25 Celsius. The Tset should be set to ~25 degrees Celsius at this time.
- Turn on the 4320 LaserSource with the power switch
- Insure the/a DHCP server is broadcasting to IP address '169.254.5.2'
- The connection from DHCP to the laser welding requires an SSH client (PuTTY)
- Your respective SSH Client should connect to the DHCP Server (hosting the printer locally on your computer) via '169.254.5.2'
- Upon connection user will see:
- "Using username "pi" and "pi@169.254.5.2's password"
- Once SSH client prompts fro password type: reprap. This will permit access. Review image above for the interface appearance.
- One inside the interface, the proper port must be assigned to PuTTY to talk to the 4320 LaserSource.
- The first line should be stty -F/dev/ttyUSB0 raw 38400. Note that "38400" could be variable based upon your computer.
- All commands through PuTTY allow for remote control of the 4320 LaserSource. Review list of available commands here: http://www.arroyoinstruments.com/manuals/ArroyoComputerInterfacingManual.pdf
- To confirm proper connection ping i.e. ask the 4320 to audibly beep by typing: echo 'BEEP'>/dev/ttyUSB0. Hit enter. The instrument should beep and confirm that you are controlling it remotely.
- Open a web browser and navigate to the hosting site for Franklin: https://169.254.5.2:8000. Depending upon your browser's security type "https" may not be possible and you will have to continue without a secure connection.
- It is recommended that this page be bookmarked in your browser for future use.
- You are now set up and ready to control the printer with the Franklin interface.
Side note:
If the RepRap printer interface comes up as "untrusted connection" then click "I understand the risks" --> "Add Exception --> "Confirm security exception". If it doesn't work on the first try, click "confirm security exception two or three more times. Sometimes it takes more than one try for it to work.
GCode Generation
[edit | edit source]Drawing on Incscape and Exporting to gcode
[edit | edit source]- Making your design
-
 Incscape Template
 -
 A line.
 -
 Selected line
 -
 Path to Gcode


- After installing Incscape and Gcodetools, run Incscape
- Open the file TEMPLATE.svg, it has the working area limits and other things necessary to generate the gcode correctly. "Save As" you file under a different file name to preserve the template
- Draw weld pattern - select the line and press Ctrl+Shift+C (this converts it to a path and keeps it selected)
- Go to Extensions>>Gcodetools>>Path to Gcode
- On the tab Preferences, you can change the File name and Directory
- Click Apply. The GCode should now be generated to the Directory folder
- If you want to make any changes, first undo with ctrl-Z to get your original paths back
Handwritten GCode and/or Utilize provided Python 3 program to write code for you
[edit | edit source]- Handwritten / Custom
Example gcode for a simple linear weld:
;///LaserSource and TECSource SET-UP///
;	Laser Source
;		Begin communciation via: "ssty -F /dev/ttyUSB0 raw 38400"
;		Next string follows as: "echo >/dev/ttyUSB0"
;	TECSource
;		No direct communcation to SSH. Turn on, set to 25C.
;/////START/////
;start position
G1 F600 X10 Y10
;set to experiment current (5000mA (12A))
(SYSTEM:echo 'LAS:LDI 5000' >/dev/ttyUSB0)
;turn on laser
(SYSTEM:echo 'BEEP' >/dev/ttyUSB0)
(SYSTEM:echo 'LAS:OUTPUT 1' >/dev/ttyUSB0)
;raster across Y290
G1 X290
;path completed turn off laser
(SYSTEM:echo 'LAS:OUTPUT 0' >/dev/ttyUSB0)
(SYSTEM:echo 'BEEP' >/dev/ttyUSB0)
;move x-head to convienet set-up location
G1 F600 X10 Y300
;//////END/////
- Python 3
- Repository contains the python code used to generate all the .gcode, the SCAD files for the open source polymer welder
- The provided program will allow an operator, based upon your inputs, will develop a useable Gcode to be directly imported into Franklin.
- Repository contains the python code used to generate all the .gcode, the SCAD files for the open source polymer welder
Laser Welding
[edit | edit source]- Welding your design
-
 Power up Scotty
 -
 Resultant weld.


- Close and latch the enclosure doors and put on the safety glasses.
- Turn the LaserSource enable key to "On"
- In the web browser page where Franklin is open. Upload your respective gcode directional controls and 4320 LaserSource commands
- Click "Print Selected"
- Allow print to cycle until completion
- Turn the "Enable" switch on the LaserSource to the "Off" position.
- You can now open the enclosure and remove the platter from the welding rig.
| Authors | |
|---|---|
| License | CC-BY-SA-3.0 |
| Cite as | JLaureto, Bmtymrak, Thaddeus Waterman, Npbudd, Sparasar (2011–2026). "Laser welding protocol: MOST". Appropedia. Retrieved July 10, 2026. |