
How to Use the WAZER Waterjet Cutter

How to use the WAZER G2 Desktop waterjet cutter
[edit | edit source]
The WAZER G2 Desktop is a compact abrasive waterjet cutter used to cut two-dimensional parts from sheet materials. It uses high-pressure water mixed with garnet abrasive to cut materials such as metal, plastic, tile, glass, rubber, foam, and composites.
This page is a practical guide for trained users of this specific WAZER setup. It explains how to prepare a cut file, check the machine, load abrasive, run a cut, clean up afterward, and respond if the machine breaks or behaves incorrectly.
Warning: Only trained users should operate the WAZER. Do not bypass safety systems, operate the machine unattended, open covers while the machine is running, or continue using the machine if it is leaking, clogging, making abnormal noises, or showing repeated errors.
Page summary
[edit | edit source]A step-by-step guide for safely preparing, operating, maintaining, and troubleshooting the WAZER G2 Desktop waterjet cutter. This guide covers WAM cut-file setup, water valve checks, visible water-line checks, abrasive loading, pre-cut checks, cutting, shutdown, cleanup, and what to do when the machine breaks.
Local machine information
[edit | edit source]WAZER location: TEB 6
Water valves to open before use: In the cabinet to the left of the machine.
Clean abrasive location: To the right of the machine on the floor.
Used abrasive disposal location: Discard used abrasive into the nearby garbage bin.
Approved materials: WAM-listed and workspace-approved sheet materials such as aluminum, stainless steel, tool steel, acrylic, polycarbonate, glass, ceramic or porcelain tile, granite or marble tile, carbon fiber, neoprene, silicone, and polyurethane. Always confirm the exact material and thickness in WAM before cutting.
Materials that should not be cut: Unknown, toxic, hazardous, unapproved, or over-thickness materials. Do not use the WAZER for engraving, etching, or other non-through cuts.
Useful links
[edit | edit source]- WAM cut-file software
- WAZER software overview
- WAZER Desktop user manual downloads
- WAM manual download
- WAZER maintenance procedures
- WAZER troubleshooting guide
- WAZER Desktop firmware and config files
- WAZER safety data sheets
- WAZER medical information card
- WAZER technical support
Safety
[edit | edit source]
The WAZER is not just a wet cutting machine. It uses a high-pressure abrasive waterjet that can cause serious injury. A waterjet injury can look small on the surface while causing serious internal damage. Seek medical attention immediately for any waterjet injury.
Minimum safety rules:
- Wear safety glasses.
- Wear closed-toe, non-slip shoes.
- Wear gloves when handling wet material, cut parts, abrasive, or tank water.
- Tie back long hair and avoid loose clothing or jewelry.
- Keep the area around the machine dry and clear.
- Know where the power switch, emergency stop, water valves, and water shutoff are located.
- Do not use extension cords.
- Do not cut unknown materials.
- Do not cut toxic materials unless the material has been approved by the lab or workspace supervisor.
- Do not expose yourself to the waterjet stream.
- Do not leave the machine unattended while cutting.
- Do not modify or bypass the interlock system.
- Do not operate the machine if there is a leak, blocked drain, broken hose, kinked hose, damaged cable, or repeated electrical trip.
GFCI/PRCD electrical protection
[edit | edit source]A GFCI or PRCD is an electrical safety device that quickly shuts off power if it detects current leaking to ground. This matters because the WAZER operates with both water and electricity.
- GFCI stands for Ground Fault Circuit Interrupter.
- PRCD stands for Portable Residual Current Device.
Before using the WAZER, check that the GFCI/PRCD protection is reset and working. Do not bypass this protection, modify the power cables, or use extension cords with the machine.
Warning: Do not use the WAZER if the GFCI/PRCD is damaged, missing, repeatedly tripping, buzzing abnormally, or not working properly. Report the issue before using the machine.
Waterjet injury response
[edit | edit source]If a waterjet injury occurs:
- Stop the machine if it is safe to do so.
- Seek medical attention immediately.
- Tell the doctor the injury was caused by a high-pressure waterjet.
- Tell the doctor what material was being cut.
- Tell the doctor the source of the water.
- Bring or show the WAZER medical information card.
Do not treat waterjet injuries like ordinary cuts. Internal damage and infection risk can be serious.
Tank water caution
[edit | edit source]Standing tank water can contain bacteria. Avoid contact with tank water if you have cuts or open wounds. Wear gloves when reaching into the tank or handling wet parts.
Water lines, valves, and machine connections
[edit | edit source]Before using the WAZER, users must confirm that the required water valves are open and that the visible water lines and drain hose are in the correct position.
Before each cut, check that:
- The required water valve or valves are turned on.
- The water supply hose is connected and not kinked.
- The visible water lines on or near the machine look normal.
- The Pump Box water connections look normal.
- The drain hose is secure and aimed into the correct drain location.
- No water is leaking from visible fittings, tubing, or machine connections.
- The area around the WAZER and Pump Box is dry enough to work safely.
- The Pump Box pressure gauge looks normal before cutting.
-
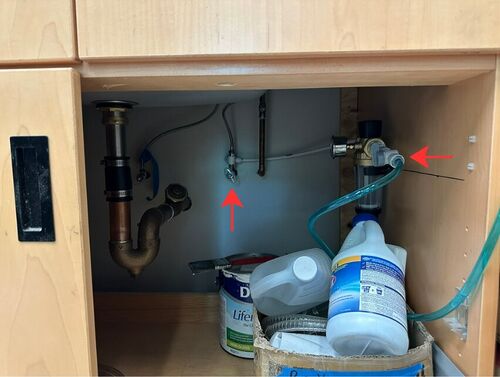 Water valves that must be opened before using the WAZER. Pressure gauge must also be checked.
 -
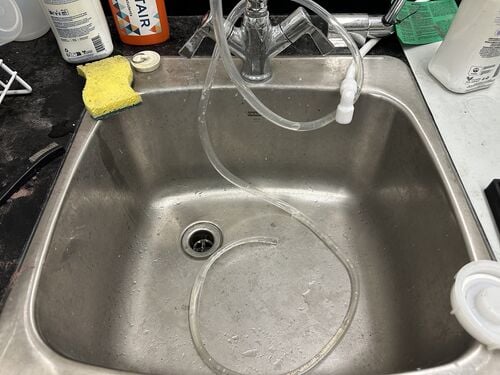
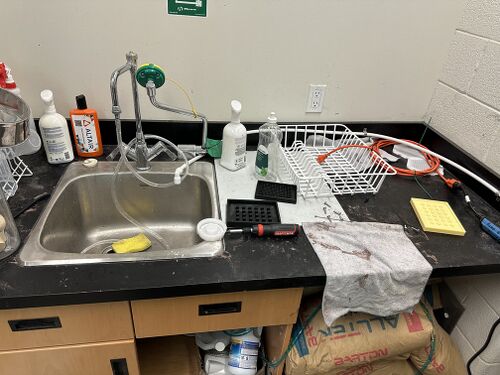 Water discharge/drain hose location. Make sure the hose is secure and aimed into the correct drain before cutting.
 -
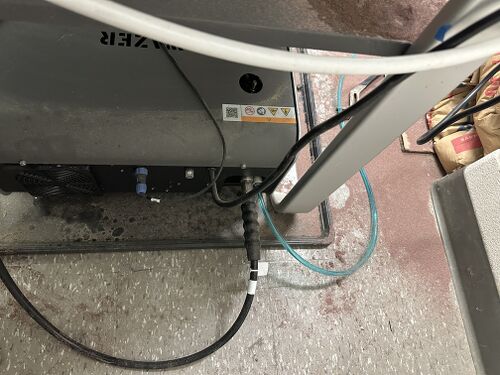
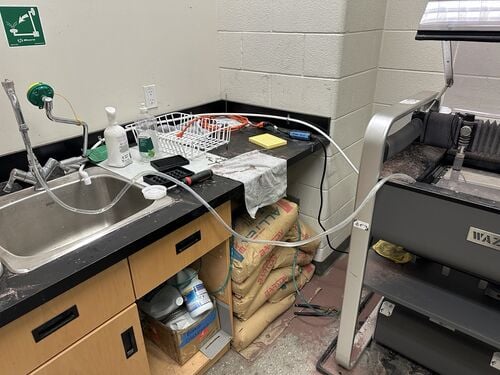
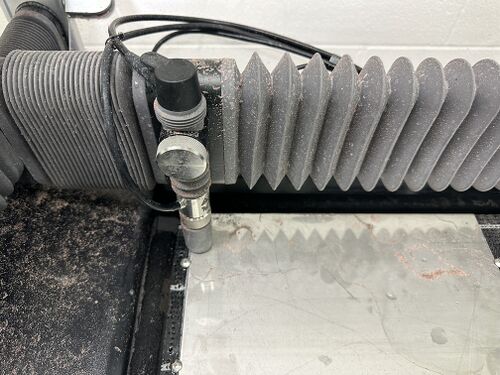
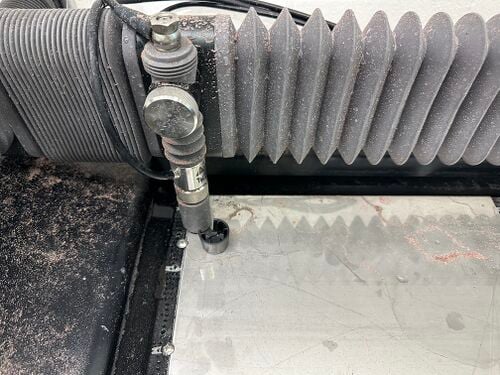
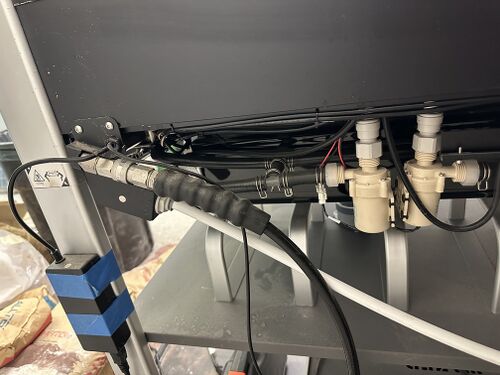 Visible WAZER water lines and machine-side water connections.
 -
 Pump Box water connections, fittings.


Users should not disconnect, modify, replace, or tighten water lines, fittings, or hoses unless they have been trained and approved to do so.
If a leak occurs:
- Pause or stop the machine if it is safe.
- Close the water valve.
- Clean up the water if it is safe.
- Take a photo of the leak.
- Report the issue to the lab or workspace contact.
Important: If the machine is leaking, the drain is backing up, or a water valve or connection looks damaged, do not run the WAZER.
Filling the tank
[edit | edit source]-
 Water fill hose used to add water to the WAZER tank before cutting.
 -
 Water fill hose placed inside the WAZER tank.


Before cutting, the WAZER tank must be filled to the correct water level. The water in the tank protects the bottom of the machine from the waterjet during cutting.
To fill the tank:
- Open the WAZER door.
- Use the water fill hose shown above.
- Place the hose into the WAZER tank.
- Fill the tank until the water level is approximately even with the top of the cut bed.
- Do not overfill the tank.
- Remove the hose from the tank and return it to its proper location.
- Check that the drain hose is secure and that no water is leaking around the machine.
Important: Do not run the WAZER with a low tank water level. A low water level can cause failed cuts and may allow the jet to damage the machine.
Basic WAZER workflow
[edit | edit source]- Create a two-dimensional design in CAD or vector software.
- Export the design as a
.dxfor.svgfile. - Open WAM.
- Import the design into WAM.
- Check the scale of the imported file.
- Choose the correct material and thickness.
- Set the cut path, tabs, leads, and cut quality.
- Generate the WAZER cut file.
- Copy the cut file to the SD card.
- Insert the SD card into the WAZER.
- Set up the machine and run the cut.
Preparing the design file
[edit | edit source]WAM is not a design program. It converts .dxf and .svg files into WAZER cut files. Create the drawing in a separate program such as Fusion 360, SolidWorks, AutoCAD, Onshape, Inkscape, Illustrator, LibreCAD, or QCAD.
Before importing into WAM:
- Use a two-dimensional design.
- Convert text to vector paths if text needs to be cut.
- Remove duplicate or overlapping lines.
- Close gaps in paths.
- Delete construction geometry that should not be cut.
- Export as
.dxfor plain.svg. - Check the final size of the file after importing.
Creating the cut file in WAM
[edit | edit source]Open WAM and log in. The WAM login is managed by the lab, so ask someone in the lab for access.
For detailed WAM screenshots, see the official WAM Manual. Pages 9–12 show the WAM setup workflow, including scale, material selection, cut path, tabs, leads, and cut quality.
Step 1: Import the file
[edit | edit source]Import the .dxf or .svg file. Check that the part appears correctly on the virtual cut bed.
Important checks:
- Confirm the part is the correct size.
- Confirm all cut lines appear.
- Confirm there are no unexpected extra lines.
- Confirm there are no missing paths.
- Confirm the part fits within the available stock size.
Step 2: Set material and thickness
[edit | edit source]Choose the correct material and thickness. WAM uses this information to estimate the cut rate.
Do not guess the thickness. Measure the material if needed.
Step 3: Choose the cut path
[edit | edit source]The cut path tells WAM which side of the design line the waterjet should follow.
Use Outside for the outside profile of a part.
Use Inside for holes and internal cutouts.
Use Centerline when the jet should follow the drawn line directly.
Use No cut for guide geometry that should not be cut.
The green line in WAM shows the actual nozzle path. The white line shows the imported design geometry. Always check that the green toolpath is on the correct side of the geometry before generating the file.
Step 4: Add tabs and leads
[edit | edit source]Tabs are small uncut bridges that hold the part in place during cutting. Leads move the pierce point away from the finished edge of the part.
Use tabs for most cuts. No-tab cutting increases the chance that the part will pop up, fall into the tank, jam the nozzle, or ruin the cut.
Tab tips:
- Keep tabs away from important cosmetic edges when possible.
- Add more tabs for small parts, thin parts, or parts that may shift.
- Avoid placing tabs where they will be hard to remove.
- Do not use no tabs unless the failure risk is acceptable.
Step 5: Choose cut quality
[edit | edit source]Cut quality affects speed and edge finish.
Use Coarse for faster rough cuts or test pieces.
Use Medium for general-purpose cutting.
Use Fine for final parts that need a cleaner edge.
Step 6: Generate the job file
[edit | edit source]Generate the cut file and copy it to the WAZER SD card. Safely eject the SD card from the computer before inserting it into the WAZER.
Loading abrasive
[edit | edit source]-
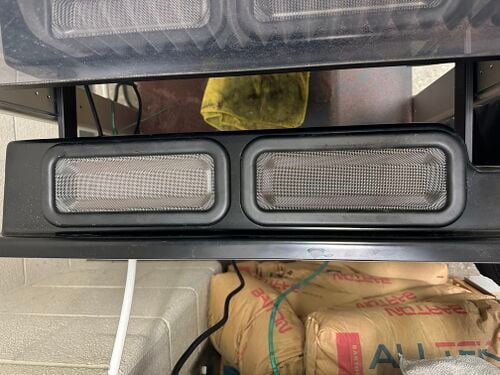 Abrasive hopper location on the WAZER.
 -
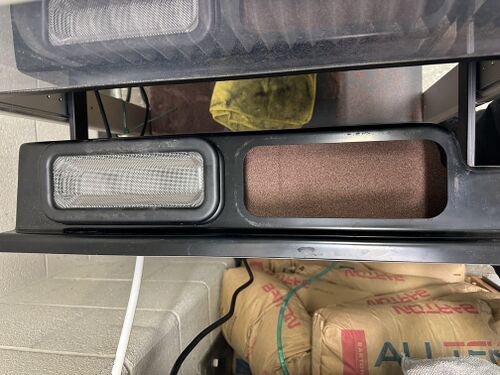 Fill the abrasive hopper with clean, dry 80 mesh garnet abrasive. Remember to always fill through the hopper screens to avoid large clumps.


Use clean, dry 80 mesh garnet abrasive approved for the machine.
To load abrasive:
- Pull out the abrasive hopper on the left side of the WAZER.
- Pour abrasive through the hopper screens.
- Fill both sides evenly.
- Do not put wet abrasive, used abrasive, debris, or foreign objects into the hopper.
- Close the hopper fully.
- Confirm the abrasive step on the control panel.
The WAZER does not directly measure how much abrasive is in the hopper. It assumes the hopper was filled before the cut. Running out of abrasive can cause a failed cut.
For long cuts, the machine may pause so the user can refill abrasive and empty the used abrasive buckets.
Emptying used abrasive buckets
[edit | edit source]
Empty both used abrasive buckets before every cut.
- Pull out the used abrasive buckets.
- Empty them into the approved disposal container.
- Check that no packed abrasive is blocking the bucket area.
- Put the buckets back fully.
- Rotate the handles forward to lock them in place.
- Confirm that both buckets are seated correctly.
If the buckets are not locked in place, used abrasive may not collect properly and the machine may clog.
Securing the material
[edit | edit source]
Secure the material so it cannot move, vibrate, float, or pop up during cutting.
Good setup habits:
- Use material large enough for the full cut path.
- Keep fasteners outside the nozzle path.
- Keep the stock flat on the cut bed.
- Do not place tabs where the part will easily rotate loose.
- Make sure the nozzle will not hit clamps or fasteners.
Setting nozzle height
[edit | edit source]-
 Remove the nozzle height tool from the top of the nozzle before adjusting the cutting head.
 -
 Correct nozzle height after adjustment. Remove the height tool before cutting.


Set the nozzle height using the nozzle height tool.
The nozzle should be close to the material but not touching it. If the nozzle is too low, it can hit the material and jam. If it is too high, cut quality can decrease.
After setting nozzle height, remove the height tool before cutting.
Check Cut Extents and Dry Run
[edit | edit source]Always run a position check before cutting.
Check Cut Extents traces the outside boundary of the job.
Dry Run traces the cut path without cutting.
Use these checks to confirm:
- The part fits on the material.
- The nozzle does not travel off the stock.
- The nozzle does not hit clamps or fasteners.
- The file is positioned correctly.
- The correct file was selected.
Pre-cut checklist
[edit | edit source]Complete this checklist before every cut.
- PPE is on.
- The correct cut file is on the SD card.
- The SD card is inserted into the WAZER.
- The required water valves are open.
- Visible water lines look normal.
- The drain hose is secure and not blocked.
- The tank is filled to the correct level.
- The cut bed is level.
- No leaks are visible.
- GFCI/PRCD is reset and working.
- The abrasive hopper is filled with clean, dry abrasive.
- Used abrasive buckets are empty and locked in place.
- Material is secured to the cut bed.
- Nozzle height is set.
- Check Cut Extents or Dry Run has been completed.
- The door is closed.
Starting a cut on the WAZER
[edit | edit source]After the cut file has been created in WAM and copied to the SD card, the cut can be started from the WAZER control panel.
- Complete the pre-cut checklist.
- Insert the SD card into the WAZER.
- Turn on the WAZER.
- Use the control panel to select the correct cut file.
- Follow the prompts on the control panel.
- Allow the machine to home.
- Load abrasive when prompted.
- Empty both used abrasive buckets if prompted or if they have not already been emptied.
- Secure the material to the cut bed.
- Set the nozzle height using the nozzle height tool.
- Run Check Cut Extents or Dry Run before cutting.
- Confirm that the nozzle path stays on the material and does not hit clamps or fasteners.
- Close the WAZER door.
- Start the cut from the control panel.
- Stay beside the machine and monitor the cut until it is complete.
Important: Do not leave the WAZER unattended while it is cutting. Pause or stop the cut if the part moves, the abrasive stops flowing, the jet does not cut through, water leaks, the drain backs up, or the machine makes an abnormal sound.
During the cut
[edit | edit source]Stay with the machine while it is cutting.
Watch and listen for:
- Normal pump sound.
- Normal pierce sound.
- Nozzle movement matching the intended path.
- No material pop-ups.
- No leaks.
- No abnormal vibration.
- No blocked drain.
- No unusual pressure readings.
- No signs of partial cutting.
Pause or stop the cut if:
- The part pops up.
- The jet does not cut through.
- The machine makes an abnormal sound.
- Water leaks from the machine or water connections.
- The abrasive stops flowing.
- The drain backs up.
- The pressure gauge is outside the expected range.
- The nozzle contacts the material, clamps, or fasteners.
Finishing the cut
[edit | edit source]
After the cut finishes:
- Wait for the machine to confirm the cut is complete.
- Open the door only after cutting has stopped.
- Remove the material carefully.
- Break tabs using pliers or an appropriate tool.
- Deburr sharp edges.
- Dry the part if needed.
- Clean the work area.
Waterjet-cut parts can have sharp edges. Wear gloves when removing and deburring parts.
Shutdown and cleanup
[edit | edit source]
After using the WAZER:
- Remove the finished part and leftover stock.
- Run a tank cleaning cycle if required.
- Close the water valves.
- Turn off the WAZER using the normal power switch.
- Empty the used abrasive buckets.
- Wipe up water around the machine.
- Leave the door open so the inside can dry.
- Report any abnormal behavior, leaks, clogs, or failed cuts.
After the machine dries, brush away loose abrasive from the window, bellows, tank sides, and accessible areas.
What to do when the WAZER breaks or fails
[edit | edit source]If the WAZER fails, leaks, clogs, loses pressure, stops cutting through, makes abnormal noises, or shows an error message, do not keep cutting.
- Pause the cut if it is safe.
- Stop the cut using the normal stop procedure.
- Use the emergency stop only if immediate shutdown is needed.
- Close the water valves if there is any leak.
- Take a photo of the issue or error message.
- Write down the material being cut.
- Write down the material thickness.
- Write down the WAM material setting.
- Write down the cut quality.
- Write down the approximate time into the cut.
- Write down what happened before the problem.
- Write down any sound, leak, clog, or pressure issue noticed.
- Clean up water if it is safe to do so.
- Report the issue to the lab or workspace contact listed above.
- Put a sign on the machine saying it is out of service if it should not be used.
Do not:
- Open the Pump Box.
- Modify wiring.
- Bypass the door interlock.
- Keep cutting after a failed pierce.
- Keep cutting with a leak.
- Reuse wet abrasive.
- Pour used abrasive back into the hopper.
- Ignore repeated GFCI/PRCD trips.
- Restart the machine without reporting the problem.
Use the official WAZER troubleshooting and maintenance links when diagnosing the issue.
Troubleshooting quick guide
[edit | edit source]Machine will not power on
[edit | edit source]Possible causes: GFCI/PRCD tripped, emergency stop engaged, power issue, water level issue, or cable issue.
What to do: Check power, reset the emergency stop, check the GFCI/PRCD, check the water level, and report the issue if it does not resolve.
Cut does not go through
[edit | edit source]Possible causes: Wrong material setting, material too thick, abrasive issue, nozzle height issue, pressure issue, or clogged abrasive path.
What to do: Pause the cut, check abrasive flow, check pressure, check nozzle height, and report the failed cut.
Part pops up
[edit | edit source]Possible causes: Not enough tabs, poor tab placement, small loose part, or material not secured.
What to do: Pause or stop the cut and revise the WAM file with better tabs and better fastening.
Abrasive clog or abrasive hose blockage
[edit | edit source]Abrasive clogging is a common WAZER issue. It can happen when abrasive is wet, clumped, contaminated, reused, or blocked inside the abrasive hopper or abrasive hose.
Possible signs: The WAZER moves normally but does not cut through the material, the jet sounds different than usual, abrasive does not appear near the cutting area, or the cut suddenly becomes weak or incomplete. If the machine is partially cutting or tail cutting, press Start/Stop immediately.
What to do: Pause or stop the cut. Do not keep cutting if abrasive is not flowing. Check that the abrasive hopper is filled with clean, dry abrasive. Do not pour wet, used, or contaminated abrasive into the hopper.
For the full unclogging procedure, see the official WAZER User Manual, pages 103–104, under “Cleaning the Abrasive Hopper and Abrasive Hose.” The procedure explains how to inspect the hopper and abrasive hose, clear blockages, use low-pressure air safely, and run the abrasive flow rate check afterward.
Important: Do not disconnect abrasive hoses, disassemble the abrasive system, or use compressed air unless you have been trained and approved to do so.
Water leak
[edit | edit source]Possible causes: Loose fitting, bad drain setup, hose issue, damaged seal, or overflow.
What to do: Stop the machine if needed, close the water valves, clean the spill, photograph the leak, and report it.
Drain backs up
[edit | edit source]Possible causes: Drain hose blocked, kinked, too high, disconnected, or not seated properly.
What to do: Stop cutting, check the drain path, clean the spill, and report the issue if unresolved.
Edge is rough
[edit | edit source]Possible causes: Coarse cut setting, wrong material setting, fast feed rate, partial cutting, or thick material.
What to do: Use Medium or Fine quality, verify WAM material settings, and check for complete cutting.
WAM file imports at wrong size
[edit | edit source]Possible causes: DXF/SVG unit issue or export problem.
What to do: Correct the scale in WAM or fix the export settings before generating the cut file.
Abrasive handling and disposal
[edit | edit source]This WAZER uses garnet abrasive. Handle dry abrasive carefully because abrasive dust can irritate the respiratory system.
Abrasive rules:
- Use only approved clean, dry abrasive.
- Pour abrasive through the hopper screens.
- Do not use wet abrasive.
- Do not reuse spent abrasive.
- Do not create dust while cleaning.
- Dispose of used abrasive in the approved container.
- Follow local disposal rules, especially if the cut material may contaminate the abrasive or water.
References
[edit | edit source]- WAZER, Inc. WAZER Desktop User Manual Downloads.
- WAZER, Inc. WAM Manual: WAM 2.0.
- WAZER, Inc. WAZER Maintenance Procedures.
- WAZER, Inc. WAZER Troubleshooting Guide.
- WAZER, Inc. WAZER Safety Data Sheets.
- WAZER, Inc. WAZER Medical Information Card.
- WAZER, Inc. WAZER Technical Support Contact Page.
- Barton International. BARTON 80 HPA Safety Data Sheet.
| Authors | Hadden Christ |
|---|---|
| License | CC-BY-SA-4.0 |
| Cite as | Hadden Christ (2026). "How to Use the WAZER Waterjet Cutter". Appropedia. Retrieved July 23, 2026. |