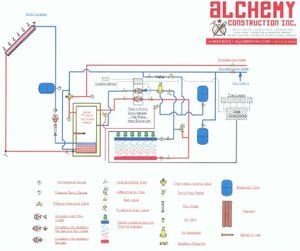
This is the Operation and Maintenance (O&M) manual for HEIF CCAT solar hot water system. Also check out the CCAT Data Collection/OM for more information on the dataloggers. Please reference and keep this manual up to date with any O&M changes.
Description[edit | edit source]
The Phoenix Water Heater and Radiant Floors[edit | edit source]
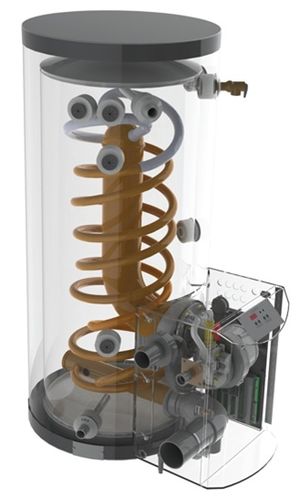
The HTP Phoenix Gas Fired Water Heater (model PH119S) was installed in 2007 by Stephen Bohner of Alchemy Construction. This water heater is quite advanced, with the following characteristics:
- Up to 96% efficiency
- 316L Stainless Steel Tanks are built to withstand high temperatures and have superior corrosion resistance, which extends the life of the unit
- Internal curponickel/stainless steel heat exchanger that provides exceptional heat transfer capabilities
- Eliminates the use of anode rods that require costly maintenance and may cause the water to have an unpleasant taste and smell
- Fully modulating condensing unit with up to a 5-1 turndown ratio. This reduces cycling and conserves energy while meeting desired heating needs
- The solar heat exchanger is finned, offering more surface area compared to tubes increasing heat exchanger capacity
- There is a backup heat exchanger that operates when higher recovery rates are needed. With a unique stainless steel and cupronickel design, it is virtually maintenance free, minimizing lime scale build up and eliminating the blockage risk associated with low mass boilers.
The radiant floor system is also hands-off. When the annual or every-other-year inspection of the Phoenix is performed, the radiant system can also be checked for any issues.
Phoenix Installation Manual Phoenix User Manual Phoenix Warranty Information Taco Block Pump Manual
The Solar Collectors[edit | edit source]
The Schuco Premium V Flat Plate Solar Collectors were installed by Ben Scurfield of Scurfield Solar in 2009. These collectors were chosen over more efficient evacuated tubes because they are high quality, low maintenance, and more durable than the evacuated tubes would have been. Some of the product characteristics include:
- High efficiency with high selectivity absorber coating
- Low energy loss due to excellent thermal insulation
- Robust silver anodized aluminum frame for maximum durability
- Corrosion resistant materials for high reliability and long service life
- High transparency, low iron glazing
- Superior flow control over conventional header/riser designs
- 10 year performance warranty
- Serpentine piping, with 1 connection on each side for portrait orientation of collector
- Thermal efficiencies up to 78.4%
- Thermal output: 2.0 kWth
Click here to see the specifications for the Schuco Premium V Solar Collectors
Operation[edit | edit source]
The Phoenix Water Heater and Radiant Floors[edit | edit source]
The Phoenix is relatively hands-off. However, the most important consideration is keeping the area around the water heater clean and clear. Since it is a natural gas furnace, be sure not to keep anything combustible in the vicinity.
WHAT TO DO IF YOU SMELL GAS
- Do not try to light any appliance.
- Do not touch any electrical switch.
- Do not use any phone in your building.
- Immediately call your gas supplier from a neighbor's phone. Follow the gas supplier's instructions.
- If you cannot reach your gas supplier, call the fire department. Installation and service must be provided by a qualified installer, service agency, or the gas supplier.
In addition, in order to ensure the Phoenix has a long life (and doesn't have to be resurrected from the ashes): Do not operate the appliance if its combustion air intake is located in or near one of the areas or in the vicinity of products listed in the following table. These areas will always contain hazardous contaminates that can form strong acids while passing through the burner and vent system. These acids will corrode the appliance's heat exchanger, burner components and vent system, resulting in flue gas spillage and/or water leakage, possible substantial property damage, severe personal injury, or death. If the appliance combustion air intake is located in any area likely to cause or contain contamination, or if products which would contaminate the air cannot be removed, the intake must be re-piped and terminated to another location.

PRODUCTS TO AVOID
- Spray cans containing fluorocarbons
- Permanent wave solutions
- Chlorinated waxes/cleaners
- Chlorine-based swimming pool chemicals
- Calcium chloride used for thawing
- Sodium chloride used for water softening
- Refrigerant leaks
- Paint or varnish removers
- Hydrochloric or Muriatic acid
- Cements and glues
- Antistatic fabric softeners used in clothes dryers
- Chlorine-type bleaches, laundry detergents, and cleaning solvents
Also, in order to adjust the temperature of stored water, press and hold {S3} for 2 seconds. The first item is: DU: Water Temperature Set Point – factory set at 119°F. Adjust down by pressing {S1} to a temperature as low as 95°F. Adjust up as high as 160°F by pressing the {S2}. Press {S3} again to display DH, the differential which is factory set at 7°F and adjustable down to 1°F by pressing {S1} and up to 18°F by pressing {S2}. Note: Due to the highly advanced control on this water heater, which compensates for varying inlet water temperature, the actual differential temperature may vary slightly from your setting. Press {S3} again to display the factory default temperature measurement in Fahrenheit. Change the default to Celsius by pressing {S1}. When finished, press {S3} one final time to place unit back into operation. The control automatically re-starts if no key is pressed for 2 minutes.
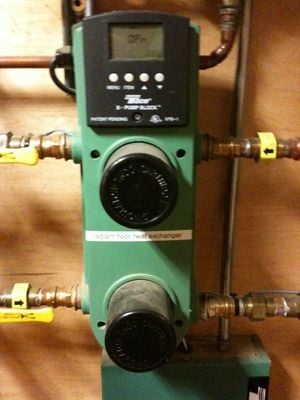
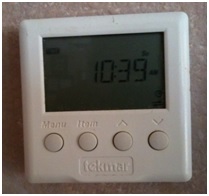
Finally, the radiant floors are controlled by the thermostat in the basement of CCAT. The thermostat is currently programmed to an occupied temperature and an unoccupied temperature. These temperatures, as well as the occupied and unoccupied settings, can be modified by reprogramming the thermostat.
The Solar Collectors[edit | edit source]
The system is designed to require no operational attention and very little maintenance attention.
Maintenance[edit | edit source]
Maintenance Schedule[edit | edit source]
- Monthly
- Clean and clear the area around the Phoenix.
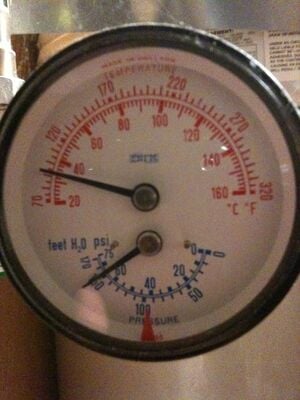
- Check the temperature/pressure gauge on the Phoenix.
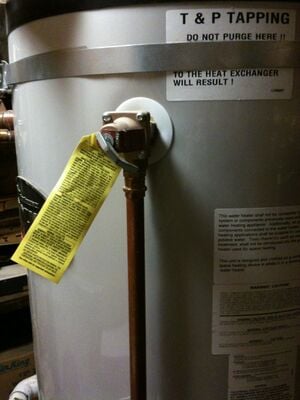
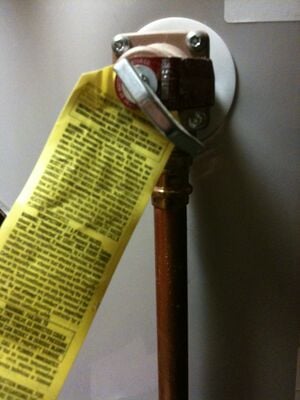
- Visually check the pressure relief valve on the Phoenix.
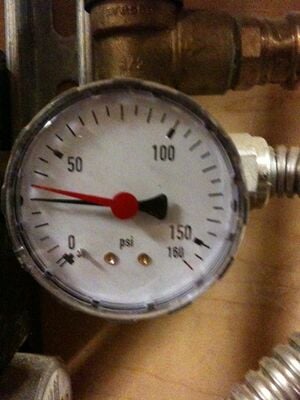
- Check the pressure gauge for the closed-loop solar thermal system.
- Check the pump on the Solar Thermal System.
- Every Six Months
- Check the Phoenix piping and gas supply piping for corrosion or signs of potential leakage.
- Check exhaust vent and intake pipe bracing on the Phoenix. Ensure bracing is undamaged and in good condition.
- Every Year
- Check the pH of the propylene glycol/water mixture on the solar collector loop.
- Have Plant Ops clean off the solar collectors and check the piping and fixtures on the roof.
- Every Three Years
- Boiler cleaning and overall assessment of the Phoenix by a qualified technician. Alchemy Construction estimates that this maintenance will take approximately two hours at $110/hour, totaling $220
- Have a qualified professional check the pressure of the three expansion tanks. The expansion tanks have to be separated from the system pressure in order to be measured.
- Every Ten Years
- Have a qualified professional change the propylene glycol/water mixture and replace the expansion tanks.
Maintenance Instructions[edit | edit source]
Check Temperature Display and Pressure Gauge (Monthly)
- Ensure the pressure reading on the gauge does not exceed 145 psig. Higher pressure readings may indicate a problem with the expansion tank.
- Ensure the temperature on the LED display panel does not exceed 160°F. Higher temperature readings may indicate a problem with the thermostat operating controls.
- Contact a qualified service technician if problem persists.
Check Pressure Relief Valve (Monthly)
- Visually inspect the primary pressure relief valve and discharge pipe for signs of weeping or leakage.
- If the pressure relief valve often weeps, the expansion tank may not be operating properly. Immediately contact a qualified service technician to inspect the appliance and system.
Check Primary and Gas Piping (Every 6 Months)
- WARNING - If you do not follow these instructions exactly, a fire or explosion may result, causing property damage, personal injury, or loss of life.
- This appliance does not have a pilot. It is equipped with an ignition device which automatically lights the burner. Do not try to light the burner by hand.
- Smell all around the appliance area for gas. Be sure to smell next to the floor because some gas is heavier than air and will settle on the floor.
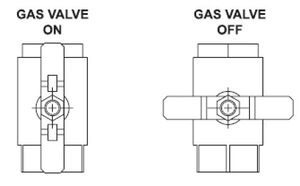
- To turn off the gas supply, use only your hand to turn the gas control knob. Never use tools. If the handle will not turn by hand, don't try to repair it an call a qualified technician.
- Do not use the appliance if any part of it has been under water. Immediately call a qualified service technician to inspect the appliance and replace any part of the control system and any gas control that has been under water.
- Remove the appliance cover and perform a gas leak inspection. If gas odor or leak is detected call a qualified service technician.
- Set the thermostat at the lowest setting.
- Turn off all electrical power to the appliance.
- Remove the front cover.
- Turn the gas shut off valve to "off". Handle will be across the piping.
- Wait five minutes to clear out any gas. If you smell gas, STOP, and immediately call your gas supplier. If you don't smell gas go to the next step.
- Turn the gas shutoff value to "on". Handle will be in-line with piping.
- Install front cover.
- Turn on electric power to appliance.
- Set thermostat to desired setting.
- If the appliance does not operate, turn off the appliance, turn off the gas, and call your service technician or gas supplier.
- Visually inspect for leaks around the internal appliance water connections and around the heat exchanger. Visually inspect the external system piping, circulators, and system components and fittings. Immediately call a qualified service technician to repair any leaks.
Operate Pressure Relief Valve (Every 6 Months)
- Before proceeding, verify that the relief valve outlet has been piped to a safe place of discharge, avoiding any possibility of scalding from hot water.
- Warning - To avoid water damage or scalding due to relief valve operation, a discharge line must be connected to the valve outlet and directed to a safe place of disposal. This discharge line must be installed by a qualified service technician or heating/plumbing installer in accordance with the appliance installation manual. The discharge line must be terminated so as to eliminate possibility of severe burns or property damage should the valve discharge.
- Read the temperature and pressure gauge to ensure the system is pressurized. Minimum is 10 psi. Maximum is 145 psi. Lift the relief valve top lever slightly, allowing water to relieve through the valve and discharge piping.
- If water flows freely, release the lever and allow the valve to seat. Watch the end of the relief valve discharge pipe to ensure that the valve does not weep after the line has had time to drain. If the valve weeps, lift the lever again to attempt to clean the valve seat. If the valve does not properly seat and continues to weep, contact a qualified service technician to inspect the valve and system.
- If water does not flow from the valve when you completely lift the lever, the valve or discharge line may be blocked. Immediately shut the appliance down per instructions on page 2 of the installation manual and call a qualified service technician to inspect the valve and system.
Check the pH of the propylene glycol/water mixture (Yearly) Check the pH of the propylene glycol/water mixture by taking a small sample of the fluid from the spigot at the base of the water heater tank. Only open the spigot a small amount as the contents are pressurized and potentially very hot! The pH of the propylene glycol/water mixture should be above pH 8 (should be around pH 10).
Troubleshooting[edit | edit source]
- The Phoenix Water Heater
| Problem | Suggestion |
|---|---|
| HEATER ERROR |
|
| LOCKOUT |
|
- The Solar Collectors
The propylene glycol mixture prevents the system from freezing. In addition, the system was designed with steam-back protection to protect it from overheating. If the pump were to break down, the system is designed so that the amount of propylene glycol that would vaporize would fill the expansion tank without causing damage to the system. If you have any concerns that the pump is not working, or if you think there is a leak, call a professional immediately to inspect the system. Do not attempt to fix it yourself, as the contents may be highly pressurized and very hot!
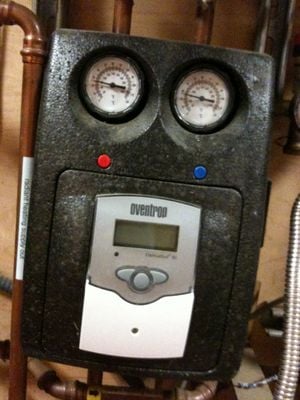
Do not be alarmed by the fact that the Oventrop DeltaSol BS controller for the pump is not connected to anything. The Oventrop controller was replaced by the SunEarth controller and datalogger (see below), but it was left in place in order to preserve aesthetics and because it would otherwise leave a large hole in the insulation.
Suggestions for future changes[edit | edit source]
- The Phoenix Water Heater
Overall, neither the Phoenix Water Heater nor the radiant floors should require much attention. The most important thing is to keep that basement room clear of hazardous materials and clean. It will also be important to establish a regular maintenance schedule with Alchemy Construction with a reliable place to record when maintenance occurred.
- The Solar Collectors
The solar thermal collectors were designed to not require much attention. Figure out a reliable way to keep track of the long-term maintenance tasks.
