
Franklin Firmware on GigabotHX:MOST


This page is dedicated to describing the proper operational procedures for successful prints on the Gigabot utilizing Franklin firmware. This procedure supported:
- John J. Laureto and Joshua M. Pearce. Open Source Multi-Head 3D Printer for Polymer-Metal Composite Component Manufacturing Technologies 2017, 5(2), 36; doi:10.3390/technologies5020036 open access, Appropedia page:Open Source Multi-Head 3D Printer for Polymer-Metal Composite Component Manufacturing
Currently, the following pages exists in dedication to either Franklin and/or the GigabotHX:

Application and material development pages are available in the following:
Further Franklin discussion can be found on MOST publication:
- Wijnen, B., Anzalone, G. C., Haselhuhn, A.S., Sanders, P.G., Pearce, J. M. Free and Open-source Control Software for 3-D Motion and Processing. Journal of Open Research Software, 4: e2, DOI: http://dx.doi.org/10.5334/jors.78 free access
Procedures
[edit | edit source]- Connecting Printer to Franklin
- Securely connect USB cable from Arduino to the operating computer
- Insure both power supplies, 12 and 24V power supplies are connected to a 120V standard outlet
- Start Franklin in command prompt "franklin" in the command prompt.
- Assuming Franklin in initialized correctly, proper connection to https://localhost:8000/admin should be possible
- If error occurs, e.g. "Cannot connect to local host", please refer to Franklin, Franklin:MOST and/or the Franklin connection section of Laser welding protocol: MOST
- The Franklin GUI (graphic user interface) should now be observable. GUI should look similar to the image below:

- Set-Up
- File Generation (STL)
- GCode Generation
- Upon creation of an STL file, commonly, Slicer and/or Cura are optimal tools for print setting adjustment and subsequent Gcode generation.
- GCode Optimization of Extruder A and Extruder E (Leader / Follower Principle)
- Currently, Slicer and/or Cura are used to generate GCodes for a single extruder. The Gigabot, in total, has five (5) extruder heads. Franklin is set up to handle all of these extruders in a "leader-follower" principle. Specifically, one of the five extruders is designated as the 'leader' while the remaining 4 'follow' the 'leader'. This design allows for rapid printing of equivalent geometries while allowing singular (more detailed features) to be built separately by the 'leader' extruder. To organize this in the GCode the 'leader' is assigned command A and the follower extruder commands are labeled E. The 'follower' extruders are driven by a single command of E which follows "'A"' commands. A common command line is shown here: G1 X73.686 Y179.964 E1.70710 A1.70710
- Thus, CONCATENATE() functions in LibreOffice allow for generation of the proper GCode including; A and E. LibreOffice .ods tool to be uploaded
- Relevant, LibreOffice commands from .ods sheet. Commands assume that GCode is pasted as text in cell A1
- =IF(ISNUMBER(SEARCH("G1",A1)),RIGHT(A1,LEN(A1)-SEARCH("E",A1,1)+1),"NA")
- =IF(ISNUMBER(SEARCH("G1",A1)),RIGHT(A1,LEN(A1)-SEARCH("E",A1, 1))," ")
- =IF(ISNUMBER(SEARCH(" ",E1))," ","A")
- =CONCATENATE(F1,E1)
- =IFERROR(IF(ISNUMBER(SEARCH(" ",G1)),A1, CONCATENATE(A1&" "&G1)),A1)
- Relevant, LibreOffice commands from .ods sheet. Commands assume that GCode is pasted as text in cell A1

- Uploading Files
- Only .gcode type files can be uploaded to Franklin. Thus, proper file preparation is required as described in Set-Up.
- Browse to your preferred file directory and selected the .gcode file required for printing
- Upon selection of .gcode file click the Add button, in the Franklin GUI, to the right of the file name.
- Clicking Add parses the selected .gcode. Parsing prepares the file for printing and reviews all command lines. Reviews typically reveal invalid commands lines such as "0" and/or a common Cura line "M117 Printing... ; send message to LCD"
- Files that have been parsed and which are available for printing will appear in a list / window to the left of the browse button as shown below:

- Printer Preparation: Homing and Parking
- Homing
- Stepper Motors X, Y0, Y1 Z0 and Z1 are responsible for the axis homing. In brief, the Gigabot is homed when all axis positions have successfully contacted the end-stop solenoid(s).
- Note that Y0/Y1 and Z0/Z1 maintain a similar "leader-follower" relationship as contained by the extruder motors. Specifically, a single command of Y and/or Z will control Y0/Y1 and Z0/Z1, respectively.
- Stepper Motors X, Y0, Y1 Z0 and Z1 are responsible for the axis homing. In brief, the Gigabot is homed when all axis positions have successfully contacted the end-stop solenoid(s).
- Parking
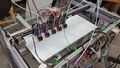
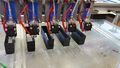
- Parking can be defined as an intermediate location prior to the printing operation(s). Typically in an arbitrary location, the parking locations should enable the operator to prepare and clean the extruder heads/nozzles prior to printing. As shown in the gallery below, the Gigabot home position(s) are as follows: X=5.0, Y= 40.0, Z=2.0
- Note that the Park Order is set-up to insure there is no contact with the build plate fixtures Thus, the Z axis (Z0 and Z1) drop out of the way before X and Y positioning can occur.
- Parking can be defined as an intermediate location prior to the printing operation(s). Typically in an arbitrary location, the parking locations should enable the operator to prepare and clean the extruder heads/nozzles prior to printing. As shown in the gallery below, the Gigabot home position(s) are as follows: X=5.0, Y= 40.0, Z=2.0
-
 Home Location of X, Y0, Y1, Z0 and Z1
 -
 Park Location of X, Y and Z

- Build Plate Preparation
- Build Surface
- The standard build surface of the Gigabot is a glass plane fixtured on all four (4) corners. To enable proper bed / build plate surface adhesion the proper surface treatments must be performed. Currently polyproplene (PP) and polyethylene terephthalate (PETG) have been developed on the Gigabot. The following describes surface preparation methods for PP and PETG:
- PP
- Fixture a polypropylene sheet material to the glass build plate. Zero the extruder motors onto this build plate.
- PETG
- Apply, at minimum, 2 "layers" of household school glue (Elmers) to the build plate surface incident the extruder nozzles. Adequate amounts of of glue will sustain proper adhesion of filament throughout the entire print cycle.
- PP
- The standard build surface of the Gigabot is a glass plane fixtured on all four (4) corners. To enable proper bed / build plate surface adhesion the proper surface treatments must be performed. Currently polyproplene (PP) and polyethylene terephthalate (PETG) have been developed on the Gigabot. The following describes surface preparation methods for PP and PETG:
-
 Polypropylene Build Plate
 -
 Household Adhesive Glue Stick


- Extruder 'Priming' / Preparation
- Extruder Temperature Settings
- Franklin allows for extruder temperatures to be set by the GCode or manually by the operator. The Franklin GUI includes an interface for the operator to adjust the temperatures settings as necessary. Temperatures can be modified as a group and/or individually by all temps and temp0, temp1, temp2, temp3 and temp 4, respectively. The thermistors currently installed have the capability to achieve a maximum temperature of 300 Degrees Celsius
- Fan Adjustment
- Similarly, each extruder fan can be adjusted individually as required through Franklin. Currently, the standard is to run them at 100%.
- Extruder Priming
- Prior to starting a print it is required that the operator confirms adequate material flow through each individual extruder nozzle. To confirm this, Franklin runs a customer GCode to extrude 100mm of filament prior to any build operation. This GCode is designated as AandE (shown in Figure: Available GCode(s) for Printing) above. The formatting of this GCode is shown below. In brief the nozzles move to an arbitrary location on the build plate and extrude the prescribed amount of filament. Upon completion of Task (GCode) Franklin / Gigabot printer requires re-homing, parking and temperature corrections prior to starting the print.


- Fine Tuning / Optimization
- Limit V (Velocity), Limit A (Acceleration), Home Order
- Franklin allows for adjustment of the maximum velocity and acceleration of each stepper motor X, Y1, Y0, Z1, Z0, A, E0, E1, E2, E3. Examples of these adjustments options are shown below. Current settings, as shown, are optimized the the Gigabot in its current state. In effect, all settings accommodate for weight of the X carriage, filament, part / build plate friction, motor skipping and excess heat generation leading to failure of A4988.
- Note that these settings override the GCode inputed by the user and potential discrepancies are not noted during parsing of the GCode by Franklin
- Franklin allows for adjustment of the maximum velocity and acceleration of each stepper motor X, Y1, Y0, Z1, Z0, A, E0, E1, E2, E3. Examples of these adjustments options are shown below. Current settings, as shown, are optimized the the Gigabot in its current state. In effect, all settings accommodate for weight of the X carriage, filament, part / build plate friction, motor skipping and excess heat generation leading to failure of A4988.

- Printing
- Assuming proper GCode development and parameter settings Franklin will manage and execute every line of the Gcode until the print is complete. Optimal prints derive from F600 speed commands at this time. Franklin estimates total remaining time allowing operator to plan builds and implement print quality checks when necessary.
- To execute a print, from selected GCode, highlight the respective file (as shown in Figure: Available GCode(s) for Printing and click Print selected from the Parked position.
Further Information and Questions
[edit | edit source]- Franklin Issues and Questions can be reported in the issues section of its GitHub page.
| Authors | |
|---|---|
| License | CC-BY-SA-3.0 |
| Cite as | JLaureto (2016–2025). "Franklin Firmware on GigabotHX:MOST". Appropedia. Retrieved July 10, 2026. |