
Embroidered Electrical Resistor Generation


| Type | |
|---|---|
| Authors | Somerset Schrock |
| Status | Prototyped |
| Years | 2021 |
| Made | Yes |
| Uses | Wearable electronics |
| Documentation home | https://socl.frigate.me/ |
|---|---|
| Software | https://github.com/srschrock/embroidered_resistor_generation Resistor https://pypi.org/project/pyembroidery/ |
| Hardware license | CERN-OHL-S |
| Certifications | Start OSHWA certification |
Embroidered Electrical Resistor Generation
[edit | edit source]Background
[edit | edit source]This is part of a research project to develop flexible wearable electronics. "If you would like to read the following information in more depth, please read my thesis" - Somer Schrock.
The objective of this tool is to create flexible resistors with embroidery machines. In current textile wearable devices, most of the components are rigid and must be soldered on. This adds complexity, manufacturing steps, decreases flexibility of the devices, and decreases comfort of wearing said devices. Creating flexible resistors a step along the path to creating a full range of electrical components to realize fully flexible electronic devices.
This python tool generates .exp files which are primarily used by Melco, Bravo, and Bernina embroidery machines.
This python tool utilizes the pyembroidery python library to convert the .exp file to the embroidery file of your choice.
Give the program major input parameters such as target resistance and unit resistance of the conductive thread. Adjustment parameters such as stitch length, gap length between lines, terminal pad size and density, and gap between terminal pads can be fine-tuned as needed for the embroidery machine and conductive thread you are using.
The program will create a resistor pattern to your specifications, save it to your specified file type, and show the generated resistor in a plot to verify that the sizing is realistic and will work with your machine.
File Download
[edit | edit source]Resistor File Generation Tool (GitHub)
^Download the python package from GitHub to make your own resistors.
File Generation Instructions
[edit | edit source](Requires libraries: numpy, math, matplotlib, pyembroidery) (Made in Python 3.8, last edit June 17, 2021)
To use this package, download from GitHub File Generation Tool (GitHub) . Open the file "main.py" with any python interpreter (I use Spyder or Pycharm). In "main.py", all inputs are listed near the top.
Enter your desired resistance, and the unit resistance of the conductive thread you are using. Note that this tool is designed for the conductive thread to be placed in the bobbin thread with normal sewing thread to be used as the upper thread, so make sure your machine is set up accordingly.
Customize further parameters as needed. Stitch length, gap length between lines, width of terminal pads, density of stitches in terminal pads, gap length between terminal pads.
Specify which output file type you need for your embroidery machine.
Run the program (main.py) with your desired inputs, and the embroidery file will be created in your working directory.
Check the generated plot to view your creation. The stitch path is shown in a red line, and the individual stitches are shown in blue "x" over the path line.
File Utilization Instructions
[edit | edit source]Upload the file to your embroidery machine. This process will depend on what brand/model of embroidery machine you are running.
Make sure that the conductive thread is in the bottom bobbin of the embroidery machine. Use a normal sewing thread for the upper thread.
Hit "run" on your embroidery machine and VOILA!
Images
[edit | edit source]-
 Showing the input section of the python code
 -
 Output image of the stitch pattern
 -
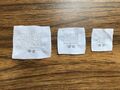 Flexible embroidered resistors in 50k, 25k, and 10k Ohms. Created with 44/12 +113/32 PET thread (Silver-coated Nylon interwound with Polyester) and a Janome MemoryCraft 400e embroidery machine.
 -
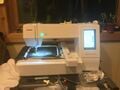 Janome MemoryCraft 400e was used, but any conventional machine should work


Testing / Validation
[edit | edit source]To show these resistors work as intended, a series of tests were done including a varied bend test, repeated bend test, VI (Voltage/Current) test, and a batch consistency test.
-
![[Varied bend test to demonstrate consistent performance of the resistors as they are being used]](/w/images/thumb/7/72/Varied_bend_test.png/120px-Varied_bend_test.png) [Varied bend test to demonstrate consistent performance of the resistors as they are being used]
[Varied bend test to demonstrate consistent performance of the resistors as they are being used] -
 [Repeated bend test to demonstrate durability and consistency
 -
![[VI test to demonstrate constant resistance]](/w/images/thumb/f/f1/VI_test.png/120px-VI_test.png) [VI test to demonstrate constant resistance]
[VI test to demonstrate constant resistance] -
![[Batch consistency test to demonstrate repeatability and accuracy]](/w/images/thumb/2/20/Batch_consistency_test.png/120px-Batch_consistency_test.png) [Batch consistency test to demonstrate repeatability and accuracy]
[Batch consistency test to demonstrate repeatability and accuracy] -
![[Inconsistency between batches of my silver-coated nylon & Polyester thread]](/w/images/thumb/4/46/Thread_inconsistency_silver_thread.png/120px-Thread_inconsistency_silver_thread.png) [Inconsistency between batches of my silver-coated nylon & Polyester thread]
[Inconsistency between batches of my silver-coated nylon & Polyester thread] -
![[Results of exposing the resistors to water]](/w/images/thumb/6/60/Water_exposure_test_embroidered_resistors.png/120px-Water_exposure_test_embroidered_resistors.png) [Results of exposing the resistors to water]
[Results of exposing the resistors to water]
![[Varied bend test to demonstrate consistent performance of the resistors as they are being used]](/File:Varied_bend_test.png)

![[VI test to demonstrate constant resistance]](/File:VI_test.png)
![[Batch consistency test to demonstrate repeatability and accuracy]](/File:Batch_consistency_test.png)
![[Inconsistency between batches of my silver-coated nylon & Polyester thread]](/File:Thread_inconsistency_silver_thread.png)
![[Results of exposing the resistors to water]](/File:Water_exposure_test_embroidered_resistors.png)
Note that there is some deviation in the batch consistency test. For many applications, these flexible resistors must comply to a tolerance similar to conventional resistors (for example, 10kOhms with a tolerance of +/- 10%). In order to achieve improved levels of tolerance, a secondary manufacturing step is required. I suspect the root cause of this is inconsistent conductivity in my 44/12+113/32PET conductive thread. My indication for this came from noticing that my batches of the thread are vastly different from each other (see the image above).
Also, note that these do not perform well when wet. They either need to be used in dry environments only or need to be protected.
Manual Short Circuit Method
[edit | edit source]-
![[Short circuit measurement method for embroidered resistors]](/w/images/thumb/6/63/Short_circuit_method_embroidered_resistors.jpg/120px-Short_circuit_method_embroidered_resistors.jpg) [Short circuit measurement method for embroidered resistors]
[Short circuit measurement method for embroidered resistors] -
![[Demonstration of using the short circuit method to decrease resistor to target]](/w/images/thumb/b/b1/Short_circuit_embroidered_resistor.jpg/120px-Short_circuit_embroidered_resistor.jpg) [Demonstration of using the short circuit method to decrease resistor to target]
[Demonstration of using the short circuit method to decrease resistor to target] -
![[Example of how it can take many short circuit pads to lower resistance to target]](/w/images/thumb/f/f9/4_short_circuits_embroidered_resistor.jpg/120px-4_short_circuits_embroidered_resistor.jpg) [Example of how it can take many short circuit pads to lower resistance to target]
[Example of how it can take many short circuit pads to lower resistance to target] -
![[Short circuit modification results for a batch of embroidered resistors]](/w/images/thumb/2/2f/Short_circuit_modification_results_embroidered_resistors.png/120px-Short_circuit_modification_results_embroidered_resistors.png) [Short circuit modification results for a batch of embroidered resistors]
[Short circuit modification results for a batch of embroidered resistors]
![[Short circuit measurement method for embroidered resistors]](/File:Short_circuit_method_embroidered_resistors.jpg)
![[Demonstration of using the short circuit method to decrease resistor to target]](/File:Short_circuit_embroidered_resistor.jpg)
![[Example of how it can take many short circuit pads to lower resistance to target]](/File:4_short_circuits_embroidered_resistor.jpg)
![[Short circuit modification results for a batch of embroidered resistors]](/File:Short_circuit_modification_results_embroidered_resistors.png)
My proposed method to improve the accuracy of the resistors is a secondary quality control procedure. This procedure involves creating manual short circuits across flow path tines of the resistors.
When a batch of resistors is first made, each is measured. The resistors that already fall inside the tolerance bounds can be left unaltered. The resistors that fall below are either discarded or used to make smaller resistors. The resistors that are over tolerance are manually short-circuited until they reach the specified target bounds for the resistor.
To create the short circuit, first, connect the resistor to a multimeter or any measurement device that can read resistance. Then use a conductive pad (I used a piece of copper tape) and place the pad on the corner of the resistor. Move it around to create bigger or smaller short circuit areas.
The files for embroidering the short circuit pads are given in the RFGT's files. These 3.8mm pads are continuously added to incrementally decrease the target resistance down to the target value. I use these smaller resistors incrementally instead of one large pad to decrease the chances of accidentally bridging too many tines of the resistor at once and passing the tolerance bounds. The process of adding these short circuit pads cannot be undone, so if the target value is missed, the resistor must be discarded or used as a weaker resistor.
Embroidery File Writing Documentation
[edit | edit source]Here is some documentation on the EXP embroidery file format and how to create said files. If you need to create an embroidery file generation tool for another application, have a problem using this tool for your application, or simply need to work with .exp files, this may help.
Links
[edit | edit source]Website of the Michigan Technological University research group developing flexible wearable electronics: Cloud manufacturing page for embroidered electronics (This site is still in development. This resistor generation package will be added as a functionality soon)
RFGT Download: Resistor File Generation Tool (GitHub)
Literature review on this project and related technologies: Open Source Wearable Electronics from Embroidery Machines literature review
Thesis: Digital Commons
| Authors | Somerset Schrock |
|---|---|
| License | CC-BY-SA-4.0 |
| Organizations | Michigan Tech's Open Sustainability Technology Lab |
| Cite as | Somerset Schrock (2021–2024). "Embroidered Electrical Resistor Generation". Appropedia. Retrieved July 10, 2026. |