
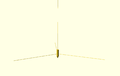
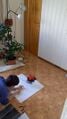
Clerck, a RepRap 3D printer hanging from the ceiling

| Type | |
|---|---|
| Authors | Torbjørn Ludvigsen |
| Status | Designed |
| Years | 2006 |
| Cost | USD 250 |
A RepRap 3D printer hanging from the ceiling.
The RepRap project first showed the world cheap small scale 3D printing in 2006. Their design was intentionally not very well thought out. The idea was that a 3D printer that could print its own parts would be improved through evolution like iterations, no matter the quality of the first design. This turned out to be quite correct, as a large community quickly grew around the first few RepRap designs. RepRap users started to experiment and remix all parts of the printer, including its Cartesian coordinate system.
Sources files and external documentation
[edit | edit source]| Source code: | currently on Gitlab repo, previously on Github repo | [1] quicklink to firmware |
| Licences: | The repo has GPLv2, the blog uses Gnu Free Documentation Licence, the Vimeo videos are CC-BY licenced | Follows FSF's recommendations |
| Build process: | Blog posts [2], [3], [4], [5], [6], [7], [8], [9], [10], [11], [12], [13], [14], [15], [16] | videos and images, very detailed |
| Development thread: | RepRap Hangprinter forum, see also original project launch thread | |
| Wiki page: | at reprap.org | outdated |
| All videos: | Vimeo user 23166500 | |
| Project Webpage: | hangprinter.org |
Understanding the market
[edit | edit source]Early non-Cartesian 3D printer designs were the Tripod-Repstrap (2007) and its geometrically similar successors Rostock (2012)[1] and Lisa Simpson (2013).[2][3] Other non-carthesian RepRap designs include GUS Simpson (2013),[4] Morgan (2013),[5] Wally (2013)[6] and Feather (2013).[7]
All these printers tries to trade heavier geometrical computations for getting rid of hardware requirements or time consuming build steps. They all have frames, and there's still spare clock cycles left in their Arduino CPUs. The idea of the Hangprinter is to skip the hard custom frame altogether and instead rely on wire-connections to already-built rigid structures, like insides of houses. This design falls into the more general category of cable robots (see Wikipedia link).
Making this work would lead to potentially enormous print volumes for prices down to ca $300. Competitors' prices are:
| Name | Price | Print volume |
|---|---|---|
| Big Rep | ca $40,000[8] | 1 m3 |
| Gigabot XL | ca $13,000[9] | 0.27 m3 |
| X1000 | ca $16,000[10] | 0.48 m3 |
Other large scale experimental printers include the Wasp's Big Delta Printer[11] and the KamerMaker, a scaled up Cartesian design.[12] Other experimental solutions for large scale printing include replacing the frame with line tracking capabilities and a support vehicle, like the Minibuilders.[13]
The presented competitors are very expensive and not very self reproducing, many of them are not even free design hardware. They don't satisfy the needs of for example the Open Source Ecology project, who wants to print structural plastic components like car body panels and redworm towers with OSHW tools.
Project goals
[edit | edit source]New project design goals at Version 4 (2018)
- A reliable workhorse
- that people will enjoy using
- and spreading
- for profit
End goal stated in 2018: Becoming a Universal Manufacturing Machine (UMM)
Initial project goals
- Low part count
- Easy to print, assemble, install and distribute
- Huge build volume
- Cheap
- Able to print many of its own parts
Design
[edit | edit source]The creator and the community are working on version 4 in September 2018. See new design goals from Tobben's blog
Design considerations for the first version
- Put all the hardware (except AC/DC-converter) in one single unit.
- Only one force vector upwards, compensated with counter weight.
- Over-constraining allows flexible compensation of slack lines.
- When printer is idle, one could retract all the strings. Enables elegant storage solutions. Could make it popular in big cities, where indoor area is scarce.
- Parallel lines attached to common spools to prevent rotation.
-
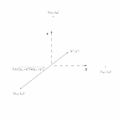
 The first sketch of Hangprinters geometry.
 -
 Straight lines are chopped into line segments by Clerck's firmware. This is the equation that Clerck's firmware needs to solve for each line segment.
 -
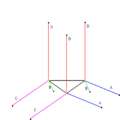 Naming of Clerck's geometry's axes. Parallel lines prevents rotation. The black triangle is Clerck. The Black dots are called anchor points. The yellow dots are called action points.
 -
 A render of Clerck's CAD file as of November 2015.
 -
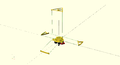
 A printed, mounted and assembled Clerck, October 2015.


Video showing the design in action
[edit | edit source]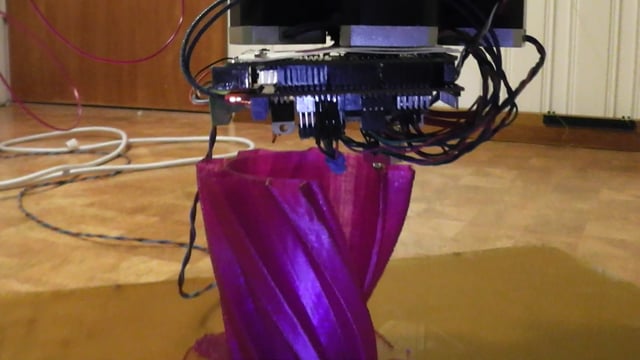

Costs
[edit | edit source]Open BMO of Hangprinter Version 3 (with Mechaduinos as closed loop motor controllers)
!!OUTDATED!!
| Item | Qty | Total price | Note |
|---|---|---|---|
| E3D V6 Volcano hot end | 1 | $100 | Kindly sponsored by E3d for prototype development. Thanks E3d! |
| Nema17 stepper motor | 5 | $60 | Prototype uses 17HS4401N. Warning: If you use steppers with another size for the extruder axis or the vertical axis, you will need to adjust the CAD files to match your motor. 17HS4401N dimentions are coded into source file measured_numbers.scad
|
| Arduino Mega | 1 | $10 | Buy in set with RAMPS and stepper drivers for lower prices |
| RAMPS | 1 | $5 | Prototype uses v1.4 |
| drv8825 stepper motor driver carrier (Pololu) | 5 | $10 | Model of stepper driver not important as long as output current is close to stepper max current (1.7 A for 17HS4401N) |
| 623 bearing | 2 | $2 | |
| 623 bearing v-groove | 5 | $5 | Currently, Hangprinter (version 2) doesn't use these, but they're nice to have should you ever want to gear down your printer, for example to allow for lighter stepper motors. |
| 608 bearing | 4 | $2 | |
| JY-MCU Bluetooth Transceiver RF Module | 1 | $6 | Used as described here |
| 220V AC to 12V converter (power supply) giving ca 15 A or more (that is 180 W or more power). | 1 | $16 | Higher voltage would give better stepper performance. Before increasing voltage, see here. |
| 2.7mm Eyes Inside Dia Fishing Rod Part | 9 | $9 | |
| Hobbed drive gear | 2 | $4 | Prototype uses E3D hobb-goblin 5 mm ID. If you use drive gears with a different size, adjust Hobbed_insert_diameter and Hobbed_insert_height in measured_numbers.scad accordingly.
|
| Set of M3 screws, nuts and nyloc nuts | 1 | $5 | Estimated price, screws and nuts are often sold in larger quantities, so investment may be larger |
| Meters of Non-elastic fishing line (dynema) | 15 | $1 | Fishing line always sold in larger quantities, so investment will be larger |
| Hooks for anchor points | 9 | $5 | Any simple hook like this: link to image... will do just fine. |
| Printing material and electricity for 3D printing parts | 1 | $10 | Printing material sold in larger quantities only, so investment will be at least ca $30 |
| Total Cost | $250 | ||
Difficulties
[edit | edit source]- Keeping rotations small, despite forces from
- Power cable
- Filament
- Accelerating motors
- Keeping filament and power cable from gears, print and (outside of) hot end.
- Accurate enough firmware configuration to keep lines tight throughout print volume
- Finding home position reliably and repeatably
Home position
[edit | edit source]If an IMU unit (accelerometer + gyro) was added, this might be the only needed sensor. Homing could be done like this:
- If printer is not horizontal, tighten D-lines until it is
- Lower printer (extend D-lines) until hot end crashes into print surface
- Set D-length. D-axis is now calibrated
- Extend D-lines an additional 2 mm
- While not horizontal:
- Calculate direction of inclination
- Tighten A, B or C to counteract inclination
- Tighten D-lines 2 mm
- We are now at home position, all axes calibrated
Automatic slack line compensation idea
[edit | edit source]An IMU unit could be used during print the following way:
- Compute some quantity describing "expected jerk" from gcode (Marlin and other firmware already does this. In Marlin the value would be tucked into the block_t struct)
- Use IMU to record "observed jerk" (again tucking it into block_t in Marlin)
- Write a function
F(expected jerk, observed jerk)→Move_to_tighten_strings, and call it once in a while
Since cheap 6-axis IMUs are really good at recording rotation, I expect the notion of "jerk" to include rotation (with expected rotation always 0). Timing will be really important, but Hangprinter-Marlin already has five nop operations in the middle of the stepping code (see the workhorse function in stepper.cpp), that could be utilized for IMU readings at precisely the right times. The nops are just there to wait for drv8825 stepper driver chips anyways.
Thanks to Dejay on forums.reprap.org for pointing out the possibility of a similar mechanism.
Next steps
[edit | edit source]- Adding cheap IMU unit like the MPU-6050
- Building a smaller version of Clerck using Nema14 motors for lower mass and cost
- Take motors off the extruder head and onto the supports to lower mass.
References
[edit | edit source]- ↑ http://reprap.org/wiki/Rostock
- ↑ http://reprap.org/wiki/LISA_Simpson
- ↑ http://forums.reprap.org/read.php?178,267835
- ↑ http://reprap.org/wiki/GUS_Simpson
- ↑ http://reprap.org/wiki/RepRap_Morgan
- ↑ http://reprap.org/wiki/Wally
- ↑ http://forums.reprap.org/read.php?1,214837,214859
- ↑ http://www.fabbaloo.com/blog/2014/2/15/big-rep-one-is-one-big-rep
- ↑ http://web.archive.org/web/20170910101611/https://shop.re3d.org/collections/gigabot-3d/products/gigabot-xl
- ↑ http://www.3ders.org/articles/20140608-introducing-large-format-x1000-3d-printer.html
- ↑ http://www.3ders.org/articles/20150914-wasp-big-delta-3d-printer-has-potential-to-build-insect-repelling-houses.html
- ↑ http://3dprintcanalhouse.com/
- ↑ http://robots.iaac.net/#robots
| Authors | |
|---|---|
| License | CC-BY-SA-3.0 |
| Cite as | Tobben (2015–2025). "Clerck, a RepRap 3D printer hanging from the ceiling". Appropedia. Retrieved July 28, 2026. |