
CNC Lubrication and Chip Clearing System

| Type | Chip clearing module |
|---|---|
| Authors | JBailey Jacob Jarvis Quinn Kaspriak |
| Location | Michigan, United States |
| Status | Designed Prototyped |
| Years | 2018 |
| Made | Yes |
| Replicated | No |
| Cost | USD 56.92 |
The goal of this design is to allow a lubrication and chip clearing module addition to a CNC router. This system consists of an external unit which served to feed the air and lubrication with an actuating arm mounted on the spindle to better direct the fluid/air onto the tool piece. This simple and easy solution would allow individuals to use their CNC Router with metal.
Bill of Materials
[edit | edit source]| Bill of Materials | ||||
|---|---|---|---|---|
| File Name / Part | Quantity | Source | Unit Price | Cost |
| CNC Mount | 1 | hyperlink | ~ $0.33 | ~ $0.33 |
| Socket Ball Long Adjusted | 2 | YouMagine | ~ $0.13 | ~ $0.26 |
| Socket Flange | 2 | YouMagine | ~ $0.08 | ~ $0.16 |
| Ball 40mm Ball Ver | 1 | YouMagine | ~ $0.12 | ~ $0.12 |
| Locking Nut | 4 | YouMagine | ~ $0.03 | ~ $0.12 |
| End Hose Clip | 2 | YouMagine | ~ $0.03 | ~ $0.06 |
| Clip | 1 | YouMagine | ~ $0.01 | ~ $0.01 |
| Nozzle Adapter | 1 | YouMagine | ~ $0.15 | ~ $0.15 |
| Peristaltic Pump | 1 | YouMagine | ~ $1.13 | ~ $1.13 |
| 3 ft of Tubing (3/8" OD) | 1 | Tubing | ~ $2.00 | ~ $2.00 |
| 8 in of Soft Tubing | 1 | Surgical Tubing | ~ $8.50 | ~ $8.50 |
| 28BYJ-48 Stepper Motor (for Peristaltic Pump) | 1 | Adafruit | ~ $4.95 | ~ $4.95 |
| Motor (for Fan) | 1 | hyperlink | ||
| Arduino UNO | 1 | Arduino | ~ $22.00 | ~ $22.00 |
| ULN2003 Stepper Motor Drive | 1 | Elecrow | ~ $1.78 | ~ $1.78 |
| SRD-05VDC-SL-C Relay | 1 | Newegg | ~ $5.44 | ~ $5.44 |
| Lubrication Bottle | 1 | |||
| free | free | |||
| Superglue | 1 | Amazon | ~ $2.97 | ~ $2.97 |
| Electrical Tape | 1 | Amazon | ~ $3.99 | ~ $3.99 |
| Total | 25 | |||
| ~$56.92 |
Tools needed
[edit | edit source]- MOST Delta RepRap or similar RepRap 3-D printer
- Soldering Iron to use filament welding method to connect parts
- Use solding iron to melt filament together. A short piece can be ran through holes and melted on either end. Another option is to melt along the edges where two parts meet.
Skills and knowledge needed
[edit | edit source]- Use for FreeCAD to adjust.FCSTD files FreeCAD Website FreeCAD Wiki
- The Basics of 3D Printing The Free Beginner's Guide
- OpenSCAD OpenScad Website
Technical Specifications and Assembly Instructions
[edit | edit source]| Print Specifications | ||||
|---|---|---|---|---|
| File Name | Print Time | Layer Height | Material | Infill |
| CNC Mount | 1:24 | 0.15 mm | Hatchbox PLA | 25% |
| Socket Ball Long Adjusted | 0:48 | 0.1 mm | Hatchbox PLA | 25% |
| Socket Flange | 0:34 | 0.1 mm | Hatchbox PLA | 25% |
| Ball 40mm Ball Ver | 0:49 | 0.1 mm | Hatchbox PLA | 25% |
| Locking Nut | 0:15 | 0.1 m | Hatchbox PLA | 25% |
| End Hose Clip | 0:14 | 0.1 mm | Hatchbox PLA | 25% |
| Clip | 0:05 | 0.1 mm | Hatchbox PLA | 100% |
| Nozzle Adapter | 0:18 | 0.25 mm | Hatchbox PLA | 25% |
| Peristaltic Pump | 3:00 | 0.2 mm | Ultimaker PLA | 25% |
| Total | 7:27 |
It is assumed that the "first step" before these instructions is to acquire all materials needed from the Bill of Materials. The Arduino Sketch can be found here GitHub
- Arm Sub-Assembly
- Use filament welding method to connect "Socket Flange" to "CNC Mount"
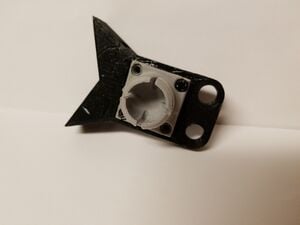
CNC Mount and Socket Flange - Use filament welding method to attach both "End Hose Clip" pieces to the other "Socket Flange"

End Clip Top 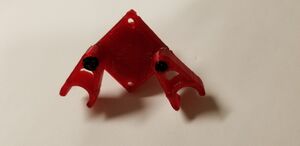
End Clip Bottom - Use the "Socket Ball Long Adjusted" (2), "Ball 40mm Ball Vert" (1), and "Locking Nut" (4) to assemble complete arm.
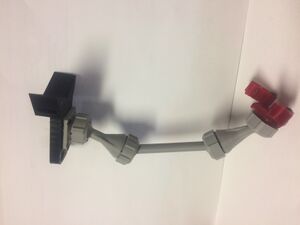
Fully Assembled Arm
- Use filament welding method to connect "Socket Flange" to "CNC Mount"
- Peristaltic Pump Sub-Assembly
- Feed Lubrication Tube through Pump so the desired length is hanging out into lubrication bottle
- Mount to lubrication bottle
- Trim tubing to appropriate length (length in this case is from the router head to the box location)
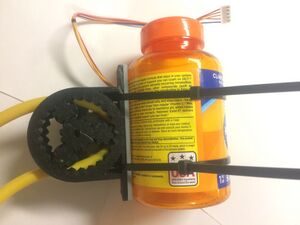
Peristaltic Pump Front 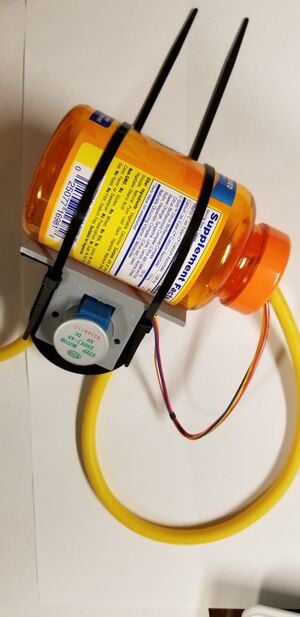
Peristaltic Pump Back
- Fan Sub-Assembly
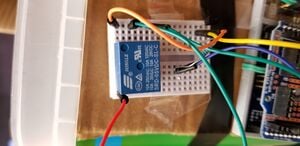
- Cut and Strip neutral wire of air mattress pump to place relay in the middle
Relay Wiring - Glue Nozzle Adapter to the pump output
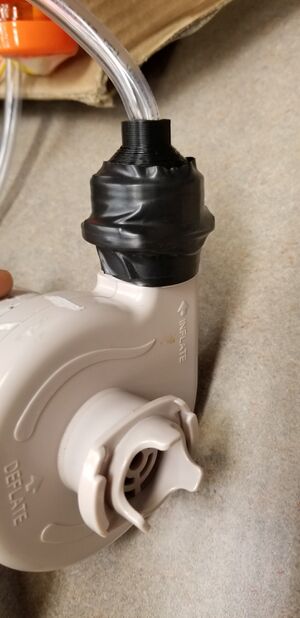
Nozzle Attachment - Cut tubing to appropriate length and attach
- Cut and Strip neutral wire of air mattress pump to place relay in the middle
- Electronics
- Final Assembly
- Place Peristaltic Pump Sub-Assembly in Box
- Secure to box with glue/tape/zip ties
- Place Fan Sub-Assembly in Box
- Secure to box with glue/tape/zip ties
- Run tubing from two assemblies to the "CNC Mount". Feed through the holes and place in "End Hose Clip" Adjust arm to angle tubing in the desired direction and tighten "Locking Nut"s.
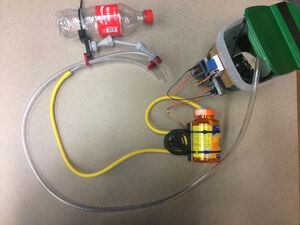
Final Arm Assembly


Common Problems and Solutions
[edit | edit source]- The End Clip could be modified to be completely circular to better hold the tubing.
Cost savings
[edit | edit source]| Commercial Cost | Our Cost | $ Savings | % Savings |
|---|---|---|---|
| ~ $900 - $2000 | ~ $56.92 | $843+ | 93.7% |
Benefited Internet Communities
[edit | edit source]References
[edit | edit source]
| Authors | |
|---|---|
| License | CC-BY-SA-3.0 |
| Organizations | MTU, Michigan_Tech's_Open_Sustainability_Technology_Lab, MY4777 |
| Cite as | JBailey (2018–2026). "CNC Lubrication and Chip Clearing System". Appropedia. Retrieved July 19, 2026. |