
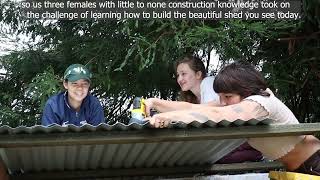
CCAT reclamation station 2023

| Type | |
|---|---|
| Authors | Kristina Fiebig Maddy Hunt Nicole Suzuki |
| Location | Arcata, California |
| Status | |
| Years | |
| Made | No |
| Replicated | No |
| Uses | source building materials, donate building materials, recycle, store materials |
| Map | |
|---|---|
| Location | Humboldt, United States |
| Coordinates | 40° 35' 59.07" N, 123° 53' 59.18" W |
Background
This project is located at CCAT's current Reclamation Station to make it more accessible for students to both donate and use building materials. The Reclamation Station needed to be leveled, organized, and have a more intuitive storage design. This natural building project was completed during the 2023 spring semester by Kristina Fiebig, Nicole Suzuki, and Maddy Hunt on the Cal Poly Humboldt campus. The final design includes a hempcrete demonstration wall, reclaimed wood shelves, and a pier and beam style foundation. This project will leave room for future updates as donated materials and needs of users change.

Problem statement
[edit | edit source]The objective of this project is to update and organize the existing CCAT Reclamation Station to make it easily accessible, safe, and welcoming for student use. This project will create a space that will increase the availability of reclaimed building materials to the campus and Arcata community. Goals of this project are to increase the feasibility of using reclaimed materials, as well as to increase the ease of use for both donations and users. This includes the safety of obtaining materials at the site, shed organization standards, proper shelter to protect materials, and creating a community code of conduct for Reclamation Station usage.
Criteria
[edit | edit source]The following criteria will be used to assess the success of the CCAT Reclamation Station project. These criteria were chosen based on the suggestions of the CCAT co-directors as well as the students who are working on the project. The scale (1-10, 10 being the most important) represents the importance level of meeting the constraint of each listed criteria.
| Criteria | Constraint | Weight (1-10) |
|---|---|---|
| Accessibility | Pathways wide enough for a wheelbarrow | 10 |
| Usefulness | Promotes 50% or more reclamation | 8.5 |
| Safety | Safety standards approved by CCAT steering committee | 8 |
| Cost | Less than or equal to $3000 | 7 |
| Durability | Must last 10 years or more | 6.5 |
| Sustainability | More than or equal to 40% recycled/natural materials | 6 |
| Aesthetics | Looks comparable or better to the green shed | 5 |
| Inspiration | Inspires student projects, promotes CCAT mission | 4 |
Literature Review
[edit | edit source]This literature reviews cover all applicable topics to the project site, materials, design, and use.
Campus Center for Appropriate Technology (CCAT)
[edit | edit source]CCAT was founded by Humboldt State University students in the 1970's, after claiming the Buckhouse through sit ins.[1] The Buckhouse was relocated in 2005 to its current location, where students built the downstairs classroom, that has now been a place for student lead courses in appropriate technology for about a decade.[1] CCAT is run by student co-directors who live in the house, as well as a team of student interns.[1] They host dozens of student built projects, as well as volunteer opportunities that promote sustainability.[1] CCAT's mission is to demonstrate that living lightly on the land is not only possible, but also rewarding.[1]
Building on a Slope
[edit | edit source]The current site of the Reclamation Station is situated on a steep slope, under a large redwood tree. The slope begins at the paved pathway and continues down to the parking lot. Some concerns with this site are the potential for rainwater erosion on both the slope and project materials, as well as the safety for users navigating the site. Building on a slope presents its own set of concerns when it comes to designing the shed. Mitigating these potential issues by stabilizing or leveling the slope is important to the durability, accessibility, and safety of this project.
Tire Retaining Walls
[edit | edit source]Tire retaining walls are a low-cost way to mitigate soil erosion and stabilize slopes.[2] Because our project site has a steep slope, we must first create a stabilized foundation to build the Reclamation Station shed on. This method recycles old tires and cardboard boxes to create a strong vessel for compacted earth.[3] To build using this method, first level and tamp down the soil where the tires will be placed.[2] Then align the first row of tires, making sure to use a level to tamp the tires to be as even as possible.[2] Once the row is placed, insert cardboard to cover the bottom hole, to prevent soil from escaping.[2] Begin filling the tire by having one person shovel soil into the vessel, while the other tamps (using a tamper or sledge hammer) it as compactly as possible.[4] When the tire is pounded, it will weigh about 300 lbs.[3] When the first row is complete, begin the second row by offsetting the tires about 6in back from the front of the first row and repeat the previous steps until complete.[2] While this method is cost efficient and requires few tools, a concern is its extensive manual labor requirements.[5] CCAT hosts multiple tire retaining walls already that serve as examples of its applicability to the site.
Drainage
Retaining Walls are also a natural form of a drainage technique, but when incorporated with a horizontal deflection pluming system it can help drainage up to 43%.[6] Since the slope we are working with is located close to a parking lot there are channel drains that flow to the ocean so we will not need to worry about incorporating a trench drainage system. If there is concern about water build up then the trench drain technique can be used, which is where one would have moss or grass on top of the system, but the drainage pipes themselves are placed below the ground in a gravel box.[7] The drainage pipes will be placed at an angle, to guide the water leading out, the gravel box is then covered with a geo-textile fabric that prevents dirt and silt form entering the drain.[7]
Shed Drainage
The shed planks are placed with a slight space between each plank. The space is about 3/4 of an inch. This should allow water to flow through the shed and not build up and not erode the planks. With the slight gaps, air flowing up the hill should provide further reduction of moisture.
Shed Design
[edit | edit source]The slope and redwood tree are a major factor in the shed design. Concerns relating to these factors are the accumulation of redwood duff on the shed roof and pathways, as well as the stability of the shed. Things to consider include storage expansion for the adaptation of a shed design on a slope, which the materials are positioned in a manner that the shed roof diverts debris away from the station, in order to protect the reclamation materials from weathering, all while being easy to organize and navigate.
Passive Energy Efficiency Designs
[edit | edit source]When Building in a damp ecosystem like Arcata CA, we need to consider how we can build storage for wood that keeps the wood as dry as possible. Passive designs use the elements to control the conditions of the building structure.[8] There are ways in which we can use solar energy to insulate our structure. By utilizing windows as an aperture on the peak sun side you can trap heat in the structure which can help the moisture evaporate out of the structure.[8] By utilizing dark colored wood or paint we can absorb more heat from the sun. We can build using a thermal mass (the wood we are storing could be the mass that stores heat) which would allow the structure to store the heat.[8] Wind can also be taken into account when building. Arcata is known for its icy wind and sideways rain, so building our structure with a barrier that keeps the wet coldness could keep the wood from developing mold.[8] The site we are building on is on the south side of a hill, so further investigation of the site specific climate may show to be useful. Having a redwood tree to the west side of our structure could also prove useful for dampening the wind.[8] The use of fans could help with air flow into the structure. Pinwheels could potentially be functional and aesthetic.[8] Trombe wall designs are another alternative, it is when the wall has a gap in-between the outer and inner layers of the wall. This allows the structure to both collect and store heat.[8] While this is interesting, this method may be too much work for the current project. Heat loss and heat gain are connected to the amount of exterior exposure, so the more nooks and crannies there are, the more efficiently the structure will maintain heat[8] (though this may affect the structures ability to get rid of moisture).
Pier and Beam Foundation
[edit | edit source]Structural posts put directly into the ground need to be “pressure treated” lumber in order for the posts to last decades.[9] This protects it from water and erosion. If we were to add a pier to the post so that we could create a flat surface for the reclamation stuff we would have to make sure we keep the pier short,[9] because the deck and beam ratio needs to small enough that the pier does not collapse. More beams would have to be placed to elongate the pier. Pier and beam foundations if done right, can be very resilient towards earthquakes.[9] Since Arcata has frequent earthquakes this would be beneficial. The beam and pier must be bolted to each other in order to better secure the heavy load that the pier will likely hold.[9] Additional pressure treated slabs should be added to the base of the beam. This slab should be poking out of the ground in order to protect the most vulnerable part of the beam. Placing the beams in 2’ 6” deep holes with concrete in it is another way to secure the longevity of the posts and their placement.[9]
Roof
[edit | edit source]A roof that aims to be prepared for rain should contain certain aspects. It is important that the roof directs the rain rather than trying to limit contact.[10] A drip-edge also known as aluminum flashing can be put along the edge of the shed roof to protect the water from stating on the roof’s edge.[10] The metal edge will use the momentum of the slope to release any water that falls on the shed roof. Layering the shingles so that they overlap should protect the weak points of the shingles and cover the intersections. Even when using completely metal shingles, strategically placed tiles may lead to better water resistance.[10] This could also lead to opportunity for future rain water catchment systems that could be installed onto the roof. The layers of the roof is crucial for a waterproof roof. After the foundation of the roof is built, the drip edge should be installed first. After this, you should add a layer of roofing felt which is an asphalt impregnated paper.[10] After this, a layer of metal roofing. For this project we will likely use the reclamation tin roof shingles from the Adobe house project. To finish, make sure you place a ridge cap at the highest points of the roof so that the water does not leak under the roof from the top.[10]
Floor
In order to create a stable foundation floor joists will need to be incorporated one every two feet, to find board footage needed the equation to use is Board feet + number of pieces x width/12 x thickness (in inches) x length (in feet).[11] To create a well built sturdy structure the foundation must equally bear the load, trust worthy foundation systems are post, pilling, stone, crushed stone or gravel and treated wood, and concrete.[11] Foundation options include rubble trenches and pier blocks or plyons, if one were to use concrete it is important that the pads be about two square feet and at the corners with the rebar extending out for future footings.[8]
Soil Infill
Soil infill also known as fill or fill dirt which is comprised of clay, silt, and sand with small rocks.[12] It is incorporated into projects mainly to fix or support the foundation, in which it effects the grade and elevation of the altered space.[12] One way to use soil infill is by compacting it in to geocells, which are 3-D interconnected honeycomb shaped stabilizers that "confine and stabilize soils that would otherwise be unstable under loading."[13] In order to have stable fill it needs to be deprived of all organic matter, since its nature is to decompose, which will leave gaps/spaces in the foundation causing future structural issues.[12] It should also be noted that fill is not an ideal material for load-bearing soil due to the natural settlement of the material, which is why "engineers rely on mudjacking and or polyurethane."[12] The difference between mudjacking and polyurethane is that "Mudjacking is the lifting or leveling of a structure, driveway, or slab of concrete by pumping a mixture of slurry (with incredibly high pressure) underneath a sunken slab" while "polyurethane foam is an injectable polyol and isocyanate resin sealant, insulation, grout which expands upon application providing void fill, structural support, and re-leveling properties" it also is "waterproof, flame-retardant, noninvasive, nonpolluting, weighing 3.5 to 5 pounds per cubic foot", has a faster cure time, and is ideal for small hole applications.[14]
Natural Building Materials
[edit | edit source]We plan to use multiple natural building materials for our shed design. The main goals of using these materials are to build sustainably, compliment other natural building features at CCAT, and provide opportunities for community participation.[15] Natural building methods are often very labor intensive, requiring many hands to complete a project.[16] This can also be a way to connect our target users to the the building process and instate their right and responsibility to the Reclamation Station when the project is complete. Major concerns with these materials are time requirements and potential for weathering.
Hempcrete Test Wall
[edit | edit source]Hempcrete is an environmentally friendly building material for walls, floors, and ceilings that has advantages and disadvantages.[17] The advantages of using hempcrete is that it makes wonderful wall installation due to its high noise reduction coefficient, regulates in order temperatures, pest proof, easy and fast to use, fireproof due to the lime, rot resistant, does not require pesticides, and can be fully recycled.[17] The main disadvantage of hempcrete is that it is unable to bear heavy loads especially when it absorbs 300 to 400 times its weight in water, therefore giving it a poor mechanical performance, but due to its pours nature it is earthquake resistant through its ability to bend without cracking.[17] When building an exterior wall the most complicated part of this process is getting "the correct ratio between the fluid phases, air and water, and the solid phases, hemp shiv, and the binder", an example of a correct ratio is "100 Lts. of hemp shiv, 22 kg of tradical PF70 lime, 30 to 35 kg of water."[17] After this is accomplished the hempcrete will need to be formed into a mold, then dried, and then applied with a lime acting in order to improve longevity.[17]
Cobb
[edit | edit source]Cobb (otherwise known as monolithic adobe[18]) in an ancient building technique, traditionally consisting of a mixture of clay, sand, and straw.[19] The benefits of this method are using locally-sourced materials, low cost inputs, opportunities for creativity, compatibility with other natural building materials, earthquake resistance, non-toxic materials, and high thermal mass.[19] Downsides to this method are labor intensiveness, and lack of defined building codes in most states.[19] While this is a labor intensive method, we may also consider the opportunity it provides for community engagement with the project. CCAT's greenshed features a cobb wall that has little to no weathering issues, and may serve as a good example for us to model ours after.
Earthen Plasters
[edit | edit source]Finishing the shed walls with earthen plaster may provide a surface for Reclamation Station signage and increase the approachability of the building. Earthen plasters protect walls from moisture, pests, wind erosion, spread of fire, while adding to the aesthetic of the building.[20] This plasters is made of 3 basic components: clay, sand, and fiber.[21] Colors and textures of these natural plasters create an inviting appearance and allow opportunities for artistic expression.[20] Downsides to this method are that it requires a lot of physical work, and maintenance requirements over time if not properly protected from weathering.[20] Something to consider is proper roofing to protect the plaster from extensive weather erosion, especially in Arcata's wet climate.[16]
Natural Paints
[edit | edit source]Natural paints can add important signage and art that may aid in organization, defining community guidelines, and general beauty of the shed design. Natural pigments come in the form of fine powders, which are combined with a solvent and binder to create paint.[22] Common types are ochers and iron oxides, which get their hue from the chemical states of various minerals.[20] Natural paints are durable and non-toxic.[22]
Designing interpretive materials
[edit | edit source]According to CCAT Co-Directors, we designed interpretive materials that include designs for structural blueprints, sizing, and aesthetics.
Prototyping
[edit | edit source]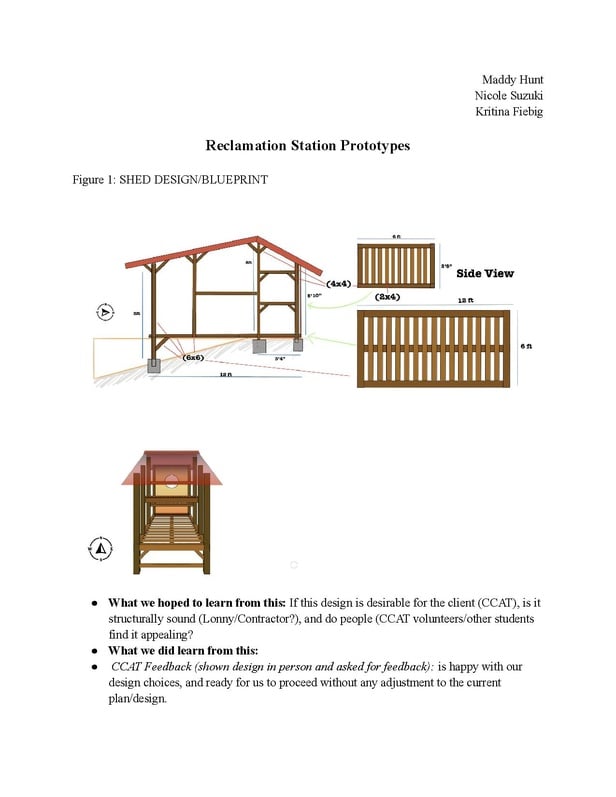


Construction
[edit | edit source]The construction of this project was done primarily during CCAT Volunteer Friday hours, with a little help from an ENST 123 Natural Building class. Many volunteers helped us throughout the process from start to finish, due to not asking for permission to post some people they are not displayed in the images below.
- Construction gallery
-
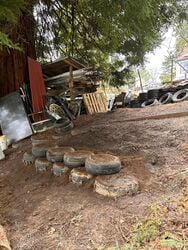
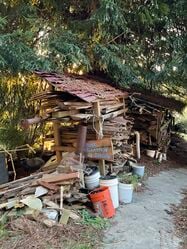 Reclamation Station before
 -
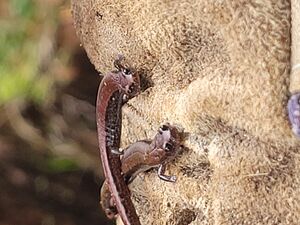 salamaders found on site (cute)
 -
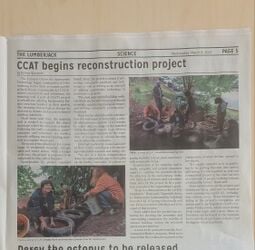 Lumberjack article on building the tire retaining wall
 -
 After the completion of the Tire Retaining wall
 -
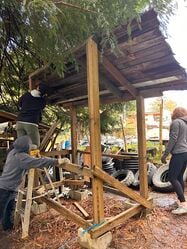 Deconstructing the existing shed on site
 -
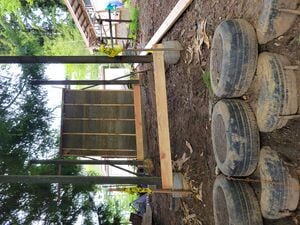
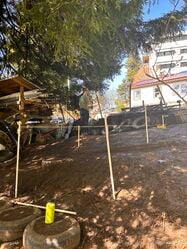 Prototyping for size using poles and string at approximate location of shed foundation
 -
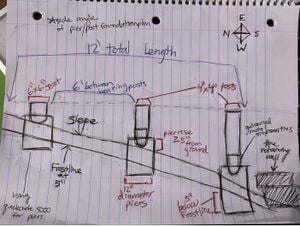 Footings drawing design
 -
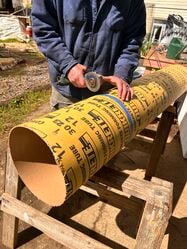 Dave Enos cutting 12" sonotube form for foundation piers
 -
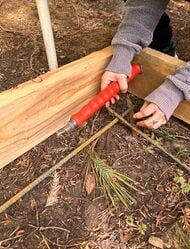 Connecting Rebar
 -
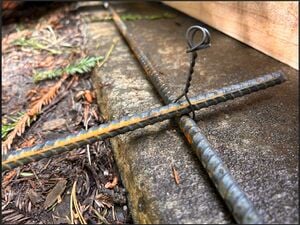 rebar with the connecting tie
 -
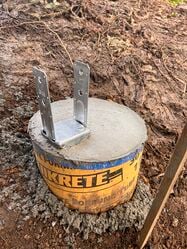 Finished pier with 4"x4" metal anchor (rebar cage cured inside for stability)
 -
 Finished north wall foundation
 -
 Concrete footings with line levels over them marking where the floor beams would go
 -
 Marci leveling the 4"x4" foundational posts
 -
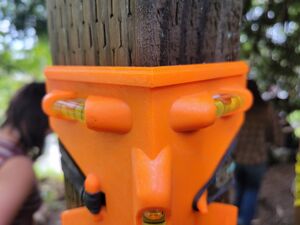 Fancy level tool (checks for level and plumb) borrowed from Dave Enos
 -
 Hempcrete wall with foundational posts and tire retaining wall
 -
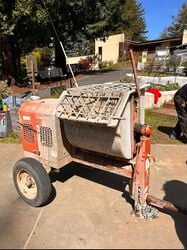 Mixer used to create the hempcrete
 -
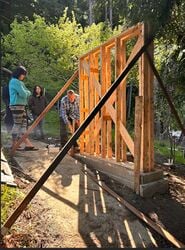 Hempcrete wall frame that was built by Wade
 -
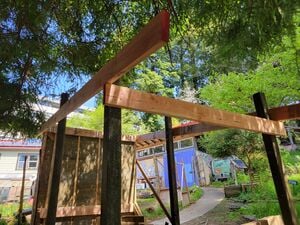 Beginning of framing the shed with 2"x6" beams
 -
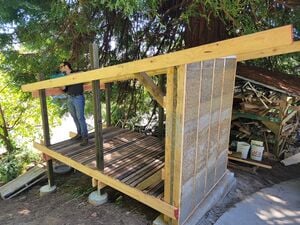
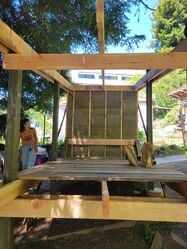 Shed framed with reclaimed wood floorboards done by Suzuki
 -
 4"x4" support beams to attach/stabilize wall to foundation frame. This is important for stabilizing the hempcrete wall.
 -
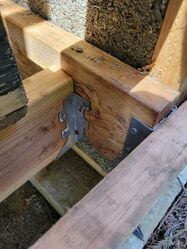 2"x6" joist connecting shed frame to hempcrete wall frame
 -
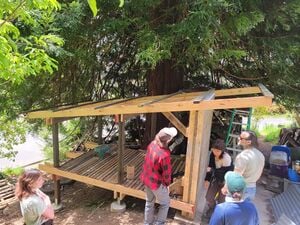 Shed framed without roof (Bri, Correy, Maddy, Lonny, Suzuki)
 -
 Lonny chainsawing off tops of 4"x4" posts to level them to roof
 -
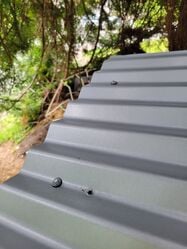 Corrugated metal roof panel with 1inch self drilling screws (with rubber washer). We used 10 total panels, 5 10'x3' and 5 8'x3'. This image also shows the South West corner where a metal screw was screw in but taken out due to not conntecting to the wood beam benath it, this may need to be fixed or covered in the future.
 -
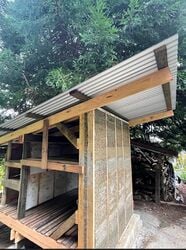
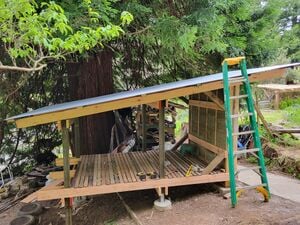 Shed with finished roof
 -
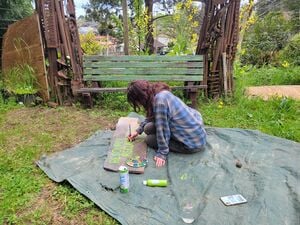 Volunteer at CCAT's Volunteer Friday making new signage for the shed
 -
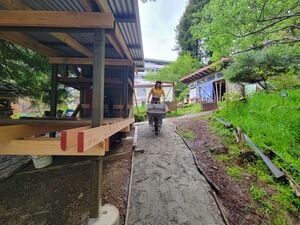 Maddy demostrating the width of the path way, wide enough for wheelbarrow access
 -
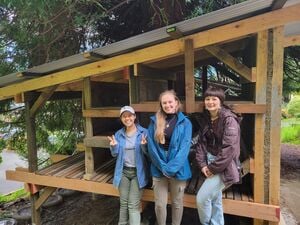
 Shed with completed shelving
 -
 Suzuki and Michelle after completion of the shelves
 -
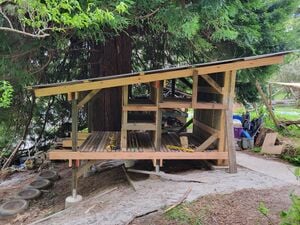
 Completed Shed
 -
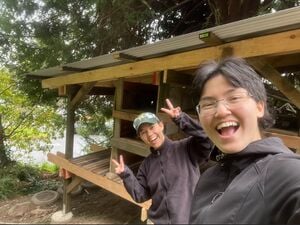
 Final photo of Suzuki, Kristina, and Maddy togther next to the completed shed.


Video instructions
[edit | edit source]The following videos document the building process of our project, and explain how to maintain it for future CCAT employees.

Steps
[edit | edit source].jpg)
Before we could start working on building the shed, the space around it needed to be cleared/prepped, then the demolition of the old shed occurred. The original Reclamation Station shed was just four posts on top of compacted dirt supported by cinderblocks.
The site prep also included a lot of general organization and clean up of the donated materials already at the site. This began with a pile of assorted materials, and was organized by material type, length, and moved off of the building site.
This step also included slope stabilization. The method we used was a rammed earth tire retaining wall. This wall was made by first leveling the area where the first row of tires would be placed. Once leveled, we arranged tires of the same width and diameter in a line, and covered the bottom holes with cardboard. The tires were then filled with earth, and compacted until full. The best method is to begin by packing the earth into the side walls of the tire, until they are firm, and then packing the center until it is full. Use mallets, sledge hammers, and feet to ram the earth. When teh tire is fully packed, tamp the top and make sure teh row is level before beginning the next layer. The second row of tires would be placed overlapping two neighboring tires on the lower row. Its should also be set back from teh front of the first layer about 4inches, to secure the slope. For best results, use soil that has adequate clay content, and is dry for ease of work.

After measuring the desired length of where the new shed will be located, stakes and string were used to mimic a prototype, in order to visually see where the shed will be. Strings were leveled using line levels, and the stakes were placed in the position of the foundation piers.
This prototype helped us to get feedback from volunteers and CCAT on the sizing and shed orientation. The feedback helped to solidify our 3D rendering design before proceeding to teh next steps.
.jpg)
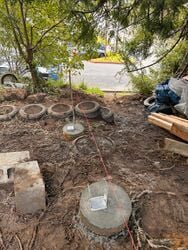
5 holes total were dug, the first one was the foundational wall for the hempcrete wall and the other 4 were for the foundational support posts in the middle and end of the shed. In order to make sure each foundation was sturdy, the holes were dug past the frost line to the desired depth which was roughly 5 inches past ground level.
The frostline was estimated according to county requirements. Be sure to dig past the layer of top soil, until clay is reached. At this point, dig another 5 inches below the clay to ensure adequate stability in events of erosion or earthquakes.
We mapped the holes based on our sizing prototype, and dug a 12in radius around the center point. Once these holes are at the appropriate depth and width, tamp the bottom to level and compact the hole.
After this, rebar boning was placed within the perimeters of the holes, in order to stabilize the piers to to slope, and prevent foundation failure from cement cracking over time. The rebar will help to strengthen and preserve the foundation in the event of erosion and earthquake.

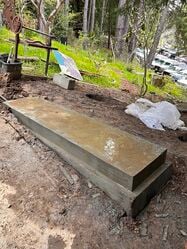
The foundation was made using a pier and beam style, with a larger northern wall footing to bear the weight of the hempcrete wall. The foundation was made using quick-crete. Before the concrete was poured, the framing was put in place, plumbed and leveled, then was reinforced with rebar, in order to prevent major cracking if an earthquake occurs in the future.
Mixing the concrete was labor intensive, but using a hoe sped up the process. The concrete itself was mixed just with water until a cake-like batter was formed. Once dumped into the desired footing, we took a stick or hoe and plung the concrete to remove any remaining air bubbles.
The northwall foundation used about 24 80lb bags of quickcrete 5000, while the smaller piers used about 2.5 bags each.
Once these were poured, metal anchors were placed in the piers for later post installation.

The hempcrete northwall was built with the help of hemp expert Wade Atteberry, who constructed the lumber frame form. This walls dimensions are 8" thick, and 6'x7'. Wade supplied our hemp hurd (which was derived from CBD stalks), and the lime mixture. Volunteers were supplied with masks and gloves to protect from the caustic lime we were working with. The wall was mixed and tamped by volunteers in 1 day.
The hempcrete wall was made using hemp hurd (woody core of the hemp plant), lime, and water mixed in a mortar mixer rented from Dons Rent-All. The ratio used was 6-8 5 gallon buckets of hurd, 2-3 buckets of water, and 1/3 bag of lime binder. We mixed this by first dumping water in the mixer, and then adding in the lime. Once this was incorporated, we gradually added in the hemp a bucket at a time. The mixture was done when it appeared to be a dry oatmeal texture, and was tested by forming a small ball of it in your hands, and withstanding a few tosses in the air before crumbling.
This mix was then dumped into a lumber frame, where volunteers helped to tamp it into place until it was firm. Volunteers tamped using 2"x4" peices and hands. This process is repeated until the frame is full, and then left to cure for 30 days. After the wall is cured, it can then be lime plastered to preserve it. At this time we will apply a "truth window" to reveal the hempcrete beneath the plaster for educational value.
An improvement to this process would be to use a pan mixer instead of a mortar mixer.
This was is the first demonstration of hempcrete natural building technology at CCAT. This wall will host a directory board and other building resources for the shed users.

The framing went off of the blue print designs. Using two long beams on either side of the posts made the base for the floor, in which 3in self-drilling deck screws were used to drill the wood into place, using roughly 4 per spot to make it sturdy but not busy. All beams were checked to make sure it was leveled. The center beam was attached by using a joist hanger as supplemental support.

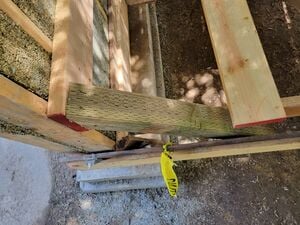
4x4 reclaimed posts cut at a 45 and 50 degree angle to connect the wall/post to the beams acting as a brace, adding extra support. Total support beams is x8.
For lower beams, both sides can be cut at a 45 degree angle. For upper beams, one side should be cut at a 50 degree angle to compensate for the roof angle.
Some beams did not fit between the 2x6 parallel boards. We solved this by using a a circular saw to cut the end of the 4x4 into a stake-like shape to wedge it in. Multiple 3 in wood screws are used to secure the posts to the frame.

We measured out multiple planks of 1x3 reclaimed wood to perpendicularly cover the floor foundation beams. We tried to keep about ~1/2 in- 3/4 in space between each plank. We color organized the planks by alternating the darker planks with the lighter planks. This gives the reclaimed wood a more artistic and rustic feel. We nailed each plank to with 5 teco nails per plank, connecting the plank to each of the 5 floor foundation beams.
- Note this flooring method is not meant for people to walk on. If needing to walk on it for maintenance purposes, make sure each foot is on at least 2 separate planks per foot.

For the roof the metal bracket had to be slightly lower than the connecting board to compensate for the roof beam to be flush at a ~55 degree angle. 2x4 scrap wood was used to trace the angles and set the bracket. This made it easier to get more exact placements without having to hold up the < 8ft roof mid beam. A string level and measuring tape was used to get the placement angles and measurements precise. The brackets are secured with 2 in teco nails.
Pre-nailing the bracket makes the placing the roof beams easier. Though, doing the predictive calculations is crucial for this method to be successful.

Three 2x6 beams are placed into the brackets and screwed into the support beams and the lower roof support beams with 3in wood screws. Each of the beams should be measured and cut shorter than the outside support beams because they do not pertrude beyond the hempcrete wall. Teco nails are used to secure the 2x6 beams to the metal frames.

Lonny used a gas powered chain saw to cut the 4x4 posts so that we could place the roof. He originally used a electric powered chainsaw but it quickly died. Would not recommend electric chain saw for cutting multiple posts.

Begin this step by laying out the roofing panels on a flat area. This allows you to adjust and calculate the needed overlapping between panels, and to size them according to the needed area.
Before the corrugated metal roof could be screwed onto the shed beams needed to be drilled onto the framing of the roof. The beams were placed were the lower and upper layer panels overlapped. The overlap beam is important due to securing them together to prevent water leaks. For this roof our vertical overlap was about 2 ft at the lower/upper layer attachment, and 3 bottom troughs of the corrugated metal overlapped connecting the panels horizontally. The screws were drilled onto the bottom of the troughs to save on money by getting smaller screws with the rubber washer.
Begin assembling the roof panels based on the previous layout. Begin by attaching the first lower level panel (10'x3' in our case) and securing it to the frame at the necessary position for overhang lengths. Once this is placed, attach the next panel over by aligning it with the first, and overlapping them by 3 troughs. Insert screws at each point of contact with the strapping boards. Continue this process until teh first layer in complete.
Begin the second panel layer by aligning it with teh first, and then overlapping the 8'x3' with the 10'x3' panel. This overlap is crucial. We chose to overlap it by about 2ft, making sure to securely attach these panels at their points of contact. Continue this process until the roof in complete.
Overall, the roof was built to have a 2.5ft over hang at the north wall, 2ft overhang at the south end, and 1ft overhangs on the east/west sides to protect the stored materials from weather.
The shelving was built to hold a substantial amount of weight. Dividers and shelf heights were strategically placed to encourage smaller/lighter materials to be placed on highest shelves, leaving larger shelves at the bottom for bulkier/heavier materials.
These shelves were made using reclaimed wood from the Reclamation Station that were cut to size using a skillsaw.
This final step of applying lime plaster to the hempcrete wall will preserve it overtime. Lime plaster is a natural medium that is compatible with hempcrete, as well as breathable. Plaster protects the wall from weathering, pests, and damage.
This lime plaster will be applied to all sides of the wall, and colored to be compatible with CCAT's aesthetic.
Timeline
[edit | edit source]This Gantt chart displays the tentative timeline for Reclamation Station project. Tasks are broken up into three sections by lines. The first is the research, drafting, and prototyping stage. The second phase is shed foundation, framing, and roofing. The third stage focuses on completing the natural built north wall, and finalizing signage along with other project outcomes. We completed the project within these stages and overall timeline (with some minor adjustments due to scheduling). The only task we did not complete was plastering and signage, as the hempcrete wall requires 30 days to cure. Due to the coordination of volunteer experts and materials, the hempcrete wall was not constructed in time to allow it to cure before the end of the semester. This step will be completed this summer.

Bill of materials
[edit | edit source]This table describes the materials needed and cost estimation for the Reclamation Station project. Items include the type of unit per material and where the materials are sourced from. These totals are tentative and reflect the current project design plans.
| Item | Amount | Cost per unit | Total |
|---|---|---|---|
| Tires — Arcata Used Tires | 10 | USD 0.00 | USD 0.00 |
| Cardboard Boxes — Arcata Co-op, Arcata Ace Hardware | 20 | USD 0.00 | USD 0.00 |
| Sledgehammers — CCAT | 1 | USD 0.00 | USD 0.00 |
| Shovels — CCAT | 5 | USD 0.00 | USD 0.00 |
| Gravel/Sand (buckets) — Donated by CPH ERE program | 4 | USD 0.00 | USD 0.00 |
| Fill Dirt (yards) — Wes Green | 2 | USD 32.23 | USD 64.46 |
| Quickcrete Cement (bags) — Ace Hardware | 10 | USD 8.59 | USD 85.90 |
| Cement Tube Form — Ace Hardware | 6 | USD 12.99 | USD 77.94 |
| Gravel (buckets) — Wes Green | 2 | USD 5.00 | USD 10.00 |
| Level — CCAT | 1 | USD 0.00 | USD 0.00 |
| Galvanized Metal Anchors — Ace Hardware | 6 | USD 30.00 | USD 180.00 |
| Galvanized Metal Roof Sheet (2'x10') — Home Depot | 3 | USD 30.00 | USD 90.00 |
| Galvanized Metal Sheet (2'x6') — Home Depot | 3 | USD 20.00 | USD 60.00 |
| Roof Underlayment — Ace Hardware | 1 | USD 79.99 | USD 79.99 |
| Plywood (8'x6') — Alves | 4 | USD 28.95 | USD 115.80 |
| Roofing nails/screws — Ace Hardware | 2 | USD 18.99 | USD 37.98 |
| Power Drill — CCAT | 1 | USD 0.00 | USD 0.00 |
| Ladder — CCAT | 1 | USD 0.00 | USD 0.00 |
| Hammer — CCAT | 3 | USD 0.00 | USD 0.00 |
| Lumber (2"x4"x6') — The Mill Yard | 30 | USD 6.00 | USD 180.00 |
| Metal roof panels — The Mill Yard | 10 | USD 30.99 | USD 309.90 |
| Pressure Treated Lumber (2"x4"x6') — The Mill Yard | 6 | USD 55.95 | USD 335.70 |
| Pressure Treated Lumber (4"x4"x6') — The Mill Yard | 4 | USD 15.12 | USD 60.48 |
| Pressure Treated Lumber (by ft) — The Mill Yard | 225 | USD 3.00 | USD 675.00 |
| Galvanized Structural Wood Screws — Ace Hardware | 2 | USD 59.99 | USD 119.98 |
| Galvanized Nails (4") — Ace Hardware | 1 | USD 20.00 | USD 20.00 |
| Tamper — CCAT | 2 | USD 0.00 | USD 0.00 |
| Lime Plaster Materials (estimation) — Some materials may be donated by CCAT | 1 | USD 250.00 | USD 250.00 |
| Signage — Signage materials TBD | 1 | USD 0.00 | USD 0.00 |
| Pathway sand/gravel (buckets) — Donated from ERE | 6 | USD 0.00 | USD 0.00 |
| Grand total | USD 2753.13EUR 2,367.69 <br />GBP 2,009.78 <br />CAD 3,413.88 <br />MXN 57,402.76 <br />INR 206,071.78 <br /> | ||
Operation
[edit | edit source]
Refer to posted signage on the shed shelving, which indicates the types of materials stored on each shelf/area of the shed.

Once the material you are seeking is identified, safely remove it from the shelf. Shelf access is available from east, west, and south sides of the shed. If the item requires, use a wheelbarrow to transport the item along teh designated pathways.

First inspect the material for any damage that may compromise the usefulness of it for future builders. If the material is too damaged for reuse, please do not donate it. If the material has screws, nails, or other additions, please remove them before donating it. When donating materials, refer to the posted signage to identify the designated material storage area, and place the item there.
Maintenance
[edit | edit source]The following schedule and instructions are the maintenance guide for the Reclamation Station project. CCAT employees will oversee and conduct these tasks accordingly.
Schedule
[edit | edit source]This is when to maintain what.
Daily
- Clean up any loose materials that have been moved from their designated area
- Make sure nothing is blocking the pathways
- Weekly
- Rake/sweep the pathways of redwood debris
- Light upkeep of shed organization
- Monthly
- Wash redwood debris from roof. Use hose to spray with the grain of the roof panels, starting from the northern end and pushing the debris off in the southern direction.
- Discard nonviable materials (molded, termites, broken, expired, etc.)
- Yearly
- Declutter the shed by removing nonviable materials and reorganizing shelves
- Take inventory of the stored materials and update signage accordingly
- Every 3 years
- Check for cracks or erosion of the hempcrete wall plaster
- Patch plaster if necessary
Instructions
[edit | edit source]There are two ways to use this shed, either donate construction items and put them in their correct stop or take construction items.
Identify the item:
What shape is the item in, can it be used again? YES = donation, NO = trash
Is the item related to construction work? YES = donation, NO = trash
If it is a piece of wood does it contain nails? YES = remove before donating, NO = donation
When grabbing items out of the shed make sure to leave it in the same or similar condition it was found in.
Conclusion
[edit | edit source]Testing results
[edit | edit source]As the shed was built, we tested the strength of the shed by walking on it throughout the roofing/shelving steps.
While we would have liked to test the signage with real users, to observe the effectiveness of various organization set ups, we did not have enough time to complete this after the shed was finished. Future adaptations of this shed may include this type of testing to determine organizational methods.
Discussion
[edit | edit source]We discovered that the "flooring" platform was strong enough to hold multiple adults at once, but that we should not walk along single 2"x1" panel. Instead, we dispersed our weight by walking on at least 2 panels at a time, which avoided panel cracking/bowing.
This informed us that the shed is plenty sturdy, but cannot support acute weights with single panels (such as a 6ft tall human). This is fine, as no one will be walking in the shed after teh project is completed, but we should suggest a weight limit for storage materials.
Overall, the shed is very strong, and will withstand small earthquakes and common weather conditions in the region. Overtime, the roof may need to be patched/repaired if redwood limbs fall on the shed, but otherwise will see usual ware and tear. The tire retaining wall will prevent extreme erosion of the slope over time, helping with overall slope stability.
The shed is safe for users and materials alike, and have multiple points of access on east/west and south sides. There is ample space for wheelbarrow usage and other wide items on pathways.
We used reclaimed wood for all shelving units, and throughout tehee building process as applicable. About 40% of wood used in the build is reclaimed.
Throughout the building process, many other students and community members began using teh Reclamation Station Materials. Over all, the project has increased use of the Reclamation Station and inspired others to build using recycled building materials.
Lessons learned
[edit | edit source]There are so many people ready and willing to help with projects like this within the community. Throughout this project, we connected with many volunteers, experts, and recruited new users for the Reclamation Station. This showed us that there is an interest and need that this project is fulfilling, but it needs more exposure to the campus and greater community to reach and serve more people. Besides word of mouth, we suggest creating an Appropedia page that documents the materials available, and links people to this page to explain how and why to use it. This can be shared through links and QR codes that maybe more accessible to new users.
Next steps
[edit | edit source]- Reorganize items and update signage as needed.
- material types and quantities will change over time, so signage and spacing will need to be adjusted accordingly. We suggest using easily detachable signage (using metal bracket or frames secured to the shelving) to swap out and reorganize the signage. This may includea QR code link to this appropedia page.
- Create directory to attach to hempcrete wall.
- A directory could be added to clarify how the Reclamation Station is used, where various types of materials should be stored, and tutorials on how to remove nails/screws/hardware from lumber. This can include some type of manual screwdriver and hammer to incentivize hardware removal.
- Include building resources board on wall.
- Provide a directory of building resources for people to reference.
- Include message board for people to post their materials needs,
- so other community members may reply and supply them (manual craigslist).
- Hempcrete inforgraphic
- Create an inforgraphic on what hempcrete is near the truth window for educational purposes.
- Lime Plaster the Hempcrete Wall
- The wall still needs to be plastered after it cures by the end of May 2023. This will be done using a lime based plaster, applied to both outer and inner walls to preserve the hempcrete. Refer to our section on natural paints and plasters to learn more about how to make a lime plaster.
Troubleshooting
[edit | edit source]This is only how to troubleshoot basic operation. For complex issues, please contact CCAT Co-Directors or Lonny Grafman:
| Problem | Suggestion |
|---|---|
| Disorganized Storage | Adjust signage to fit the needs of the materials being stored/user intuition.
If users are moving a item repeatedly to a different spot, consider changing the signage to match this, as it suggests a user preference/need. |
| Animals Moving In | Clear out any densely packed areas, and discourage animals from making the shed a
home by leaving plenty of exposed gaps between materials. Avoid cave/nest like materials storage. |
| Leaking Roof | Identify the leak(s) and patch them using a flex seal liquid for metal roofing, found at any hardware
store. |
Team
[edit | edit source]- Maddy Hunt
- Nicole Suzuki
- Kristina Fiebig
References
[edit | edit source]- ↑ 1.0 1.1 1.2 1.3 1.4 Julia. Team Interview with Internal CCAT Co-Director Julia. Personal, February 9, 2023.
- ↑ 2.0 2.1 2.2 2.3 2.4 White, Connor, and Zach Alva. “Six Rivers Charter School Garden Pathway.” Six Rivers Charter School garden pathway - Appropedia, the sustainability wiki. Accessed February 7, 2023. https://www.appropedia.org/Six_Rivers_Charter_School_garden_pathway
- ↑ 3.0 3.1 Donovan, Trey. “Tire Retaining Walls.” Earthship Biotecture, January 16, 2023. https://earthshipbiotecture.com/2020/03/27/tire-retaining-walls/.
- ↑ Bird, Thallia, and Daniel Hughes. “CCAT Earthship Wall.” CCAT Earthship Wall - Appropedia, the sustainability wiki. Accessed February 7, 2023. https://www.appropedia.org/CCAT_Earthship_Wall.
- ↑ Paschich, Ed, and Paula Hendricks. The Tire House Book. Santa Fe, NM: Sunstone Press, 1995.
- ↑ Moayedi, Hossein, Bujang BK Huat, Fatemeh Moayedi, and Afshin Asadi. "Effect of Embedding Drainage System on Retaining Wall Structure Stability." Electronic Journal of Engineering Geotechnical Engineering 16 (2011): 157-163.
- ↑ 7.0 7.1 “5 Drainage Techniques for Sloped Landscaping.” KG Landscape Management - Minneapolis Landscape Design & Installation. Accessed February 17, 2023. https://www.kglandscape.com/sloped-property-drainage#:~:text=Retaining%20walls%20are%20among%20the,continue%20down%20through%20your%20landscaping.
- ↑ 8.0 8.1 8.2 8.3 8.4 8.5 8.6 8.7 8.8 Elpel, Thomas J. Living Homes: Integrated Design & Construction. Pony, MT: HOPS Press, 2005.
- ↑ 9.0 9.1 9.2 9.3 9.4 Eccli, Eugene, and Erick Ingraham. Low-Cost, Energy-Efficient Shelter for the Owner and Builder. Emmaus Pe.: Rodale Press, 1978.
- ↑ 10.0 10.1 10.2 10.3 10.4 “Garden Tool Shed.” Workbench 54, no. 3 (June 1998): 26. https://search-ebscohost-com.ezproxy.humboldt.edu/login.aspx?direct=true&db=ulh&AN=588199&site=ehost-live.
- ↑ 11.0 11.1 White, Mark. Superinsulated Truss-Frame House Construction. 1st ed. TAB BOOKS inc., 1984.
- ↑ 12.0 12.1 12.2 12.3 Dalinghaus, Brian. “What Are Fill Soils (Fill Dirt, Fill, & Foundation Settlement).” Dalinghaus, January 8, 2023. https://www.dalinghausconstruction.com/blog/what-are-fill-soils-fill-dirt-fill-foundation-settlement/.
- ↑ “GEOWEB® Geocells – 3D Soil Stabilization Technology.” Presto Geosystems, November 4, 2021. https://www.prestogeo.com/products/soil-stabilization/geoweb-geocells/.
- ↑ Dalinghaus, Brian. “Polyurethane Injection vs Mudjacking.” Dalinghaus, January 8, 2023. https://www.dalinghausconstruction.com/blog/polyurethane-vs-mudjacking/.
- ↑ Kahn, Andrea. “Building Community.” Architectural design 85, no. 3 (2015): 72–77.
- ↑ 16.0 16.1 Kennedy, Joseph F., Smith, Michael G., and Wanek, Catherine, eds. The Art of Natural Building-Second Edition-Completely Revised, Expanded and Updated : Design, Construction, Resources. Gabriola Island: New Society Publishers, 2014. Accessed February 8, 2023. ProQuest Ebook Central.
- ↑ 17.0 17.1 17.2 17.3 17.4 Yadav, Madhura, and Ayushi Saini. "Opportunities & challenges of hempcrete as a building material for construction: An overview." Materials Today: Proceedings (2022)
- ↑ Watkins, Chris, and Lonny Grafman. “Cobb.” Cobb - Appropedia, the sustainability wiki. Appropedia. Accessed February 7, 2023. https://www.appropedia.org/Cobb.
- ↑ 19.0 19.1 19.2 McClellan, Chris. 2013. “Cob Construction: BUILD WITH EARTH & STRAW.” Mother Earth News, no. 260 (October): 54–59.
- ↑ 20.0 20.1 20.2 20.3 Guelberth, Cedar Rose, Dan Chiras, and Deanne Bednar. The Natural Plaster Book: Earth, Lime and Gypsum Plasters for Natural Homes. Gabriola Island: New Society Publishers, 2002.
- ↑ Crimmel, Sukita Reay, and James Thomson. Earthen Floors a Modern Approach to an Ancient Practice. Gabriola Island, BC, Canada: New Society Publishers, 2014.
- ↑ 22.0 22.1 “Natural Paints.” Natural paints - Appropedia, the sustainability wiki. Accessed February 12, 2023. https://www.appropedia.org/Natural_paints.
| Authors | |
|---|---|
| License | CC-BY-SA-4.0 |
| Location | Arcata, California |
| Organizations | Cal Poly Humboldt, Campus Center for Appropriate Technology |
| Cite as | Maddyhunt, Lonny, Kristina Fiebig, Nicolesuzuki (2023–2026). "CCAT reclamation station 2023". Appropedia. Retrieved July 18, 2026. |