When I'm at Burning Man, I typically stay up until after sunrise. Then, knowing that I'll be doing the same all week, I want to get a good sleep. During the day, sleeping in a tent is like sleeping in a sauna, even with a shade structure. This little solar swamp cooler chills the space enough for me to get a good rest.
Swamp coolers or Evaporative coolers only work well in hot, dry environments. Perfect for Black Rock City (BRC). Here's a rudimentary explanation of evaporative coolers (but follow the link for more):
We all know water boils (evaporates very quickly) when we heat it up enough. Well there's a direct correlation between how much energy is added to water and its rate of evaporation. Looking at it another way, if water evaporates, it must have gotten the energy to do so from somewhere. When we blow hot, dry air over water, the water evaporates and takes the heat energy from the air to do so. As a result, the air gets cooler. And, the air gets more humid, which at Burning Man gives a nice break from all the dry dustiness.
Bill of materials[edit | edit source]
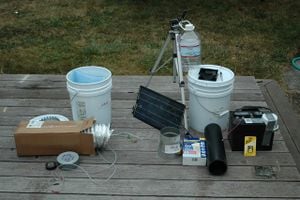
| Item | Quantity | Cost |
|---|---|---|
| A few Watt Solar Panel | 1 | Borrowed |
| 12V Deep Cycle Battery | 1 | Borrowed |
| Fuse Holder | 1 | $?? |
| 5-Amp Fuse | 1+spares | $?? |
| 4-inch mylar drier exhaust tubing | 30-feet (10-meters) | $17 |
| 3/8-inch O.D. Clear Vinyl Tubing | 12-feet (4-meters) | $5 |
| 5-gal PVC Buckets with water-tight lids | 2 | Free used or $5.50 each new |
| 3-inch to 4-inch ducting adapter | 1 | ??$ |
| 4-inch ducting flange | 1 | $?? |
| Wicking Filter Manufacturer/Model: Kaz WF2 | 1 | $8 |
| 3-inch ABS Pipe | 36-inches | $?? |
| 3-inch ABS female/female adapter | 1 | $?? |
| 1-gallon water bottle with, large tight fitting screw lid | 1 | Recycled |
| Dust filter | 16-in x 16-in | $?? |
| 1/4" (hole size) Galvanized wire cloth | 16-inch x 16-inch | $?? |
| Quick Ties | A handful | $??/tub |
| 2-inch Wood Screws | 4 | Found |
| 12-Volt DC 0.7-Watt Axial Fan | 1 | $2 Used |
| 14-gauge paired wire | 20-feet | $?? Found |
| milkshake straws (fat enough to go over 3/8" vinyl tubing) | 3 | Free |
Tools Used[edit | edit source]
- Saber Saw
- Sheet Metal Shears
- Drill and Bit Set
- Exact-o Knife
- Scissors
- Wire Strippers
- Permanent Marker
- Duct Tape
- Electrical Tape
Air Intake Filter[edit | edit source]
My intention for the air intake bucket was to minimize playa dust from entering the cooler bucket. Minimizing dust keeps the system cleaner, which helps efficiency and reduces maintenance. There are two technical reasons I designed a large surface area for air filtering: Given a particular rate of air being sucked in through the system, a large filter will experience less of an air flow per unit area than a small filter (less vacuum effect), allowing more dust to settle at the bottom of the bucket rather than being sucked into the filter; Also, a larger surface area will be less likely to clog. There are much more important things to do on the playa then clean filters.
- Use the 4-inch ducting flange as a template to cut a hole out of one of the bucket lids. I just positioned it where I wanted it and used a marker to draw my cutting lines. Drill a pilot hole slightly larger than the saber saw blade to get the saw started easily. Try to make a tight fit for the flange, but if the hole is a little too big just seal up the gaps with tape. I think I secured the flange on with tape anyway.
- Roll up the wire cloth to fit into the flange. Use quick ties to keep the roll at the right size. Cut the bottom of the roll (I used the sheet metal sheers) so that it fits snug to the bottom of the bucket when the lid is snapped to the bucket. Duct tape at the edges of the wire cloth acts as a gasket, keeping a better seal on both ends, and keeps you from getting scraped up by the wire cloth.
- Use a couple more quick ties to hold the filter media around the wire mesh cylinder.
- Cut air intake holes into the rest of the lid. Make them as large as possible. Leave some plastic between the holes to keep the structural integrity of the lid.
The Cooler[edit | edit source]
- Use the ABS female/female adapter as your template for cutting a hole in the other bucket lid. Trace the inside of the adapter with the marker. You want to make sure that the hole in the bucket lid is slightly smaller than the adapter. The adapter will butt against the lid, not push through it.
- Drill four small holes equally spaced around the perimeter of one side of the adapter near the edge. The holes should be slightly larger than the quick ties that will be used to secure the adapter to the lid. Drill four holes near the edge of the hold cut out of the lid. These holes should line up with the holes in the adapter. Secure the female/female adapter to the lid with quick ties through the holes.
- Secure the fan to the outside of the lid, centered over the hole, with some wood screws. Make sure the air flow of the fan is directed into the bucket. Seal any gaps between the fan and the lid with some sort of gasket (liquid gasket, silicone, glue, tape).
- Cut holes in the lid for the cold air to escape. The cross sectional area of the air escape holes should be at least as large as the cross sectional area of the 4" ducting. Smaller cross sectional area will create some back pressure, reducing the efficiency of the system. The cross sectional area of the 4" duct is pi*2^2is about 12-1/2 inches^2. Four 2" diameter holes give a cross sectional area equal to one 4" diameter hole.
- Secure the 3" to 4" ducting adapter to the fan. I used duct tape secured over the top of the 4" side of the adapter and looped the end near the 3" side of the adapter. Then cinched the adapter to the fan with quick ties through the loops. See pictures.
- Cut the length of the 3" ABS pipe down so that it fits snug to the the bottom of the bucket, when inserted into the adapter attached to the lid and the lid is secured to the bucket.
- Then use the evaporation filter to measure out holes to cut out of the 3" ABS pipe. You want to make sure that these holes are shorter than the evaporation filter's length. We do not want any air to escape without going through the evaporation filter. That would significantly reduce the efficiency of the system. The end of the 3" pipe will be submerged in water so a tight seal is less important than the top side. I left a good 3/4" lip at the top side to make sure air didn't escape.
- Gingerly stretch the evaporation filter over the 3" ABS pipe, then push the pipe into the ABS adapter on the lid assembly.
How it Works[edit | edit source]
The Evaporation Filter is manufactured to evenly distribute water throughout it's structure by a wicking action. The structure of the filter has many passages to allow air to flow through it easily. When hot, dry air flows past the wet filter, it evaporates the water and the air cools.
The fan pulls air from the hot, dry outside through the dust filter, then pushes the cleaned air through the evaporation filter into you living space. The air cools in the process. As the water evaporates from the filter, the filter wicks more water from the pool at the bottom of the bucket.
Electrical[edit | edit source]
Battery[edit | edit source]
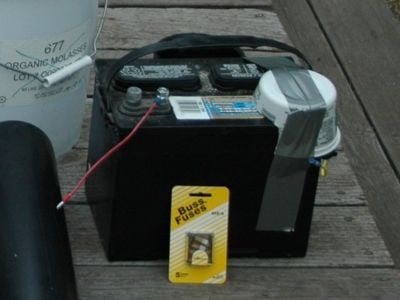
- A battery of this size has the potential to kill you. The first thing you need to do is put a fuse on the positive terminal. Then put a cover over the terminal to eliminate the possibility of something bridging the two terminals. I used a 5-Amp fuse which is plenty big for the 0.7-Amp fan and small enough so that it wont give too much of a jolt before tripping if you short the circuit. After carefully connecting the fuse, I cut the side off a plastic food container and duct taped it over the terminal.
Wiring[edit | edit source]
- Quick connectors make things easy. I crimped quick connectors to the ends of all the wires so it would be easy to put together when I set the whole thing up.
- Make sure your wires are long enough to put everything were you plan when you set up camp, especially the solar panel wires. The solar panel won't do much good stuck inside the tent.
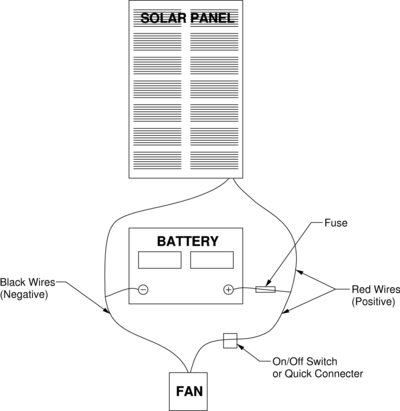
- Check the diagram to see how everything wires together. The fan and solar panel is connected to the battery in a parallel configuration.
- Note: When you turn the fan off and on, you want to leave the solar panel connected to the battery to allow charging of the battery.
Water Source[edit | edit source]
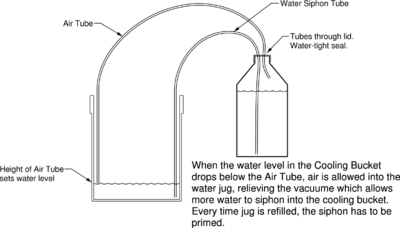
Since this is an evaporative cooler, it uses up water. With this system, I used about 3/4" of a gallon of water per day. The cooling bucket is designed to work best with about a ½" to 1" of water pooled at the bottom. That amount of water completely evaporates in about 45-minutes when the system is on. Wanting low maintenance, I was only willing to refill the water once a day so I devised a siphoning system to keep the water at the required level without tending to it.
- Drill two holes into the top of the screw-top lid of the gallon-sized water bottle. The holes should be slightly smaller in diameter than the 3/8" vinyl tubing; A 5/16" drill bit should do fine. The holes must be small enough that it's a little hard to get the vinyl tubes through. The idea is that we want a water-tight seal around the tubes.
- Pull a vinyl tube through each hole. Pull one tube far enough that it will touch the bottom of the water bottle – This is the Siphon Tube. Pull the other tube just an inch inside the lid – This is the Air Tube.
- Pull one of the straws over the longer tube. The straw keeps the vinyl tube straight. We want the end to be as close to the bottom of the bottle as possible. Without the straw the tube is frustratingly difficult because it will want to curl.
- Cut the two vinyl tubes so that they are long enough to reach the bottom of the Cooling Bucket when set up as planed for camp.
- Push straws over the ends of the two vinyl tubes going into the Cooling Bucket.
- Tape the Air Tube Straw to the side of the Cooling Bucket so that the end of the Air Tube is is between 3/4" to 1" from the bottom of the bucket. This sets the water level.
- If for some reason the end of the Siphon Tube doesn't want to rest close to the bottom of the Cooling Bucket, tape the Siphon Tube Straw to the side of the Cooling Bucket so that the end of the Siphon Tube is about 1/16" to 1/8" from the bottom of the Cooling Bucket.
Using the Water System[edit | edit source]
- Fill up the Water Bottle as much as you can without covering the Air Tube. The Air Tube in the water bottle must be above the water surface for it to work.
- Secure the lid to the water bottle. Since you have tubes coming out of the lid, I found the best way to avoid a twisted, tangled mess is to pre-twist the lid in the opposite direction as it tightens before screwing it to the bottle. Then once the lid is tight on the bottle, turn the whole bottle to undo any remaining twists in the tubing.
- Set the Water Bottle in place. It is very important that the bottom of the bottle is at least 6-inches above the planned water level in the Cooling Bucket. The Crystal Geyser bottles I used were square shaped. So I found it convenient to just mount it on another bottle that was lying on it's side.
- Make sure the end of the Air Tube in the Cooling Bucket is positioned at the desired height.
- The Siphon Tube need to be primed to get the siphon action started. Pull the Siphon Tube out of the cooling bucket and suck on the end like a silly straw; then once the water is filling the whole tube, quickly place the end of the vinyl tube back in the Cooling Bucket close to the bottom.. If some air got in the Siphon Tube and the siphon is going too slow, here's a little trick: Pinch the Air Tube tight enough so that no air can get through, then squeeze the Water Bottle firmly to get the water flowing. If your Water Siphon Tube isn't too long and you get good at the Water Bottle squeezing technique, you can probably skip priming it with your mouth and just do the squeezing technique to prime the system.
- When the water runs out of the Water Bottle. Unscrew the lid, fill the bottle back up with water (or if you brought you water supply in these bottles just screw the lid to a new bottle). Reprime the system.
Setting Up[edit | edit source]
- Put the Air Filter Bucket outside of your tent. I fed my tent poles through the bucket handle to keep the bucket secured in one place and then left my tent stake hammer inside the Air Filter Bucket to make it heavier and less susceptible to the heavy winds on the playa.
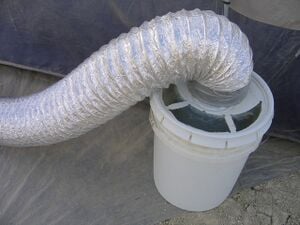
- Duct tape one end of the 4" Flexible Ducting to the Ducting Flange on the Air Filter Bucket. Pull the other end of the 4" Flexible Ducting into the tend and duct tape it to the Ducting Flange on top of the Cooling Bucket.
- Connect all the electrical. Make sure that your Solar panel faces the sun and is not in any shade during the bright hours of the day.
- Prime the water, turn it on, and relax in your private little oasis.
Practical Use[edit | edit source]
- Don't leave the fan on when you're not there. It just wastes a lot of water and battery power.
- Fill the water bottle and prime the system before you plan on going to sleep. It sucks to wake up and realize you've run out of water and hot air is being blown on you.
On Site Adjustments[edit | edit source]
- I learned quickly that this little system was no match for the hot sun on this large of a tent. I even had a little bit of a shade structure over my tent. So what I did was safety pin some cord to the tent a couple feet high across the top of my bed, then draped my sheet over the cord. This created a little kid style fort over my bed. I cut up some cardboard and made a few baffles to direct the cool air from the Cooler into the little fort. This turned out to be perfect. It was 95-°F outside and I could sleep like a baby.
- The solar panel stopped working very well after a day. I realized that it was completely covered in playa dust. I learned that I had to add cleaning the dust off the solar panel to my daily maintenance to get a good electrical charge.
Improvements I would make next time[edit | edit source]
- I would make the air tube in the siphoning system a larger diameter. Sometimes, if the water jug was too high, the siphon pressure would suck water up the air tube so high that when the water level in the cooling bucket dropped the air tube wouldn't drain, rendering the self leveling system useless. Specifically, I would solve this by stepping up the size of the tubing using either an adapter or just shoving the small tube into the opening of larger tube. For example if the siphon tube was 3/8" O.D (Outside Diameter), you could shove it into a tube that had 3/8 I.D. (Internal Diameter). I would step up a couple times to at least 5/8" I.D. Also the 5/8" I.D. tubing should extend up about as high as you plan for the top of the water jug. That large of diameter tube will eliminate the capillary effect that happens in narrow I.D. tubes and will allow whatever water that might have sucked up the air tube to drain once the water level in the cooling bucket drops below the opening of the air tube.
- I would set the system up with stronger fan power. The 12-Volt 0.7-Amp fan worked fine with my little fort trick but it would be nice not to have to bother with that. The problem with stronger fans is that they are noisier. The nice thing about axial fans like the one I used is that they are really quiet (good for sleeping). Next time, I would either try to find a 2-Amp Axial Fan or try stacking two or three of these axial fans on top of each other to get more air flow without introducing too much more noise. I think the battery could handle the extra load over the period of one week. Just in case, I would consider getting an additional solar panel or one larger one.


