
Locally Delicious Worm Bin for School

| Type | Compost bin Vermicompost system |
|---|---|
| Authors | Paul C Johnston Max Hullman Paul Sereno Ryan Wullschlger |
| Location | Arcata, California |
| Status | Prototyped |
| Years |
Locally Delicious is an organization working to re-localize Northern California, and the Six Rivers Region's food system. Their work is not only just about re-localizing food, but also changing the growing of food to a more organic, healthy matter. Locally Delicious is writing a new book, Lunchbox Envy, that aims to change the way children eat. One way to change this is to teach children how their waste can be used to grow the food they eat. This can be done by using a worm bin that creates healthier, more fertile soil, and reduces the environmental impact of organic wastes and chemical fertilizer. A worm bin is a form of composting in which certain types of worms are used to create compost out of organic waste, such as leftovers from a salad or old bread. The Locally Delicious worm bin was built for the Jacoby Creek Charter School located in Arcata, CA. Humboldt State's Spring 2011 ENGR 215 Design team the Organic Flapjacks designed and built the Barrel O' Fun worm bin. The worm bin was built for the school for educational purposes and also for the organic waste that comes from the school's salad bar and their garden. This bin will handle roughly 10 pounds of organic waste per week.
Problem Statement and Criteria
[edit | edit source]
The following table represents the criteria addressed in the project, the associated constraints, and the weights of the relative importance of each criterion.
| Criteria | Constraints | Weights |
|---|---|---|
| Safety | This criterion is defined by a lack of structures that can cause harm to the user, as well as being nontoxic to humans and worms. | 10 |
| Simplicity | This is defined as being easy to construct and easy to maintain. | 9 |
| Durability | This criterion was determined by how long the worm bin would last through use and weathering. | 9 |
| Cost | The cost is defined as the cost of materials to build and start the bin. | 7 |
| Educational Value | This criterion is met by teaching users about vermicomposting. | 7 |
| Efficiency | In order for the worm bin to get a high rating in this criterion, the solution has to produce usable compost in a short amount of time. | 6 |
| Extensibility | The criterion was determined by how easily the worm bin could be reconstructed, and added to the previous worm bin. | 5 |
| Aesthetics | The worm bin had to appease the eye and look professional in order to meet this criterion. | 4 |
Description of Final Project
[edit | edit source]
The Barrel O' Fun worm bin is constructed from a plastic, food grade, 55 gallon drum. The drum is cut in half, longitudinally, and the end of one half is removed, creating a "nest" half. The intact half is laid inside the nest section and they are bolted together. A spigot is installed at the end of the nest barrel to harvest worm compost tea. Two pallets, with a central trough cut out, are placed on top of cinder blocks. The worm bin is then placed on the pallet. A PVC cover support system is constructed, and a plastic sheet is draped over the top. The sheet is then bungeed to the pallet. The cover is folded back in order to add waste to the bin. Over six to eight weeks, the worms will compost the waste. When it is time to harvest, only a corner of the bin is fed. This draws the worms to the top layer of compost in the corner, and they can be scooped up and placed in the other half of the bin. The full side can then be harvested. Waste is then added to the half with the worms, and the process continues. The build process is inexpensive and fairly simple. The Barrel O' Fun is built from durable materials and is safe to use. It provides a great way to teach children about vermicomposting, and it is efficient, producing vermicompost in six to eight weeks. It is easy to create more bins, and it looks professional.
How to Build
[edit | edit source]
The first step, after obtaining a food-grade 55-gallon drum, is to cut it in half lengthwise, as shown on the left.

Cut 3" off of one end of one half, seen as the line marked for cutting. This will make the "nest" barrel.

Then lay the intact half inside the nest barrel. Adjust the barrels until they overlap by 5".

A ¼" hole is drilled near the top of the connection on one side. The barrels are then bolted together with a ¼" bolt and nut, with the bolt head on the outside of the connection. This is repeated around the connection until the barrels are well connected (approximately 5-6 bolts). A hole is then drilled or cut at the end of the nest barrel for the spigot. The spigot is then installed.

Next, drill 5-10 ¼" holes at the bottom of the dividing wall for drainage.

A gutter strainer is then trimmed so that it will lay flush with the bottom of the barrel, and cover the entrance to the spigot. 100% silicone caulk is then applied to the area around the spigot, and is also used to glue the gutter strainer to the bottom of the barrel.

The outside of the connection is caulked as well, in order to prevent leaking. The caulk is then allowed to set for at least 24 hours.

After the caulk has set, the base is created. Six cinder blocks are placed underneath the corners of the pallets.

The pallets then have the center of the top planks removed, creating a trough.

The barrel is then placed in the trough. The end of the barrel opposite the spigot is elevated by placing a 2"x4" across the trough.

The connection of the barrel is supported by placing a small cut of 4"x4" lumber inside the trough. The rain cover is constructed with ½" PVC piping. For this barrel, four 2'7" lengths, two 7¼" lengths, two ½" T-joints, and one ½" 90° elbow are used. Two of the 2'7" sections are joined by a T-joint, to make a total of two 5'2" crossbars that will span the length of the barrel.

¼" notches are cut 1" from each end, these notches hold the crossbars in place.
The crossbars are placed apart by 9½". The 7¼" sections are joined by the 90° elbow. The free ends of the sections are placed in the free opening of each T-joint, to provide a tent for the 10 mil plastic sheet.

The 10 mil plastic sheet is laid over the top and cut, with an overhang of at least 6" on each side. Grommets are installed at each corner of the sheet, folding over the corners for extra strength. The worms are then added to the bin, along with compostable waste and the bedding material (horse manure or shredded paper).

Worms should be added at the ratio of one pound of worms to every half-pound of waste. The sheet is then bungeed to the pallet with four 24" bungee cords. One end is hooked into each corner, and the other end is wrapped around a board on the pallet. The sheet is then adjusted to ensure a snug fit.
How to Maintain
[edit | edit source]The sheet is removed weekly in order to feed the worms. After approximately 6-8 weeks, the compost should be ready to harvest. When it is time to harvest, only one corner of the bin (about one quarter of the surface) is fed. Over a few days, the worms will migrate to this area. This area is then scooped up and placed in the empty half of the bin along with more waste and bedding. The vermicompost can then be shoveled out of the full half, and the cycle continues.
Over time, due to the break down of organic waste, leachate will build up at the bottom of the bin. As the barrel is elevated, the leachate should drain through the drain holes in the divider and down to the spigot area. The spigot can then be opened and the leachate collected. The leachate can be mix at a ratio of 1 cup of leachate to 2 gallons of water. The resulting liquid can be applied to soil or plants.
Costs
[edit | edit source]The table below breaks down the individual cost of each material used to build the Barrel O' Fun. The total retail cost is $272.60, while our cost was $179.13.
| Material | Quantity | Individual Cost ($) | Retail Cost ($) | Our Cost ($) |
|---|---|---|---|---|
| 55 Gallon Plastic Drum | 1 | 40.00 | 49.95 | 40.00 |
| Pallet | 2 | Donated | 10.00 | Donated |
| Worms | 4 | 14.99 | 24.95 | 59.96 |
| Carriage Bolts | 6 | 0.15 | 0.15 | 0.90 |
| Washers | 6 | 0.09 | 0.09 | 0.54 |
| Nuts | 6 | 0.09 | 0.09 | 0.54 |
| 10 ml Plastic Covering (per ft) | 1 | 1.80 | 1.80 | 12.00 |
| Spigot | 1 | 6.29 | 9.99 | 6.29 |
| Spigot 1/2" Fitting | 1 | 3.59 | 3.59 | 3.59 |
| Cinder Blocks | 6 | 1.75 | 1.75 | 10.50 |
| Grommets (pkg) | 1 | 8.54 | 8.94 | 8.54 |
| Caulk Sealant | 1 | 5.39 | 7.99 | 5.39 |
| Gutter Strainer | 1 | 3.41 | 3.41 | 3.41 |
| Bungee Cords | 4 | 1.45 | 2.50 | 5.83 |
| Sand Paper | 2 | 0.99 | 0.99 | 1.98 |
| Small Bucket | 1 | 1.99 | 4.99 | 1.99 |
| PVC 90 Degree Joint | 1 | 0.44 | 0.44 | 0.44 |
| PVC Piping (per ft) | 20 | 0.44 | 0.44 | 4.98 |
| PVC T Joint | 2 | 0.44 | 0.44 | 0.88 |
| Tax | $22.38 | $11.37 | ||
| Total | $272.60 | $179.13 | ||
Testing Results
[edit | edit source]The Barrel O' Fun was installed on April 10, 2011. The bedding, organic waste, and worms were added. The first revisit 7 days later revealed little compost, however the colony was still consuming the waste material. Water had pooled on the cover from the recent rain and drainage occurred only to a certain extent, due to a drooping of the middle of the B.O.F. where the barrels are connected. When the water was drained the spigot functioned properly. More worms were added to handle the amount of organic waste and plans were formed for a frame to prevent water collection. During the second revisit, on April 24, 2011, the colony was still alive and compost was being produced. A 4"x4"x4" block was inserted under the middle of the B.O.F. to prevent the drooping and a PVC structure was built under the cover material to handle the excessive rain. The testing so far indicates a working vermicompost system, although it is too early to confirm success. Transfer of the worms to the other half of the barrel still needs to take place as well, which is also time dependent.
Discussion and Next Steps
[edit | edit source]The Barrel O' Fun has achieved most of the goals set out for the project and is currently still being tested. The project allows for large scale vermicompost while minimizing maintenance and area required for the composting.
The next steps are to continue watching the bin as the worms progress throughout the organic waste and test the transfer of worms from one half of the barrel to the other.
Organic Flapjacks Barrel O' Fun Video
[edit | edit source]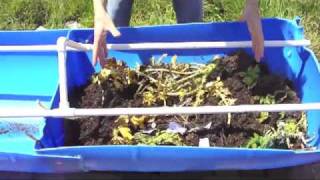
2011 Team Organic Flapjacks
[edit | edit source]| Authors | |
|---|---|
| License | CC-BY-SA-3.0 |
| Organizations | Locally Delicious |
| Cite as | Mkh62, Pauljohnston1992 (2011–2025). "Locally Delicious Worm Bin for School". Appropedia. Retrieved July 11, 2026. |