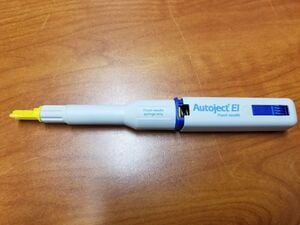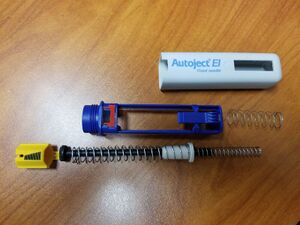
AutoInjectors are a spring-loaded device that aides in delivering the proper dosages of certain medicines. The have built-in adjusters to ensure the medicine is delivered at the proper depth in the body. They are useful for those that have trouble using a simple needle for injections, possibly children, the elderly, or those with needle-phobias. They are also useful for injecting pets with their medication. The AutoInjector keeps the needle covered until injection time to prevent injury, and some have a built-in safe measure of requiring the injector to be pushed against the skin before the trigger button can be pushed to prevent accidental discharge.
Bill of Materials[edit | edit source]
- 3.5" by.5" Spring
- 3" by.25" Spring
- 1.5" by.5" Spring
- Optional Clear Plane to use as Window; leaving open works fine as well
- Glue, like a hot glue gun
- all colors are notional and used to specify which piece is being referred to

- Glue Spring holder Top and Bottom pieces together
- Use hot glue to create small cushion on end of plunger rod, if desired, for comfort and to aid in stabilizing rod
- Place the 1st spring onto the plunger rod.
- Insert the spring holder with the smaller top into the spring with the plunger rod through the middle
- Place the 3rd spring onto the plunger rod, so that it falls into the spring holder.
- Place "yellow" indicator piece onto groves inside "blue" plunger and trigger button piece, with indicator marks facing the viewing hole in the "blue" piece
- Place small end of plunger rod through small hole at the top of the "blue" plunger and trigger button piece
- Place wide end of plunger rod into "yellow" indicator piece. You will have to compress the springs to do this
- Insert #2 spring followed by assembled pieces into Injector body. You will have to push down the trigger button in order to slide the pieces into the body
- Thread long depth adapter into syringe housing
- Insert primer/depth guide into long depth adapter
- Use syringe housing unit to set springs by inserting it into injector body, as far as it will go
- Remove from injector body once springs are set
- Twist syringe housing unit on assemble pieces
Tools needed[edit | edit source]
- MOST Delta RepRap or similar RepRap 3-D printer
Technical Specifications and Assembly Instructions[edit | edit source]
The Injector Body needs supports generated when printed for the Trigger Button window; these will be snapped off after printing.
About 4 hours to print all of the parts.
5-10 min for final assembly.
Common Problems and Solutions[edit | edit source]
- Make sure the springs are loaded properly. Spring positions are not interchangeable*
This project was way beyond my CAD abilities, so not all of the pieces are optimized for printing; Hopefully a someone can improve upon my design
Cost savings[edit | edit source]
- $1 for plastic, $5 for springs, $6 in total
- $27.99 Owen Mumford Autoject EI [1]
- $22 total savings or a 78% price reduction.
Benefited Internet Communities[edit | edit source]
- Owners of Dogs with Diabetes
- People with Allergies
- Parents of Kids with Allergies
- People with needle-phobias
- Nurses
References[edit | edit source]
- DallasMTBR, director. About the Autoject 2. Youtube - About the Autoject 2, Youtube, 18 June 2017.
- Owen Mumford. Autoject-Brochure. Autoject-Brochure
- Rawlings, Kelly. "Injection Helpers." Main.Diabities.org, 2015,